
Intellect™
UTILITY MENU OPTIONS

Tools
Configuration
This option is used to set paths, ports, and other necessary properties to utilize several of Intellect's services.
1. To configure in Intellect, go to Utility --►Tools --►Configuration

The Modify CONFIG screen displays. Note: Sample settings are shown below. The settings for each office are unique for that office.
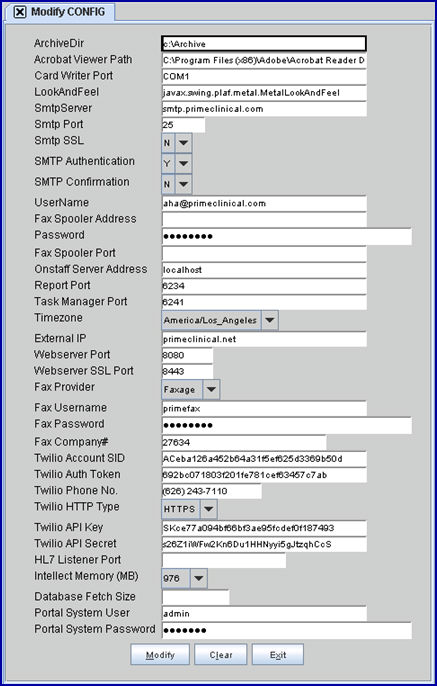
2.1 This is the path for document storage used when printing to 'Archive.'
2.2 Intellect automatically creates a storage folder in the designated path. Any item printed to 'Archive' is stored in this folder.
3. Acrobat Viewer Path 
3.1 The path used if the external viewer program is to be employed.
4. Card Writer Port 
4.1 The port used for Id card creator.
5. LookAndFeel 
5.1 Holds the Java "LookAndFeel" string. This field is set by PCS and should not be modified.
5.2 The term 'look and feel' refers to the visual appearance and physical behavior of GUI components.
6.1 Type the address for the mail server’s outgoing email.
6.2 This field is required to send email appointment reminders.
6.2.1 Obtain information from your DSL carrier.
7. Smtp Port 
7.1 Type in the port number required by your mail provider in their setup instructions. This can vary per mail provider. Inform PCS if your SMTP server uses a port other than the default of '25.'
8. Smtp SSL 
8.1 Effective version 17.08.24, Intellect supports TLS security protocol.
8.2 Follow your mail provider setup instructions as this can vary per mail provider.
8.3 Click on the field, OR press the [F2] key to display the valid choices:
N: Select 'N' if no protocol is required. This is the default.
S: Select 'S' if the email server requires SSL (for example 'gmail').
T: Select 'T' if the email server requires TLS.
9. SMTP Authentication 
9.1 This option is used in Email setup where the mail server requires login and password authorization.
9.2 Accept the default 'Y' to use authentication OR use the drop-down list to select 'N' if authentication is not necessary.
10. SMTP Confirmation 
10.1 Effective version 16.02.22 - New field.
10.2 If set to 'Y,' once an email sent by Intellect is viewed, a confirmation email is requested if the receiving email software honors/supports the request.
10.3 If set to 'N,' (the default setting), a confirmation email is not requested .
11.1 Type the user name for the email server account, if required.
11.2 This field is required to send email appointment reminders.
11.2.1 Obtain information from your DSL carrier.
12. Fax Spooler Address 
12.1 This field is used to send faxes via modem and phone line. If sending faxes via the internet, leave this field blank and fill-in the <External IP> field.
12.2 Complete with the IP address of the Fax server (the machine that holds the FAX device).
13.1 Type the password for the email server account, if required.
13.2 This field is required to send email appointment reminders.
13.2.1 Obtain information from your DSL carrier.
14. Fax Spooler Port 
14.1 This field is used to send faxes via modem and phone line. If sending faxes via the internet, leave this field blank and fill-in the <Webserver Port> field on this screen.
14.2 Use the default Spooler port '6235'.
15. Onstaff Server Address 
15.1 This field is used ONLY when the clinics database server and the task server are different. Do not change default settings unless instructed to do so by PCS.
16. Report Port 
16.1 This field is used ONLY when the clinics database server and the task server are different. Do not change default settings unless instructed to do so by PCS.
17. Task Manager Port 
17.1 This field is used ONLY when the clinics database server and the task server are different. Do not change default settings unless instructed to do so by PCS.
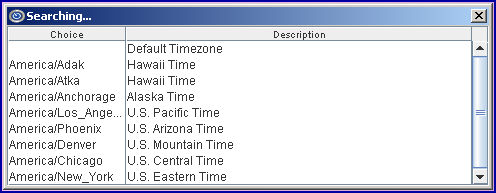
18. Timezone 
18.1 Effective version 9.12.04 - New field
18.2 Used only for Windows 2008 to select the time zone.
18.3 This setting overwrites both the Windows Time Zone for Intellect automation and the appointment checkin/checkout.
18.4 To view the list of codes with descriptions, select this field, and then either press the [F2] key, left-click on the field, OR press the → (right arrow) on the keyboard. To view the list of only the codes, click on the arrow. To select, double-click on the correct code, and then press the [Enter] key to select, OR use the ↑ (up) and ↓ (down) arrows to highlight the correct code, and then press the [Enter] key to select.
19.1 Effective version 9.12.10 - New field added to accommodate patient response to email appointment reminders. See Schedule --►Appointment Reminder --►Email Appt Reminder with Confirmation for additional information.
19.2 The IT person for the clinic/office should complete set up for this field.
19.3 Offices using the option for patient response to email appointment reminders should enter their public (external) IP address.
19.3.1 If the external IP address is unknown, open up a web browser (i.e., Internet Explorer), type http://www.whatismyip.com and hit [Enter]. A web page pops up displaying your IP address.
Note: Offices using Twilio who make changes to their external ip address have to update that information here and also notify PCS support as the IP address will need to be updated in the offices' Twilio account.
20.1 Effective version 9.12.10 - New field added to accommodate patient response to email appointment reminders. See Schedule --►Appointment Reminder --►Email Appt Reminder with Confirmation for additional information.
20.2 The IT person for the clinic/office should complete set up for this field.
20.3 The webserver port accepts regular http requests. If the office uses the option for patient response to email appointment reminders, enter the port to be used by the web server.
20.3.1 The default port is 8080. The recommended port is 8080 but if that port is already being used for another purpose, another port may be used as long as it is an open port through the firewall.
21. Webserver SSL Port 
21.1 The IT person for the clinic/office should complete set up for this field.
21.2 The webserver SSL port accepts https requests. Https is basically a secured channel.
22.1 Effective version 9.12.10 - New field - Added to accommodate the Internet Faxing feature.
22.2 Effective version 17.08.16 - New 'Faxage' option added.
22.2 Click on the field, OR press the [F2] key to display the valid choices.
To view the list of only the codes, click on the arrow. To select, click on the correct code, OR use the ↑ (up) and ↓ (down) arrows to highlight the correct code and then press the [Enter] key to select.
22.2.1 Blank: Offices not sending internet faxes should select this option (the default).
22.2.2 InterFax:This option should only be selected if the office is already using InterFax to send faxes via the internet and NOT using Faxage. To send faxes via InterFax, the <Fax Username> and <Fax Password> fields must also be completed.
22.2.3 Faxage: Select this option to send faxes via Faxage (a third-party faxing vendor). To use Faxage, the <Fax Username>, <Fax Password>, and <Fax Company#> fields must also be completed. For complete Faxage set up information, click here. PCM users: Please note that Faxage is also compatible with PCM.
23.1 Effective version 9.12.10 - New field - Added to accommodate the Internet Faxing feature.
23.2 To send faxes using InterFax via the internet, enter your vendor-assigned login/user name.
23.3 To send faxes using Faxage via the internet, enter the information provided by Faxage when signing up.
23.4 If using a modem and phone line to send faxes, this field should be empty.
24.1 Effective version 9.12.10 - New field - Added to accommodate the Internet Faxing feature.
24.2 To send faxes using InterFax via the internet, enter your vendor-assigned password.
24.3 To send faxes using Faxage via the internet, enter the information provided by Faxage when signing up.
24.3 If using a modem and phone line to send faxes, this field should be empty.
25.1 Effective version 17.08.16 - New field - Added to accommodate Faxage.
25.2 This field is for use with Faxage.
• Offices not using Faxage should leave this field blank.
• If using Faxage, complete this field with the information given to you when you signed up with Faxage, or, if your office is using PCM, click here for additional set up information.
26.1 Effective version 9.12.18 - New field for Twilio users only.
26.2 Twilio.com is the third-party vendor currently working with Prime Clinical Systems in regard to using CallSTAFF with a third-party internet company and/or sending Text Message Reminders with Confirmation. To use these features, a Twilio account is required. See Schedule --►Appointment Reminder --►Twilio --►Twilio - User Set Up.
26.3 The ACCOUNT SID number is generated by Twilio when setting up a Twilio account. See Schedule --►Appointment Reminder --►Twilio --►Twilio - User Set Up, III - Enter Your Twilio API Credentials into Intellect for information on accessing your ACCOUNT SID number.
27.1 Effective version 9.12.18 - New field for Twilio users only.
27.2 Twilio.com is the third-party vendor currently working with Prime Clinical Systems in regard to using CallSTAFF with a third-party internet company and/or sending text message reminders with confirmation. To use these features, a Twilio account is required. See Schedule --►Appointment Reminder --►Twilio --►Twilio - User Set Up.
27.3 The AUTH TOKEN number is generated by Twilio when setting up a Twilio account. See Schedule --►Appointment Reminder --►Twilio --►Twilio - User Set Up, III - Enter Your Twilio API Credentials into Intellect for information on accessing your AUTH TOKEN number.
28.1 Effective version 15.05.12 - New field for Twilio users only.
28.2 This field is used to facilitate patients' ability to respond to Text Message Reminders with Confirmation.
28.3 To use this feature, a Twilio account is required. See Schedule --►Appointment Reminder --►Twilio --►Twilio - User Set Up.
28.4 The Twilio phone number is purchased through Twilio. See Schedule --►Appointment Reminder --►Twilio --►Twilio - User Set Up, II - Set Up URL, Port, and Telephone Number in Twilio, specifically steps 5 - 5.4, for purchase information. Enter the Twilio-purchased phone number in this field.
Note: Offices using Twilio who make changes to their external ip address have to update that information here and also notify PCS support as the IP address will need to be updated in the offices' Twilio account.
29.1 Effective version 17.11.08 - New field for Twilio users only. It was included in release notes for version 17.12.20.
29.2 This field was added to ensure that all Intellect users are in compliance with the new HIPAA standards.
29.3 Twilio users should have this field set to 'HTTPS.' If 'HTTPS' is selected:
29.3.1 The office must be on Intellect version 17.11.08 or greater.
29.3.2 The office must have a web domain name and renew the subscription for the domain name before its' expiration date. A domain name is required when setting up Twilio. See Schedule --►Appointment Reminder --►Twilio --►Twilio - User Set Up, section II - Set Up a URL, Port, and Telephone Number in Twilio, step 4.
29.3.3 The office must enter their domain address in the <External IP> field on this screen.
29.3.4 The office must have a current basic SSL certificate for IIS with 2048-bit encryption for the specified web domain name. An SSL certificate is required when setting up Twilio. See this document, section II - Set Up a URL, Port, and Telephone Number in Twilio, step 4.
29.3.5 The office must notify Prime Clinical's Hardware/IT Department so they can complete the set up of their account and automate the task.
29.3.6 Offices configuring their Twilio account in the Twilio program, and requesting a URL, should use the format of https://domainname:port#/app_confirm, where domainname is the domain that the SSL certificate is on, and port# is the SSL port. See Schedule --►Appointment Reminder --►Twilio --►Twilio - User Set Up, II - Set Up URL, Port, and Telephone Number in Twilio, specifically step 4, for additional information.
29.4 Accept the default 'HTTP,' OR click on the field, OR press the [F2] key to display the valid choices:

29.4.1 HTTP (Hypertext Transfer Protocol): HTTP is an unprotected request/response protocol between the computer and the web server. HTTP may be selected for transmission/receipt of non-confidential information.
29.4.2 HTTPS (Hypertext Transfer Protocol Secure): HTTPS is protected/secure request/response protocol between the computer and the web server. HTTPS should be selected for transmission/receipt of confidential information.
30.1 Effective version 20.04.20 - New field
30.2 This field is used in conjunction with the <Twilio API Secret> field to facilitate patients' ability to use Telemedicine.
30.3 To populate this field, a Twilio account is required. If you do not have an account, go to Schedule --►Appointment Reminder --►Twilio --►Twilio - User Set Up and complete sections I through IV.
30.4 With your Twilio account open, go to Schedule --►Appointment Reminder --►Twilio --►Twilio - User Set Up, section VI - Configure Twilio for Video Chat and complete steps 1 - 5. Do not close either Twilio or Intellect.
30.5 Go to the <Twilio API Secret> field below, step 31.3.
31.1 Effective version 20.04.20 - New field
31.2 This field is used in conjunction with the <Twilio API Key> field to facilitate patients' ability to use Telemedicine.
31.3 With your Twilio account open, go to Schedule --►Appointment Reminder --►Twilio --►Twilio - User Set Up, section VI - Configure Twilio for Video Chat and continue with steps 6 - 11 to complete the set up for both the <Twilio API Key> and <Twilio API Secret> fields. Steps 1 - 5 were completed in step 30.4 above.
32. HL7 Listener Port 
32.1 This is an optional field. To have this field added to the screen, please contact PCS Support.
32.2 If another program/device wants to send HL7 files to Intellect (with information such as Appointment info or Patient Demographics), enter the number for the port through which Intellect may receive the information.
33. Intellect Memory (MB) 
33.1 Effective version 12.12.06 - New field.
33.2 This field is used to re-set Intellect's memory.
To view the list of memory options, click on the arrow. To select, click on the correct amount of memory, OR use the ↑ (up) and ↓ (down) arrows to highlight the correct amount of memory and then press the [Enter] key to select.
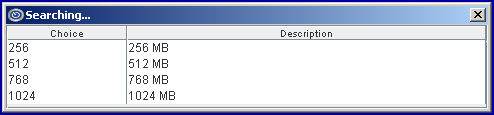
Note: There are four standard values for the memory; however, if the current value is something other than one of the standard choices it is added to the bottom of the list temporarily.
33.3 This option is workstation-specific.
33.4 This is RAM dependent; i.e., if you have an old computer, your selections may be limited.
33.5 Intellect has to be restarted after changing this field in order for the change to take effect.
34. Database Fetch Size 
34.1 This field is generally left blank.
34.2 It supports the Appointment Schedule.
34.3 The range is 3000 - 5000, with 3000 being the default (displayed as blank).
35. Portal System User 
35.1 PCM users only.
35.2 Enter your administrative login for PCM Patient Portal.
36. Portal System Password 
36.1 PCM users only.
36.2 Enter your password for PCM Patient Portal.
37. Press the [Modify] button, shut down Intellect, and then re-logon for the settings to take effect.


