
Intellect™
SCHEDULE MENU OPTIONS

Appointment
Full Day
Tab Options
Day Tab
Video Available: Click Navigating the Appointment Schedule to access the link. Depending on the system set up, the media player may need to be activated. Speakers need to be attached to the workstation to hear the instructions.
Note: To view the videos, log-in through the www.primeclinical.com website. Current support is required.
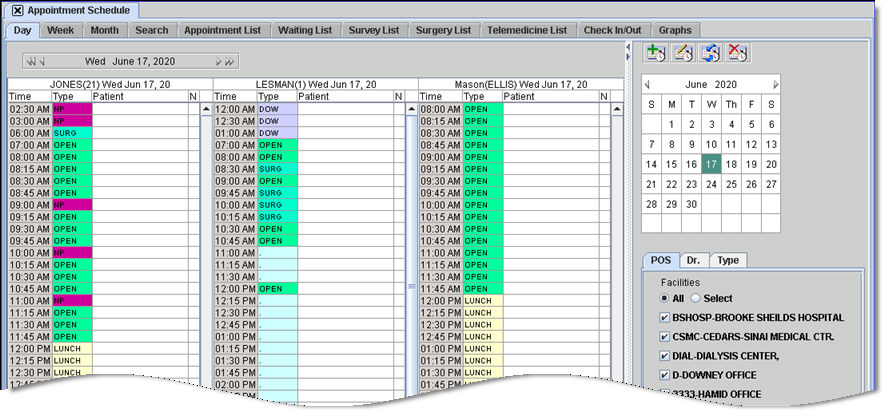
The Day tab is the default screen seen upon opening the scheduling program. It displays columns for scheduled providers which include the date, time, appointment type, and how many appointments start or continue into a given time slot.
Note: Providers' schedules may be sent to their email, cell phone, etc. using the Export option on the right-click menu.
The Day tab also includes short cut icons, a calendar and POS, Dr., Type tabs on the right side of the screen to schedule providers as desired.
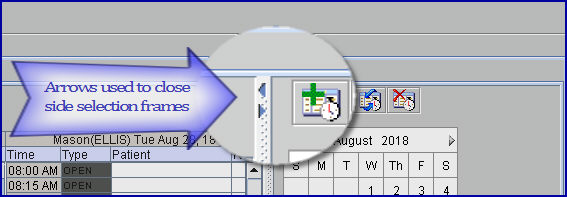
Users may adjust the screen to only display the schedule display area:
1.1 Shows the current calendar date and day of the week as a default.
1.2 Use single arrows to advance one day at a time forward or one day at a time back.
1.3 Use double arrows to advance one week at a time forward or one week at a time back.
2. Scheduling Short Cut Icons:
Although short cut icons may be accessed from this option, they are typically not used; keyboard commands are used instead.
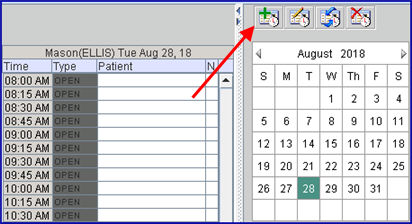
2.1.1 Click to open the Add Appointment dialog box.
2.2.1 Click to open the Modify Appointment dialog box.
2.3.1 Use as a cut and paste to reschedule existing appointments.
For additional information, see the Reschedule option on the right-click menu in Introduction To The Schedule.
2.4.1 Click to remove a patient appointment from the schedule.
For additional information, see the Cancel option on the right-click menu in Introduction To The Schedule.
When pressing one of the following command keys, case is not important unless noted below.
2.5.1 A: With the cursor in the desired appointment slot, press 'A' to display the Add Appointment screen to add an appointment.
2.5.2 C: With an appointment highlighted, press 'C' to view comments, if any.
2.5.3 D: With an appointment highlighted, press 'D' to display the Delete Appointment screen to copy, reschedule, delete, or postpone an appointment, or mark it as no show.
2.5.4 I: With an appointment highlighted, press 'I' to display the Inquire Appointment screen to inquire about an appointment.
2.5.5 M: With an appointment highlighted, press 'M' to display the Modify Appointment screen to modify an appointment.
2.5.6 P: With the cursor in the desired appointment slot, press 'P' to paste the contents of the clipboard to the appointment slot. Information must have already been saved to the clipboard for this to work -- see 'X'.
2.5.7 R: With an appointment highlighted, press 'R' to display the Add RECEIPT screen to request a receipt.
2.5.8 S: With an appointment highlighted, press 'S' to display the Appointment screen to search for a patient/appointment.
2.5.9 T: With the cursor on the appointment screen, press 'T' to change the display to the current date.
2.5.10 W/w: With the cursor on the appointment screen, press 'Shift+W' to advance the display by one week, OR press 'w (lowercase)' to decrease the display by one week.
2.5.11 X: With the cursor in the desired appointment slot, press 'X' to copy the contents of the appointment slot to the clipboard. Information may be pasted elsewhere using 'P' -- see above.
2.5.12 Y/y: With the cursor on the appointment screen, press 'Shift+Y' to advance the display by one calendar year, OR press 'y (lowercase)' to decrease the display by one calendar year.
2.5.13 +/-: With the cursor on the appointment screen, press '+' to advance the display by one day, OR press '-' to decrease the display by one day.
2.5.14 >/<: With the cursor on the appointment screen, press '>' to advance the display by one day, OR press '<' to decrease the display by one day.
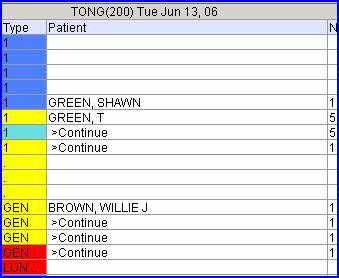
2.5.15 View 1 & 2: With the cursor on the appointment screen, press '2' to display all scheduled appointments, enabling the user to view double-booked appointments (appointments with a number greater than '1' in the 'N' column). Press '1' to return to the normal view.
View 1
View 2
The calendar on the right of the screen displays the current month, by default. The month may be advanced or moved back one month at a time by clicking an arrow in either top corner of the display - see yellow highlighted arrows below:
3.1 The selected day is highlighted (see the 21st above).
3.2 Click on any day in the calendar to display that day’s schedule view.
3.3 Alternately, the date may be changed using the arrows on the date selection field located in the top left of the screen. Changing the date via this method changes the date displayed on the calendar and vice-versa.
4.1 This option provides the ability to limit the time slots in the Full Day, Day tab schedule based on the Facility, Provider, or Appointment Type assigned to the time slot in Utility --► Set Up --► Appointment --► Template. It works similar to the search features under the Search tab.
4.2 The Facilities (POS) selection box with the ![]() All radio button selected is the default view. To change the selection, click on the desired tab.
All radio button selected is the default view. To change the selection, click on the desired tab.
4.3 Effective version 15.03.10, the tab names were changed from Fac, Doc, and Types to POS, Dr. and Type:
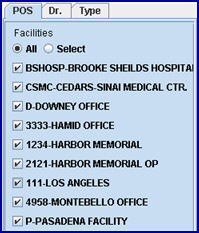

4.3.1 POS: The place of service (POS) selection box is the default view and provides a choice between all facilities and selecting only one specific facility. The available entries come from the Facility Code entered in Utility --► Set Up --► Appointment --► Template <Place of Service>. Accept the default ![]() All, OR click the
All, OR click the ![]() Select radio button and then any desired facility(s). Effective version 15.03.10, POS names include the Facility Code, as set up in Utility --►Facility.
Select radio button and then any desired facility(s). Effective version 15.03.10, POS names include the Facility Code, as set up in Utility --►Facility.
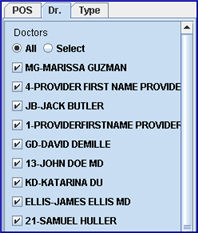
4.3.2 Dr: The ![]() All radio button is the default. It selects all Providers that are enabled for the schedule. Alternately, click the
All radio button is the default. It selects all Providers that are enabled for the schedule. Alternately, click the ![]() Select radio button and then click on the individual
Select radio button and then click on the individual ![]() check box(es) to select the desired Provider(s). Effective version 15.03.10, Dr names include the Provider Code, as set up in Utility --►Provider --►Provider.
check box(es) to select the desired Provider(s). Effective version 15.03.10, Dr names include the Provider Code, as set up in Utility --►Provider --►Provider.
4.3.3 Type: The ![]() All radio button is the default. It selects all Appointment Types. Alternately, click the
All radio button is the default. It selects all Appointment Types. Alternately, click the ![]() Select radio button and then click on the individual
Select radio button and then click on the individual ![]() check box(es) to select the desired Appointment Type(s). Effective version 15.03.10, Type names include the Appointment Type, as set up in Utility--►Set Up --►Appointment --►Appointment Type.
check box(es) to select the desired Appointment Type(s). Effective version 15.03.10, Type names include the Appointment Type, as set up in Utility--►Set Up --►Appointment --►Appointment Type.
4.4 The POS, Dr., and Type tabs in this option work similarly to the App. List Tab, but have one difference: Under the Day view when only specific Facilities or Types are selected to display, the program displays the slots depending upon the Utility --►Set Up --►Appointment --►Template. Whereas, in the App List tab, the slots displayed depend on the scheduled appointment. For example, if the slot defaults to OPEN, but, when scheduled, is changed to the reason for the appointment such as OV (Office Visit) or CONS (Consultation), selecting the Type = OV displays the scheduled appointment.

5.1 If a provider is designated to be listed for the displayed date, his/her last name, provider code, and the scheduling date heads a column.
6. Column Listing Time:

6.1 Displays the available starting time for each time slot (as set by the <Time> and <Length> fields).
6.2 The time differential for each slot is originally determined in Utility --► Set Up --► Appointment --► Template <Time>.
6.3 Once set in the template, the length of the displayed slot can only be changed by creating and assigning a new template or by deleting and adding individual slots.
7. Column Listing Type:

7.1 The Type displayed on the schedule is the Type set in the Template. Although this is the default type for this slot, a new type of appointment may be assigned during Add or Modify Appointment tasks.
7.2 Pass the mouse over any displayed Type to display a tool tip indicating the POS associated through this template:
8. Patient:
![]()
8.1 Displays the scheduled patient’s name Last, First.
8.2 This might also display 'continue' to indicate the appointment uses more than one time slot.
8.3 Version 9.12.32 - New Feature: When the mouse is hovered over a patient's name, a pop-up box displays the patient's name, appointment type, total length of the appointment, and the facility code:
8.4 Version 9.12.32 - New Feature: When an operator accesses the Add Appointment dialog box to begin scheduling an appointment, all other operators see HOLD in the Type column and PENDING in the Patient column for that time slot. The PENDING feature prohibits multiple operators from overbooking an appointment time slot. For more information, see PENDING in the Add Appointment Dialog Box.
8.5 Note: The combined character length of the names entered in the <Last Name> and <First Name> fields on the Registration --►Regular --►Patient screen should not exceed 70 characters. If the 70-character length is exceeded, the patient name displays on the appointment schedule, but the right-click menu is not accessible.
9.1 Displays a number indicating how many appointments start or continue into a given time slot. See View 1 & 2.
9.2 The 'N' column might be color-coded to reflect the confirmation status of the appointment.
9.2.1 For example, effective version 24.12.19, the color of the 'N' column changes to red for No Show appointments:
10. Right-click (Context) Menu
10.1 The primary way to make additions or modification to the appointment schedule in the Day view is from the right-click (context) menu pop-up.
10.2 To display the menu, click on the appropriate time slot within the patient column and then right click:
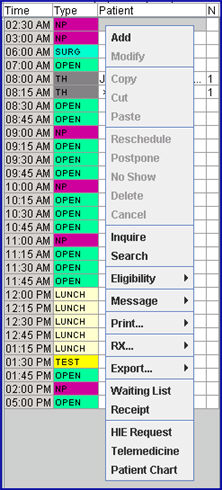
10.2.1 For example:
• Click on an empty time slot and select Add to display the Add Appointment screen.
• Click on an existing patient appointment for other modification options.
See right-click (context) menu for detailed information.
- OR -
10.3 Instead of using the right-click menu, type 'A' in an empty time slot to add a patient, OR type 'M' in an existing patient appointment to make modifications.
11. Options to Change Day View
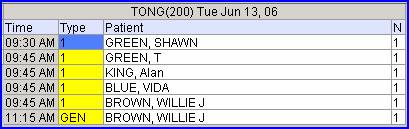
11.1 Press the number [2] on the top portion of the key board when in the Day View to change the default display. Only booked appointments for that day display, and each appointment, regardless of time slot, appears on a separate line. Un-booked time slots are not visible.
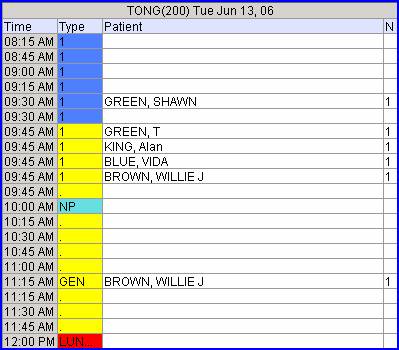
11.2 Press the number [3] on the top portion of the key board when in the Day view to change the default display. All appointments slots for that day display and each appointment, regardless of time slot, appear on a separate line. All time slots display.
11.3 Press the number [1] on the top portion of the keyboard to return to the standard view.
11.4 Type 'C' on the keyboard to change the display, adding a wider column to display any entry in the Add/Modify Appointment Dialog Box. To return to the normal view, type 'C' again.
The Comment field holds 47 characters.
