
Intellect™
SCHEDULE MENU OPTIONS

Appointment
Full Day
Tab Options
Waiting List Tab
The Waiting List tab allows scheduled appointments to be viewed where the <Earlier Appt> field is set to ‘Y’ on the Add Appointment or Modify Appointment dialog box. The appointment date-specific list may be filtered by appointment facility, provider, and/or type of appointment. For details on rescheduling appointments on the Waiting List to available time slots, see the documentation for context menu option {Waiting List} on the Full Day Schedule.
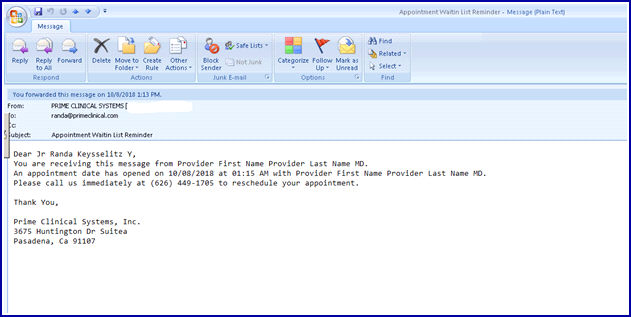
Effective version 18.10.30, when an appointment is cancelled, rescheduled, or deleted, the program now has the capability to send a text message to a patient on the waiting list. Before a text message may be sent, complete steps 1. and 2.
Sample Text:
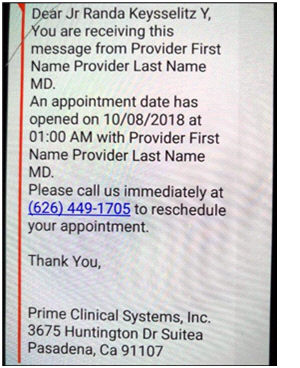
The program checks for which provider the appointment was cancelled/rescheduled/deleted and sends to the first patient on the list for that providers' schedule, based on the appointment date of the patient. Once the appointment is scheduled, that patient no longer appears on the waiting list.
Sample E-mail:
The Waiting List is accessed by clicking the Waiting List tab on the Appointment Schedule:

The Waiting List screen has three sections: 1) the waiting list display area, 2) the selection calendar, and 3) the selection tabs for the facility (POS), provider (Dr.), and type of appointment:
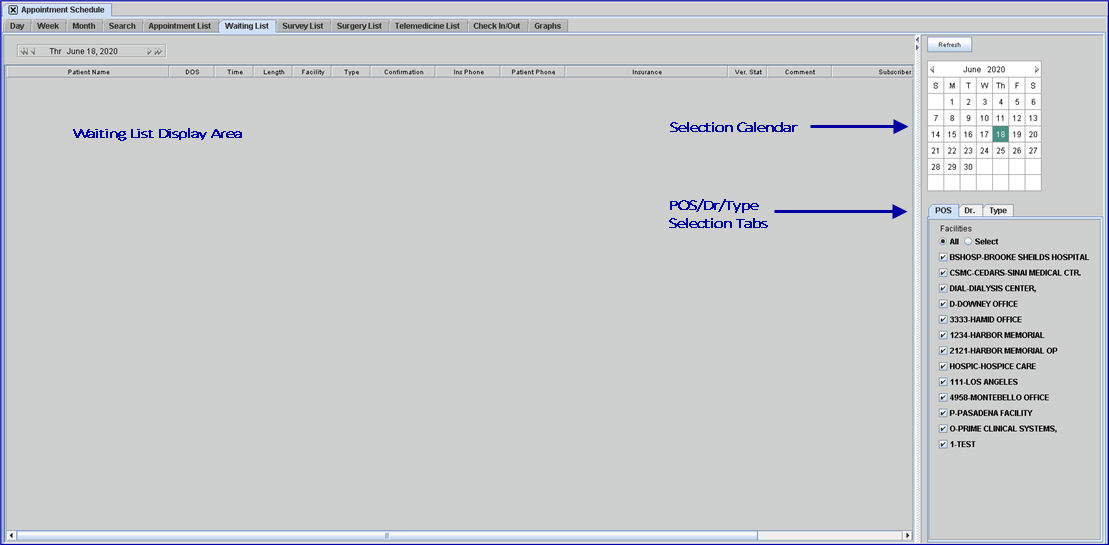
Information follows for each section of the Waiting List screen:
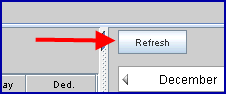
Note: After using the Selection Calendar and/or POS, Dr., Type Tabs to determine which patients should be displayed on the Waiting List, update the display by clicking on the [Refresh] button located in the top right corner of the screen:
A context menu may be accessed by right clicking within any column (in software versions prior to 9.12.32, this option is only available in the Patient Name column):
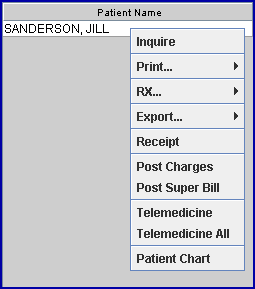
The Inquire (Effective version 9.12.32), Print, RX, Export, Receipt, and Patient Chart (Effective version 18.05.24 for PCM users only), and Telemedicine features work the same as they do on the right-click menu on the Day tab. See Schedule --►Appointment --►Full Day --►Schedule Overview & Right-Click Menu.
Post Charges - Effective version 9.12.35.
Click on the Post Charges option to go to the <Diagnosis Code> field on the Charges --► Charge screen, skipping the prior fields in the Public Info section. Once a charge has been posted for a client using this option, a colored background displays for the patient on the Waiting List.
For more information on posting charges, see Charges --► Charge.
Post Superbill - Effective version 15.08.06.
Right-click on a row of patient information on the Waiting List, and then click on Post Superbill displays the Superbill Post screen, which allows superbills to be posted electronically. See Post Superbill option for detailed information. Once a charge has been posted for a client using this option, a colored background displays for the patient on the Waiting List.
Effective version 17.06.09, click on a column heading and drag it to a new location in the displayed column order. Closing the schedule and then reopening it returns the screen to the default order.
2.1 Patient Name 
Displays the name of the patient, as shown in the <Name> field on the Add Appointment screen.
2.2 DOS 
Displays the appointment date as shown on the Add Appointment screen when the appointment was scheduled.
2.3 Time 
Displays the appointment time as shown on the Add Appointment screen when the appointment was scheduled.
2.4 Length 
Displays the length of the appointment in minutes, as shown in the <Length> field on the Add Appointment screen. For example, 15 indicates a 15-minute appointment.
2.5 Type 
Displays the appointment type, as shown in the <Type> field on the Add Appointment screen.
2.6 Facility 
Displays the place of service of the appointment, as shown in the <Facilitys> field on the Add Appointment screen.
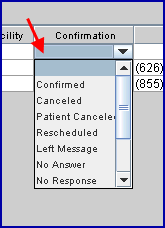
2.7 Confirmation 
From the Waiting List tab, update the Confirmation column by clicking in the Confirmation column on the row to update, then selecting the appropriate code from the drop-down list.
2.8 Ins Phone 
Displays the Utility --►Insurance --►Insurance <Phone> for the Insurance associated with this appointment.
2.9 Patient Phone 
Displays the patient's <Home Phone No> as entered on the Registration PATIENT screen.
2.10 Insurance 
Displays the Utility --►Insurance --►Insurance <Name> for the Insurance associated with this appointment.
2.11 Ver. Stat 
The Ver. Stat column displays the status of patient eligibility.
• When the <Ver. Stat> field is blank, the batch or real-time eligibility has not run
• When the <Ver. Stat> field has a date with a gray background, it indicates a 270 eligibility request has been sent out but no response has been received.
• When the <Ver. Stat> field has a date with a green background, it indicates the 271 eligibility response has been received.
2.12 Subscriber Number 
Displays the patient's <Subscriber No.> as entered on the Registration PATIENT_INSURANCE screen.
2.13 CoPay 
Displays the patient's <Co Payment.> as entered on the Registration PATIENT_INSURANCE screen.
2.14 Ded. 
Displays the patient's <Deductible.> as entered on the Registration PATIENT_INSURANCE screen.
The calendar on the right of the screen is used to select and filter the results shown on the Waiting List. The calendar's default display is the current month. The month may be advanced or moved back one month at a time by clicking an arrow in either top corner of the display - see yellow highlighted arrows below:
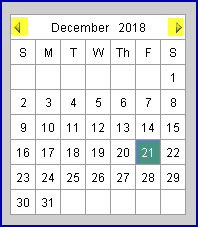
Clicking on any day in the calendar highlights that day and displays appointments scheduled for that day and forward which match the criteria selected using the POS, Dr., and Type tabs. In the above calendar, the 21st is the selected day.
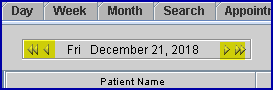
Alternately, the date may be changed using the arrows (highlighted below in yellow) on the date selection field located in the top left of the screen. Changing the date via this method changes the date displayed on the calendar and vice-versa.
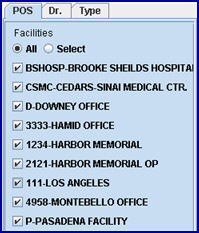

The POS, Dr., and Type tabs in this option work similarly to the Day tab.
POS: The place of service (POS) selection box is the default view and provides a choice between all facilities and selecting only one specific facility. The POS tab displays the <Name> of the <Facility Code>s, as set up in Utility --►Facility. Accept the default ![]() All, OR click the
All, OR click the ![]() Select radio button and then any desired facility(s).
Select radio button and then any desired facility(s).
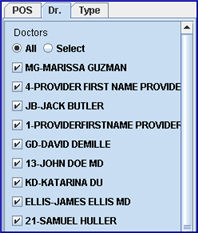
Dr: The Dr tab displays the <First Name> and <Last Name> of the <Provider Code>s, as set up in Utility --►Provider --►Provider. When the Waiting List is first opened, the ![]() All radio button is selected. As a result, the display includes all providers for whom appointments are scheduled on the selected day (see Selection Calendar) and forward. To limit the Waiting List to specific provider(s), click the
All radio button is selected. As a result, the display includes all providers for whom appointments are scheduled on the selected day (see Selection Calendar) and forward. To limit the Waiting List to specific provider(s), click the ![]() Select radio button and then click the
Select radio button and then click the ![]() check box for the desired provider(s).
check box for the desired provider(s).
Type: The Type tab displays the <Description> of the <Appointment Type>s as set up in Utility --►Set Up --►Appointment --►Appointment Type. The ![]() All radio button is the default. It selects all Appointment Types. Alternately, click the
All radio button is the default. It selects all Appointment Types. Alternately, click the ![]() Select radio button and then click on the individual
Select radio button and then click on the individual ![]() check box(es) to select the desired Appointment Type(s).
check box(es) to select the desired Appointment Type(s).