
Intellect™
WEBSTAFF MENU OPTIONS

WebStaff Overview
Effective version 9.12.10 – New option
BETA - Documentation and Software Program are subject to change.
WebStaff provides remote access to your appointment schedule via the internet. To connect to the internet from anywhere, at anytime, open a web browser, enter the WebStaff address, select your clinic, and enter your password. In addition to reviewing your schedule, you can also add, modify, or delete an appointment (see sections 3 and 4 of this documentation), and enter charges to import into Intellect for scheduled appointments (see section 5 of this documentation).
To utilize this feature, specific areas of Intellect should already have been set up and your hardware needs to have been configured as discussed in the WebStaff Set Up menu option.
In this Topic Hide
1.1 Go to your Internet Server (for example, Internet Explorer).
1.2 You may access WebStaff from outside of your office or within your office, as follows:
• If you are accessing WebStaff outside of your office, enter:
http://[your external ip address]:8080/webstaff and press [Enter]
• If you are accessing WebStaff within your office, enter:
http://[the WebStaff server’s ip address]:8080/webstaff and press [Enter]
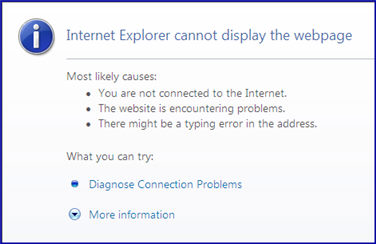
If WebStaff is not correctly set up, or if the service is not up and running, you will get an error message from your internet server, such as the following. Contact your IT person to verify that your system is set up correctly, or call PCS support.
1.3 After successfully completing the above, the Login screen displays (effective version 17.07.21):
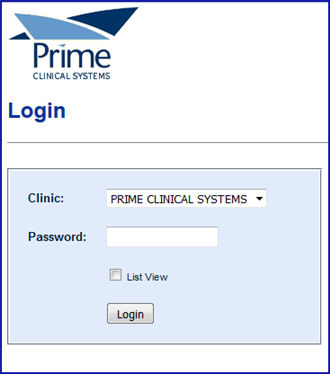
2.1 At the Login screen (see example above), enter your information:
2.1.1 Clinic: (Effective version 17.07.21, the <Username> field was replaced with the <Clinic> field). Select your clinic name from the drop-down list.
2.1.2 Password: Effective version 17.07.21, enter the password you use when signing-in to Intellect. Users who do not have an Intellect password need to have one set up for them in Utility --►Set Up --►Security --►Log In Users.
2.1.3 ☐ List View: WebStaff may be opened in either the Calendar View (the default) or the List View. Click the List View box to open WebStaff in that view.
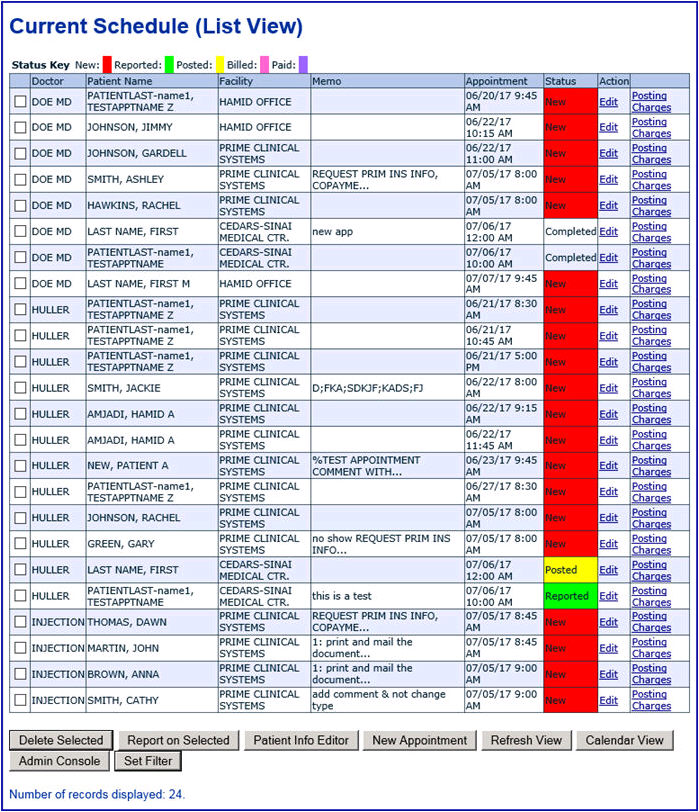
List View (see section 4. Current Schedule (List View) Details):
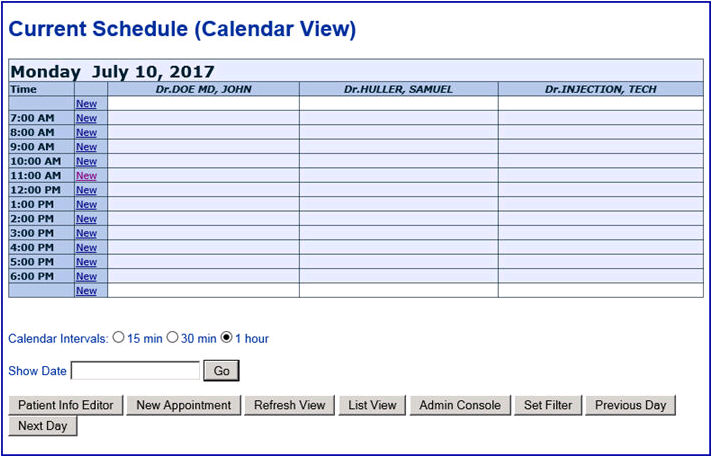
Calendar View (default view -- see section 3. Current Schedule (Calendar View) Details):
2.1.4 [Login]: Click the button OR press the [Enter] key.
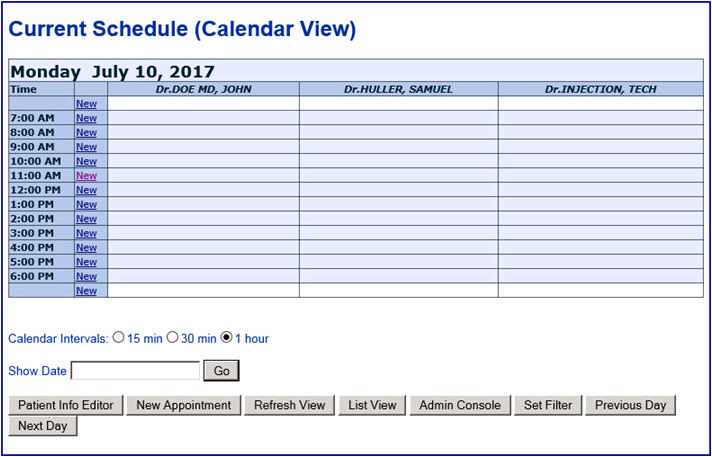
Calendar View is the default view. The Current Schedule opens to today's date. The settings of the signed-in user determine the doctors who are displayed (see section 3.7.9 User Setup).
Display Options:
3.1  : Click on the time display option for your schedule. Note: See the <Appointment Time> field on the Appointment Editor option for information on setting appointments for a specific time.
3.2  : Enter the date you want on the Calendar and then click [Go]
- OR -
 : Click on either button to move forward or back in the schedule by Day.

Links for descriptions of each button:
Click the [Patient Info Editor] button to display:
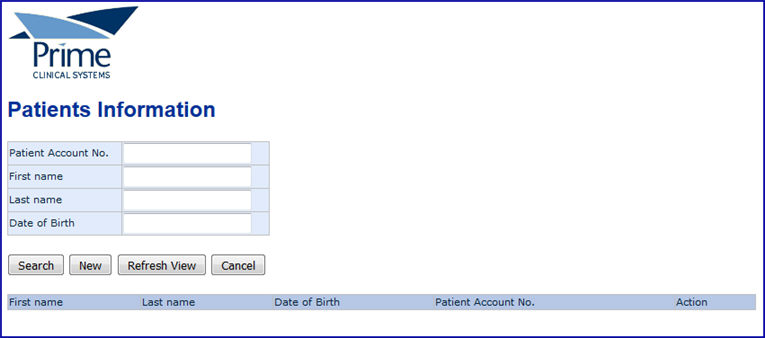
This screen allows users to search for a particular patient(s), or to add a new patient to the program.
3.3.1  : To search for a patient, either enter the patient's account number, first name, last name, or date of birth. Fill in the field you want to search by, then click on the [Search] button to display your patient.
- OR -
Enter the first few letters of the Last Name, and click on [Search]. This pulls up all names that include those letters in the order entered. Be aware that entering 'MA' in the Last name field could display the variety of last names shown below (see blue arrow). This option is helpful for names for which you are unsure of the spelling.

Click Edit (located in the Action column - see red arrow in the example above) opens the Patients Editor screen (see below) where users can modify or view patient demographics.
3.3.2  : Click this button to open the Patients Editor screen where a new patient may be added. Note: When a new patient is added through WebStaff it is also added to Intellect. When entering information on this screen, users can either press [Enter] or [Tab] to move to the next field.
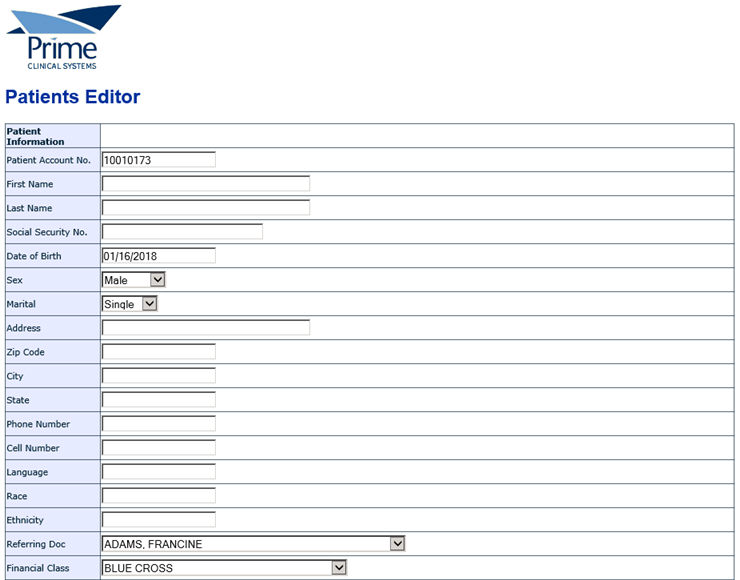
3.3.2.1 <Patient Account No.> This is the Account Number as assigned in Intellect. [Tab] down to the next field and the number pulls from Onstaff.
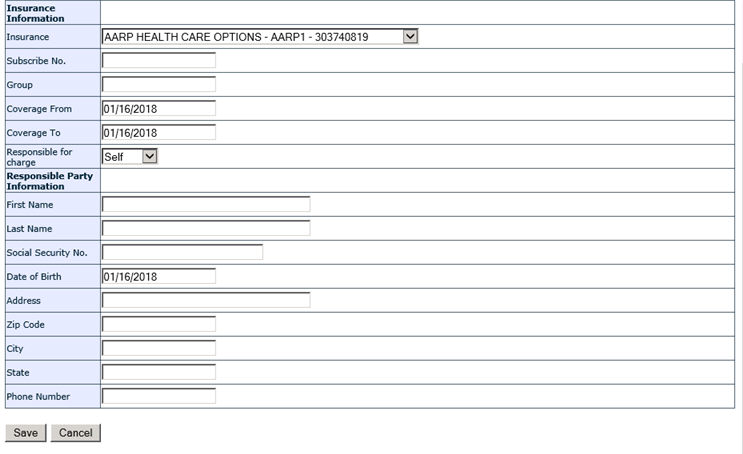
3.3.2.2 Enter the patient's name, address, other personal demographics, and patient's insurance information in the appropriate fields. Please note the specific information for these fields:
<Date of Birth>: This field includes a pop-up calendar button. Click on this button to display a Calendar for your reference, allowing you to look back by month or year.
<Referring Doc>: This field has a drop-down arrow that pulls up all choices that have been entered, displaying them with the last name first. Scroll down for your choice OR type the first initial of the last name and it will go to the first name in the list with that letter. Then click on the down arrow to bring up the list from which to select OR type that same letter again for the next choice in the list and so on.
<Insurance>: This field has a drop-down arrow which works the same as the <Referring Dr> field.
<Coverage From> for insurance: Click on this field to display a calendar for your reference, allowing you to look back by month or year. Caution: The system will not bill outside the entered From and To dates.
<Coverage To> for insurance: Click on this field to display a calendar for your reference, allowing you to look back by month or year. Caution: The system will not bill outside the entered From and To dates.
3.3.2.3  : Click on [Cancel] to go to the previous screen OR to start entering patient information.
3.3.2.4  : Click on [Save] to go to the previous screen and view the patients' name that you added. Alternately, press [Enter] to save.
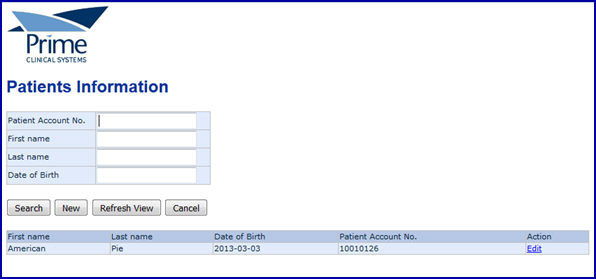
From here you may add your next patient, search for someone else, or press [Cancel] to get out and go to the Current Schedule (List View).
3.3.3  : Click on [Refresh View] to bring up your entire patient list.
3.3.4  : Click on this button to go to the previous page.
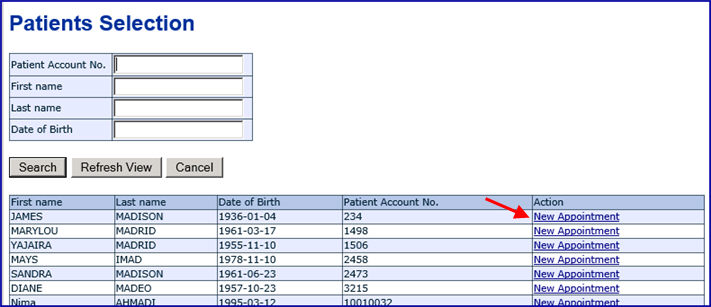
Click on the [New Appointment] button to open the Patients Selection screen. This screen works the same as the Patients Information screen described above. See 3.3.1 for directions on selecting patients.
To schedule a new appointment for your patient, click on New Appointment (see red arrow below):
The Appointment Editor screen opens for your patient:
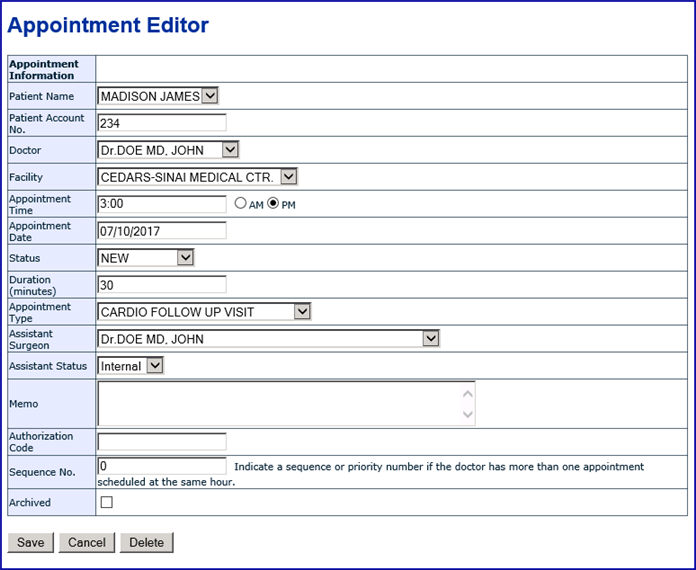
3.4.1 <Patient Name>: Displays the selected patient.
3.4.2 <Patient Account No>: Displays the account number of the selected patient.
3.4.3 <Doctor>: The first in-house provider is displayed. To select a different provider, click on the down arrow and make your selection.
3.4.4 <Facility>: Click on the down arrow to select the facility in which the patient will be seen.
Note: When scheduling in OnStaff, the place of service (POS) must be entered or the <Facility> field will display 'unknown hospital.'
3.4.5 <Appointment Time>: The time shown is the current computer time default. Enter the TIME of the patients appointment and then click on the appropriate option:

3.4.6 <Appointment Date>: This field defaults to the current date. Enter the date of the appointment you are scheduling. This field includes a pop-up calendar button to aid in locating the appropriate date.
3.4.7 <Status>: The default is NEW. When scheduling a new appointment for a patient, select NEW for the <Status>. Click on the down arrow to view other options:
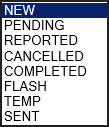
Note: FLASH and TEMP are not used at this time.
3.4.8 <Duration (minutes)>: Enter the length of the appointment.
3.4.9 <Appointment Type>: Use the drop-down list to select the appropriate type of appointment.
3.4.10 <Assistant Surgeon>: The default is the first doctor on the drop-down list. Click on the down arrow and make a selection. If there is no Assistant surgeon, select the Treating Physician.
NOTE: The use of <Assistant Surgeon> can be turned ON or OFF. This is how it works:
• ON: Make the surgery appointment in WebStaff and select the Assistant Surgeon
1. If it is the Treating Doctor you must select his name. If other than the Treating Doctor, select the Assistants Name.
2. The next field is <Internal> or <External> which means:
• If the Assistant Doctor is within your practice, select <Internal>.
• If the Assistant Doctor is outside your practice, select <External>.
Please note:
a. <Internal> - This choice creates an appointment for the Assistant and will export a charge for the Treating Doctor and also a charge for the Assistant Doctor with an 80 modifier.
b. <External> - This choice does not create an appointment for the Assistant therefore when charges are exported there will be only 1 record and that will be the Treating Doctor.
• OFF: When you schedule an appointment for Surgery in WebStaff or OnStaff the program will not look at the Assistant so no assignment needs to be made.
When charges are exported, there will be only 1 Record for the Treating Doctor.
IF you do have an Assistant, you will manually add an Appointment for the Assistant so you are manually creating a second record that will post charges.
3.4.11 <Assistant Status>: This field is affected by the set up of the <WebStaff Assistant Surg> field on the Utility --► Set Up --► Parameter screen in Intellect. When selecting External or Internal, please note:
• If the <WebStaff Assistant Surg> field is set to 'Y':
External: The appointment will not be created nor will a charge bill for the assistant surgeon.
Internal: Charges will automatically be added in WebStaff for the assistant surgeon. When charges are posted to the surgeon in WebStaff, charges will also be added to the assistant surgeon.
• If the <WebStaff Assistant Surg> field is set to 'N':
External: The appointment will not be created nor will a charge bill for the assistant surgeon.
Internal: You have to manually add charges in WebStaff (or in OnStaff) for each, if it applies, for both the surgeon and assistant surgeon.
3.4.12 <Memo>: You may enter notes pertaining to this appointment. If you have made an appointment in the OnStaff program, this field pulls what is in the <Comments> field. This Memo is displayed in the Calendar and List View of the Schedule.
**Note: The comment is imported from Onstaff with the appointment. If the appointment is modified in Onstaff to ADD more to the comment, it will NOT update the Memo in WebStaff.
3.4.13 <Authorization Code>: This is blank until a user enters an Authorization # (usually from the insurance company) authorizing the visit and then attaches it to a charge. This field indicates the authorization number.
3.4.14 <Sequence #>: Indicates a sequence or priority number if the doctor has more than one appointment scheduled at the same time.
3.4.15 <Archived>: If the box is checked, the appointment is removed from the appointment schedule.
At the bottom of the screen, click on your selection:
 to save an appointment and add it to the schedule.
 to return to the previous screen and not schedule this patient.
 to delete the entry.
Selecting [Save] adds the appointment to the schedule (displayed in yellow below):
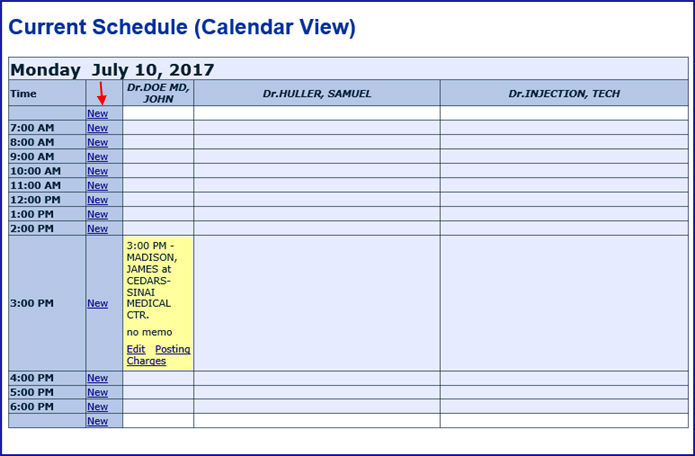
You can also schedule a new appointment from Current Schedule (Calendar View) by clicking New (see red arrow above) next to the time that you want the appointment. This takes you to the Search Patient screen where the steps described in 3.4 above may be completed.
[Refresh View], which refreshes the screen.
Displays the schedule in List View. Please see 4. Current Schedule (List View) Details for details.
The [Admin Console] button is only available for users with a security level of 2. Effective version 17.07.21, security levels are set in the <WebStaff Security Level> field on the Utility --►Set Up --►Security --►Login Users screen.
See Administrative Console Menu Options for links to the options shown below:
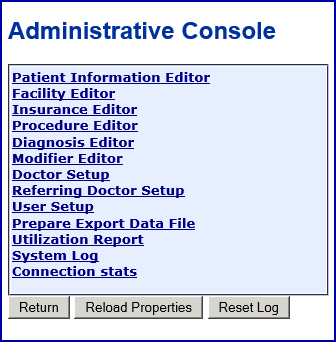
 : Click [Return] to go back to the previous screen.
 :
:
 :
:
Administrative Console Menu Options
Patient Information Editor (see section 3.7.1)
Facility Editor (see section 3.7.2) In software prior to version 17.07.21, this was the Hospital Editor.
Insurance Editor (see section 3.7.3)
Procedure Editor (see section 3.7.4)
Diagnosis Editor (see section 3.7.5)
Modifier Editor (see section 3.7.6)
Doctor Setup (see section 3.7.7)
Referring Doctor Setup (see section 3.7.8)
User Setup (see section 3.7.9)
Prepare Export Data File (see section 3.7.10)
Utilization Report (see section 3.7.11)
System Log (see section 3.7.12)
Connection Stats (see section 3.7.13)
Effective version 17.07.21, the Region Editor and Import from OnStaff options were removed from this screen.
3.7.1 Patient Information Editor
Select Patient Information Editor to display the Patients Information screen. See 3.3 [Patient Info Editor] Button for screen information.
Select Facility Editor to display a list of facilities where the provider sees patients:

Column information and other options are as follows:
3.7.2.1 <Facility>: The names of clinics or offices, as set up in Intellect.
3.7.2.2 <Phone>: Displays the phone number of the facility, as set up in Intellect.
3.7.2.3 <Facility Code>: Displays the number of the facility as set up in Intellect under Utility --►Facility <Facility Code>.
3.7.2.4  : Click to close the Facilities screen.
3.7.2.5  : Click this box to update the information on the screen.
Note: Whenever the 'Include Archived Records' box is selected or deselected, you must also click on [Refresh View] to update the screen.
Select Insurance Editor to display a list of insurances used by your clinic.
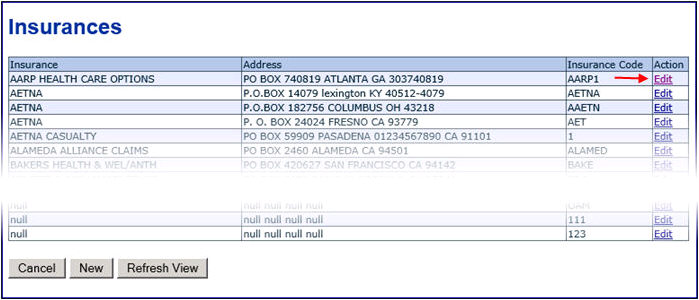
Column information for the Insurances screen:
3.7.3.1 <Insurance>: The insurance name.
3.7.3.2 <Address>: Displays the insurance address.
3.7.3.3 <Insurance Code>: Displays the code for the insurance as set up in Intellect under Utility --►Insurance --►Insurance <Insurance Co. Code>.
3.7.3.4 <Action>: Contains an Edit link. Click on Edit to open the Insurance Editor screen for the selected insurance. For example:
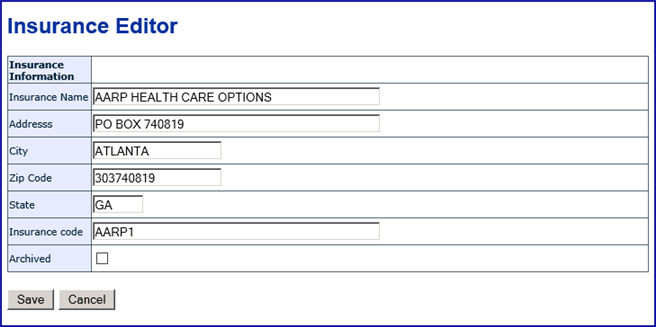
The same information as shown on the Insurances screen displays. Users may edit the information and/or select/deselect the ☐ Archived box. After making changes, click the [Save] button. To return to the Insurances screen without saving changes, click [Cancel].
Button information for the Insurances screen:
3.7.3.5  : Click [Cancel] to close the Insurances screen.
3.7.3.6  : Click [New] to open the Insurance Editor screen. See section 3.7.3 above for screen information.
3.7.3.7  : Click [Refresh View] to update the information on the screen. Note: Whenever the 'Include Archived Records' box is selected or deselected, you must also click on [Refresh View] to update the screen.
Select Procedure Editor to display a list of procedure codes used by your clinic.
This option on the Administrative Console screen works the same as the Insurance Editor option in regard to editing or adding a new entry. See section 3.7.3 for more information.
Select Diagnosis Editor to display a list of diagnosis codes used by your clinic.
This option on the Administrative Console screen works the same as the Insurance Editor option in regard to editing or adding a new entry. See section 3.7.3 for more information.
Select Modifier Editor to display a list of modifier codes used by your clinic.
This option on the Administrative Console screen works the same as the Insurance Editor option in regard to editing or adding a new entry. See section 3.7.3 for more information.
Note: The Modifier Editor screen includes an 'Allowed override' field. When this field is checked/selected, the modifier is overridden when not affiliated with the top priority procedure during export.
Select Doctor Setup to display a list of providers in your clinic. The screen also includes each provider's code, as set up in Utility --►Provider --► Provider <Provider Code>.
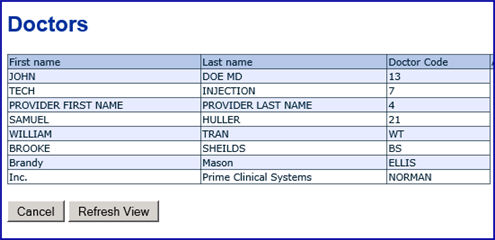
Select Referring Doctor Setup to display a list of providers referred by your clinic.

This option on the Administrative Console screen works the same as the Insurance Editor option in regard to editing or adding a new entry (see section 3.7.3 for more information). However, please be aware that after clicking on Edit, the Referring Doctor Editor screen includes information not shown on the prior screen:
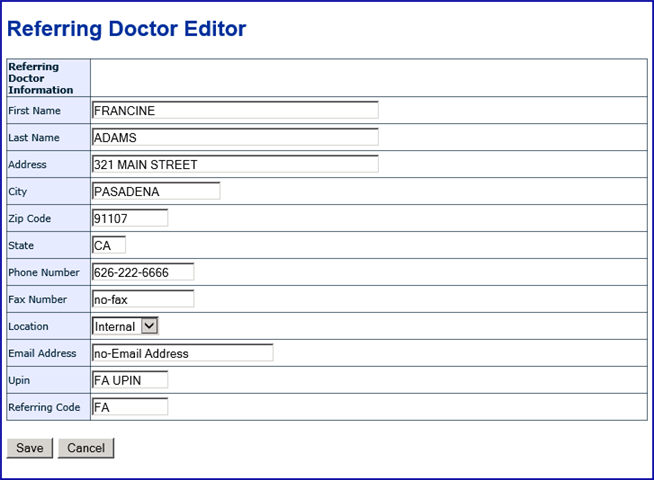
Except for the <Location> field, this information is pulled from Utility --►Referring. For the <Location> field, if the referring doctor is within your practice, select 'Internal'; if the referring doctor is outside your practice, select 'External.'
Note: If you skip this option, the user will not see a schedule when he/she logs in.
Select User Setup to display a list of users in your clinic:

Users are added and deleted via Intellect's Utility --►Set Up --►Security --►Login Users screen. Effective version 17.07.21 the user's security level is set on that screen in the <WebStaff Security Level> field. Also effective in version 17.07.21, the Edit and Password columns were removed from this screen.
The Doctors link, as indicated by the red arrow in the <Action> column above, opens the User Preferences screen (see below) for the selected user. The User Preferences screen allows you to select which Doctors this user will see on the schedule and for whom charges may be posted.
In the example below, since Samuel Huller is the only doctor selected, only his appointments will display and this user may only post charges for him:
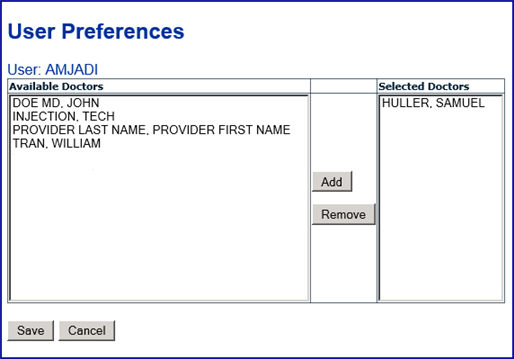
3.7.9.1  : To add another doctor to the 'Selected Doctors,' highlight your selection in the 'Available Doctors' column by clicking on the doctor's name and then click the [Add] button. Highlight and [Add] as many doctors as you would like.
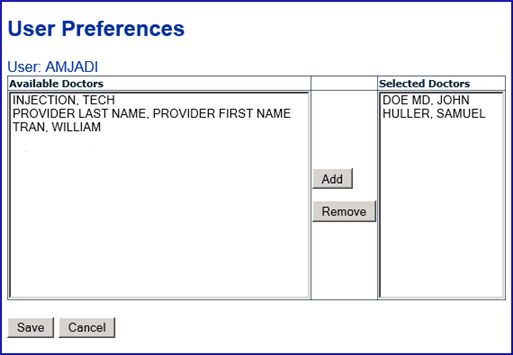
3.7.9.2  : To remove a Doctor from the 'Selected Doctors' list, highlight the Doctor under Selected Doctors and click on the [Remove] button.
3.7.9.3  : When you are done with your selections, click on the [Save] button to save.
3.7.9.4  : Click on the [Cancel] button to quit and not save your changes.
3.7.10 Prepare Export Data File
Not available at this time.
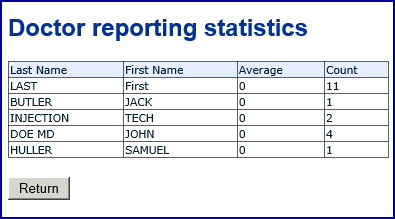
Select Utilization Report to display the Doctor Reporting Statistics:
Select System Log to display a screen showing actions that took place on WebStaff:


In the example above, a doctor was added for user 67 and a doctor was also deleted for user 67 on Wednesday, July 12th, at 9:18. This log aids in troubleshooting and verification of user actions.
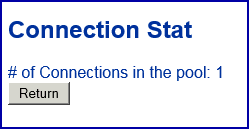
Select Connection Stats to display a screen displaying the number of users currently logged-in on WebStaff:
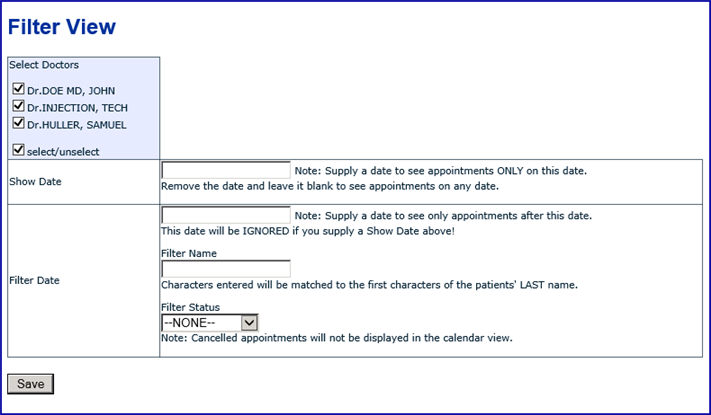
The [Set Filter] button allows the data displayed on the schedule to be edited. For example, all providers in a clinic may be displayed, or only one provider displayed; all appointments may be displayed, or only appointments for a specific day displayed, etc. For the screen shot below, the schedule would show all providers in the clinic since there is a check mark in the box by each provider, and the schedule would show all appointments since no limiting dates were entered:
3.8.1 Select Doctors
Check the box next to a provider to display that provider on the schedule. Unchecked providers do not display on the schedule.
 : Not necessary at this time.
3.8.2 Show Date
Enter a specific date to see ONLY appointments with that date. Leave BLANK to see any date.
3.8.3 Filter Date
Enter a date in the first box to see appointments AFTER this date. This cannot be left blank if dates should be filtered.
3.8.3.1 <Filter Name> Letters entered should be the first letters of the patients' LAST name.
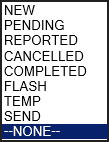
3.8.3.2 <Filter Status> Allows the searching of specific kinds of appointments. Make a selection by clicking on the down arrow.
Once all the desired filters have been entered, save the changes by clicking the [Save] button at the bottom of the screen.
Click the [Previous Day] button to move back in the schedule by Day. See 3.2 for more information.
Click the [Next Day] button to move forward in the schedule by Day. See 3.2 for information.

Columns and buttons on this screen are described below.
4.1 <Doctor>: Displays the name of the doctor with whom the appointment is scheduled.
4.2 <Patient Name>: Displays the name of the patient for whom the appointment is scheduled.
4.3 <Facility>: Displays the location of the appointment.
4.4 <Memo>: For appointments made in the Intellect program, this field pulls what is in the <Comments> field. Note: If the Comment is modified in Intellect, the change will NOT update the <Memo> field in WebStaff.
4.5 <Appointment>: Displays the date and time of the appointment.
4.6 <Status>: This column is only available to users with a security level of 2. Effective version 17.07.21, security levels are set in the <WebStaff Security Level> field on the Utility --►Set Up --►Security --►Login Users screen.
The <Status> column indicates the status of the charges as:

Note: Charges must be manually Exported daily for each clinic. This is explained in 5. Posting Charges in this documentation.
4.7 <Action>: Edit and Posting Charges options are available from this column.
4.7.1  : Click Edit to open the Appointment Editor screen, allowing information to be edited for that appointment such as <Facility>, <Appointment Type>, <Authorization Code>, etc. Fields on the Appointment Editor screen were previously defined in conjunction with the [New Appointment] button.
After making changes, click on the appropriate button:
 : Saves the changes and adds them to the schedule.
 : Discards the changes and returns to the previous screen.
 : Displays the Delete Appointment Confirmation screen:
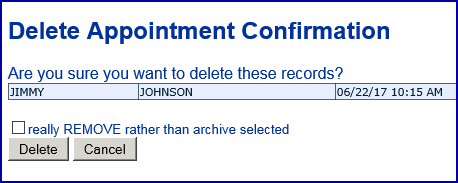
Note: The purpose of this screen is to delete an appointment, NOT to delete the changes that were just made.
To delete the changes that were just made, press [Cancel]. To remove the appointment, see 4.8 [Delete Selected] Button for additional information.
4.7.2  : See 5. Posting Charges for information on the Posting Charges option.
The response for this button depends on whether or not the box is checked next to the patient’s name.
4.8.1 Box Checked Response
This example shows the box checked:

With the box checked, click the [Delete Selection] button to display the Delete Appointment Confirmation screen:

4.8.1.1 ☐ really REMOVE rather than archive selected: Click this box to affect how the [Delete] button works:
• When this option is selected and the [Delete] button is clicked, the appointment is completely removed from the appointment schedule.
• When this option is not selected and the [Delete] button is clicked, the appointment is archived.
4.8.1.2 [Delete]: This button is affected by the previous option ☐ really REMOVE rather than archiving the selected record. See above for details. After deleting, the screen returns to the previous screen.
4.8.1.3 [Cancel]: Click on the [Cancel] button to return to the previous screen.
4.8.2 Box Unchecked Response
If a check mark has NOT been put next to a selection, the Selection Error screen displays:
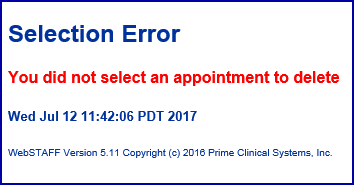
When this message displays, click the <BACK> button to return to the previous screen.

4.9  Button
Put a check in the box next to the patient's name:

Click on [Report on Selected] to show the appointment information and also show the history. See sample below:
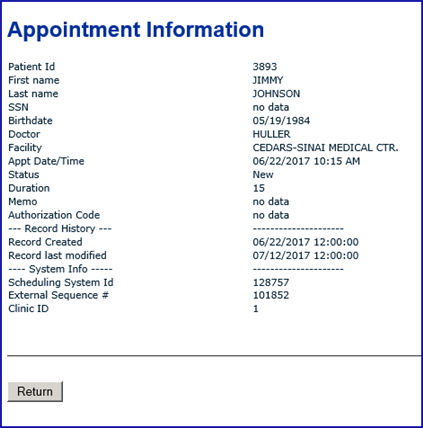
To close the report, click [Return].
4.10  Button
See section 3.3 for button information.
4.11  Button
See section 3.4 for button information.
4.12  Button
Refreshes the screen.
4.13  Button
Displays the schedule in Calendar View. See 3. Current Schedule (Calendar View) Menu Options for information.
4.14  Button
See section 3.7 for button information.
4.15  Button
See section 3.8 for button information.
This action can be performed from either the List View or Calendar View options of the Current Schedule:
5.1 List View

Click on Posting Charges in the column at the far right of the screen to open the Posting Charges screen.
- OR -
5.2 Calendar View

Within the yellow appointment block, click on Posting Charges to access the Posting Charges screen.
5.3 From either List View or Calendar View, click on Posting Charges to display the Posting Charges screen:
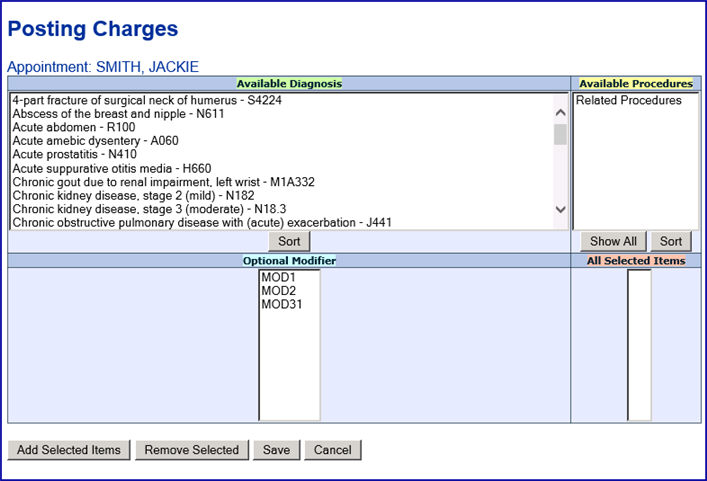
The above screen indicates charges are being posting for Jackie Smith's appointment.
Note that each section is color-coded: Diagnoses are green, procedures are yellow, modifiers are blue, and all items are pink. The green, yellow, and blue colors are also used in the 'All Selected Items' box to identify each type of item in the list.
5.3.1 Available Diagnosis Box/Section
This section lists diagnosis in alphabetical or numerical order. Click on the [Sort] button to change the listing order.
Use the scroll bar on the side to find the desired diagnosis, click on it, and then click on the [Add Selected Items] button to add the diagnosis to the All Selected Items box.
TIP: To quickly find a specific Procedure or Diagnosis, highlight any choice in the box and then type the first letter of the word to look for. For example, to look for Hernia, highlight any item on the list and then type the letter ‘H.’ The list will then go to the first diagnosis starting with the letter ‘H’ allowing users to scroll down to find the specific Hernia diagnosis.
Note for OnStaff 2000 Users: If clinics have linked their procedures and diagnosis in the OnStaff program in Utility --►Procedure --►ICD9 Check, the program automatically brings up these related charges in the Available Procedures box.
5.3.2 Available Procedures Box/Section
This section lists the clincis procedures in alphabetical or numerical order.
[Sort] changes the sorting order.
[Show All] lists all the clinics procedures.
Use the scroll bar on the side to find the procedure, click on the desired one, and then click on the [Add Selected Items] button to add the procedure to the All Selected Items box.
TIP: To quickly find a specific Procedure or Diagnosis, highlight any choice in the box and then type the first letter of the word to look for. For example, to look for Hernia, highlight any item on the list and then type the letter ‘H.’ The list will then go to the first diagnosis starting with the letter ‘H’ allowing users to scroll down to find the specific Hernia diagnosis.
Note for OnStaff 2000 Users: If clinics have linked their procedures and diagnosis in the OnStaff program in Utility --►Procedure --►ICD9 Check, the program automatically brings up these related charges in the Available Procedures box.
5.3.3 Optional ModifierBox/Section
This section is optional and is used to add a modifier if needed.
Scroll down OR use the arrow to find the selection, click on the desired one, and then click on the [Add Selected Items] button to add the procedure to the All Selected Items box.
5.3.4 All Selected Items Box/Section
As choices are made in each box and the [Add Selected Items] button clicked, they are listed in the All Selected Items box:
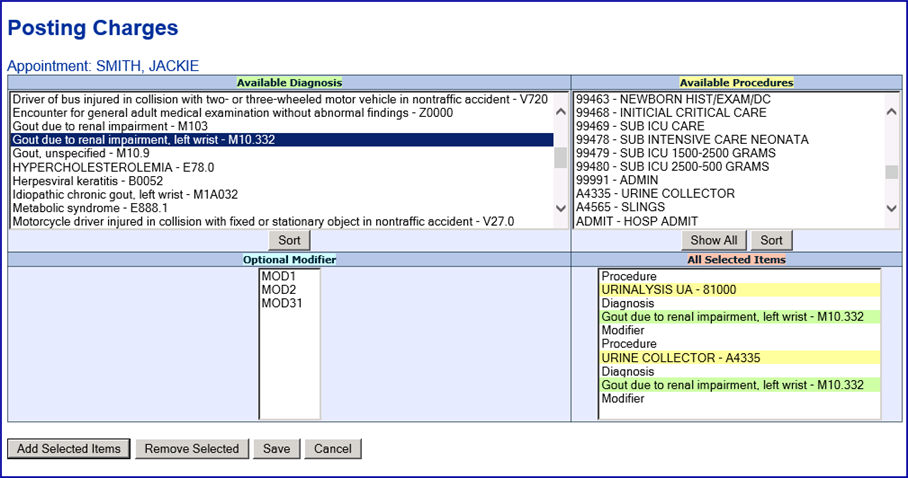
To add a charge, diagnosis, etc. to the list in the All Selected Items box/section, the selection and click on the [Add Selected Items] button.
5.3.6  :
:
To remove an entry from the All Selected Items list, click on the item to be removed and then click on the [Remove Selected] button.
5.3.7  :
:
Once all the items are selected that should be posted, click on the [Save] button. This saves charges and then goes to the Current Schedule (List View).
The Appointment <Status> column changes from New to Reported to indicate the charge was posted :

When this item has been exported to the Intellect program, the <Status> changes to:

The system automatically exports these charges to Intellect, depending on the set up of the program.
Notes for OnStaff 2000 Users:
• Clinics with Administration Security can manually export the charges to OnStaff.
• If a New Procedure is added into WebStaff, it must also be added in OnStaff. If it is not added, the charge will not be exported into OnStaff.
• If a New Procedure is added in OnStaff it will import to WebStaff.
5.3.8  : Cancels the selections (does not post) and then goes back to the Current Schedule.
6.1 Intellect and WebStaff users should run an End of Day report. See End of Day Procedures in this documentation for details.
6.2 For OnStaff users, manually export charges to OnStaff each day for each clinic:
Select ADMIN CONSOLE
PREPARE EXPORT DATA FILE
Select/Unselect by clicking the box for the charges to be exported
Click <EXPORT SELECT> button
When a user goes back to the List View schedule, the <Status> displays:

Whether Intellect or OnStaff is used, a Pre-billing Report needs to be run:
• This report checks the charges for missing information before the nightly billing. Verify that DOB, DX, Patient Category, and the Patient Insurance are correct.
• It is good to run this report enough times to make the needed corrections.
If the web page cannot be accessed to get a login, use the instructions below to RESTART the Tom Cat program. Clinics who are not familiar with this program, or who do not have access to it, should contact Prime Clinical for additional information.
Go to START
PROGRAMS
APACHE TOMCAT
CONFIGURE TOMCAT
Click the <STOP> button
Click the <START> button
Now, try again to login.