
Intellect™
BILLING MENU OPTIONS

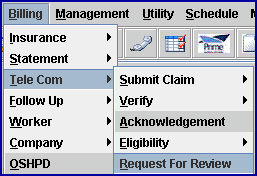
Tele Com
Request for Review
This menu option is used to electronically provide the information necessary to submit a request for review and receive a response (278).
Business Events Supported - Request and Response
The 278 covers these business events:
• Admission certification review request and associated response
• Referral review request and associated response
• Health care services certification review request and associated response
• Extend certification review request and associated response
1. To electronically submit a request (278) in Intellect, go to Billing --►Tele Com --► Request For Review
The Claim Request For Review screen displays:
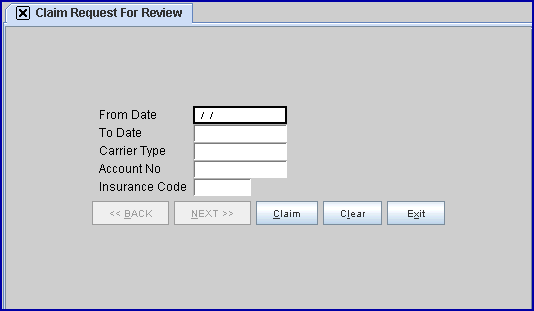
2.1 Enter the beginning date of the date range for this request.
3. To Date 
3.1 Enter the latest date of the date range for this request.
4. Carrier Type 
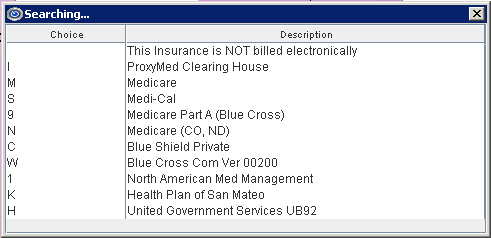
4.1 Enter the Utility --► Insurance --► Insurance <Electronic Billing> code for this carrier.
4.2 This is a required field.
5. Account No. 
5.1 Type the patient account number to submit.
5.2 This is a required field. If this field is blank when [Enter] is pressed, this message displays:
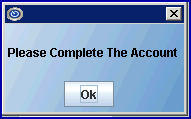
Click [Ok] to return to the <Account No> field.
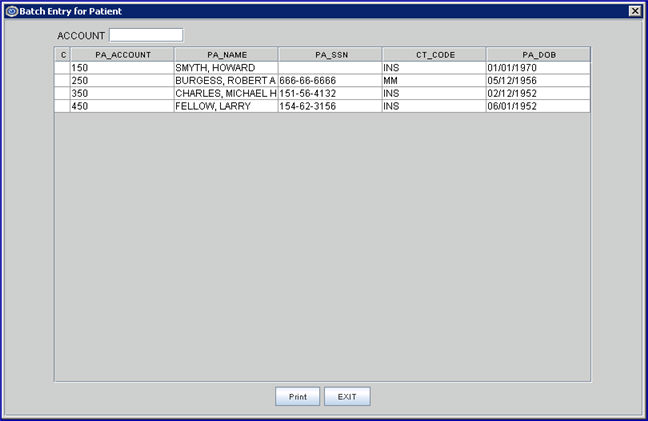
5.3 Press [Enter] to open the Batch Entry dialog screen, allowing more accounts to be individually added to process as a single batch.
5.4 Type any additional account numbers (one at a time) and press [Enter] to add.
6. Insurance Code 
6.1 Type the Utility --► Insurance --► Tele Com <Insurance Code>.
6.2 This is a required field. If this field is blank when [Enter] is pressed, this message displays:
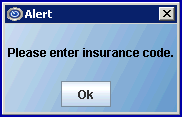
Click [Ok] to return to the <Insurance Code> field.
7. When the information is completely entered, select one of these options:

7.1 Select the [Claim] button OR press [Enter] to display the printer dialog box:
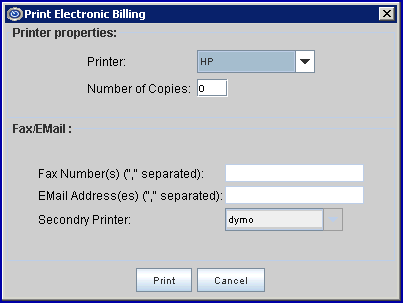
7.1.1 Printer Properties:
7.1.1.1 Printer: The default printer for the logged-in clinic and password is selected. To select a different printer, either click on the arrow, OR press the → (right arrow) on the keyboard to view the list of printer codes. In our example, the defaulted Printer is HP. This is just an example of a printer name and may or may not be set up on the system.
To select the printer type, click on the code, OR use the ↑ (up) and ↓ (down) arrows to highlight the correct code; then press the [Enter] key to select.
7.1.1.2 Number of Copies: This field defaults to either 0 (zero) or 1. Both print 1 copy. To print more than one copy, enter the number of copies.
7.1.2 Fax/Email:
In addition to printing reports, Intellect provides the capability to export reports to an Excel spreadsheet, Email, Fax, Disk, or Archive. A secondary printer may also be selected, if one is set up, by clicking on the arrow to display the drop-down list.
7.1.3 Select the [Print] button to send the request to the printer (or as a Fax or email).
7.1.4 Select the [Cancel] button to clear the screen and return to the Claim Request For Review screen without saving or printing.
7.2 Click [Clear] to clear all information and return the focus to the <From Date> field without saving.
7.3 Click [Exit] to clear the screen and return the focus to the main Intellect screen without saving.
