
Intellect™
MANAGEMENT MENU OPTIONS

Aging
Misc Aging Report
Aging reports allow accounts receivable to be printed based on several aging criteria. This report shows a system-generated aging report based on several different date selections. Aging reports are run by clinic only.
With this Management Report, Intellect provides the capability to print, export to Email, or Fax.
Effective version 17.06.09, the report includes these changes:
• Insurances with a zero balance (i.e., where the amount in the Total column would be zero) no longer display on the report.
• The report is now sorted according to the Description column instead of the Code column.
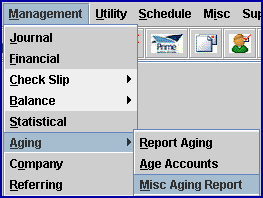
1. To display the print Misc Aging screen in Intellect, go to Management --► Aging --► Misc Aging Report:
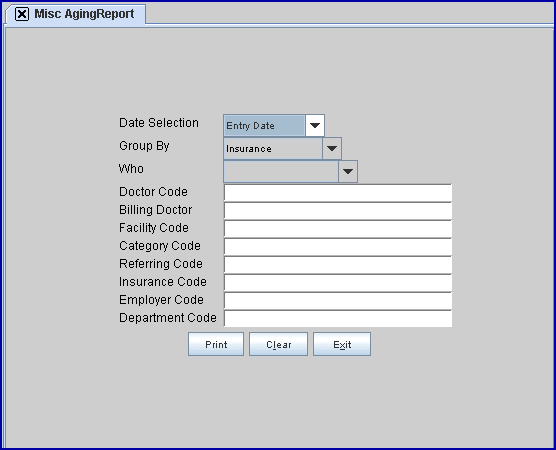
The Misc AgingReport screen displays:
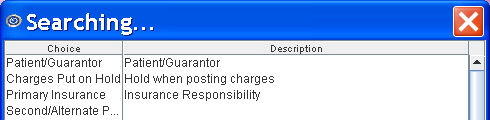
Effective Version 9.12.10 Field Modification. The one- and two-character code choices on the drop-down lists have been replaced with explanatory choices, making the code selection more user-friendly and comprehensive.
Note: The drop-down list descriptions for the code choices have remained the same, allowing correlation between the old and new code choices.
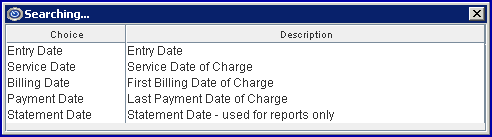
2. Data Selection 
2.1 This field is used to determine the date on which to begin aging. The selected date is defined based on the time the charge was posted; i.e., from the treatment history table.
NOTE: When selecting Insurance Responsibility (formerly P1) from the <Who> drop-down above, do not select Statement Date (formerly G) as a report will not print.
2.2 Accept the default 'Entry Date', OR use the drop-down list to make an alternate selection.
2.3 Click on the field, OR press the [F2] key to display the valid choices.
To view the list of only the codes, click on the arrow. To select, click on the correct code, OR use the ↑ (up) and ↓ (down) arrows to highlight the correct code and then press the [Enter] key to select.
Effective version 9.12.10
All versions prior to 9.12.10

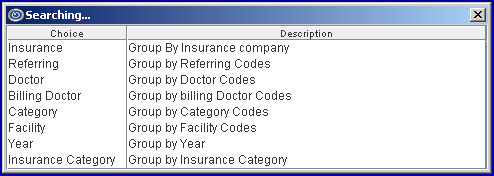
3. Group By 
3.1 Used to select the return format of the results. See Sample Misc Aging Reports based on the <Group By> field.
3.2 Accept the default Insurance OR use the drop-down to make an alternate selection.
NOTE: When grouping by Insurance, Intellect uses the insurance at the time the charge was posted (charge/modify/x).
3.3 Effective Version 9.12.08 - New Option: Year. This option groups the aging as it was at the last date of each year. When payments and adjustments are posted against a prior year DOS, the report balances for prior calendar years do not change. For example:
• In 2008, when a charge for $100.00 was posted and no payments or adjustments were posted, the balance on the report for 2008 is $100.00
• In 2009, if a $75.00 payment was posted, the balance on the report for 2008 ($100.00) is unchanged, and for 2009 it is $25.00
• In 2010, if a $10.00 payment was posted, the report balances for 2008 ($100.00) and 2009 ($25.00) are unchanged and the remaining balance for 2010 is $15.00
3.4 Effective Version 12.12.06 - New Option: Insurance Category. Select this option to group the report based on the Group selected in the <Category> field on Utility --►Insurance --►Insurance.
3.5 Effective version 17.06.09. Select the 'Year' option for this field to write the date in text format in the Description field. See sample report.
3.6 Press the [F2] search key OR click directly on the field to display the valid choices:
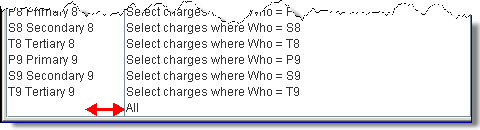
4. Who 
4.1 Select the desired account aging responsibility.
4.2 Accept the 'blank' default OR use the drop-down list to filter by the selected Who type. Partial lists are shown below:
Effective version 12.12.06 - A 'blank' option was added (see below). Select this option to include all of the other options.

Effective version 9.12.10 to 12.12.06
All versions prior to 9.12.10

5. Doctor Code 
5.1 Effective version 19.07.17.
5.2 The report may be generated based on this field.
6. Billing Doctor 
6.1 Effective version 19.07.17.
6.2 The report may be generated based on this field.
7. Facility Code 
7.1 Effective version 19.07.17.
7.2 The report may be generated based on this field.
8. Category Code 
8.1 Effective version 19.07.17.
8.2 The report may be generated based on this field.
9. Referring Code 
9.1 Effective version 19.07.17.
9.2 The report may be generated based on this field.
10. Insurance Code 
10.1 Effective version 19.07.17.
10.2 The report may be generated based on this field.
11. Employer Code 
11.1 Effective version 19.07.17.
11.2 The report may be generated based on this field.
12. Department Code 
12.1 Effective version 19.07.17.
12.2 The report may be generated based on this field.
13. When the information is completely entered, select one of these options:

13.1 Click [Print] OR press [Enter] to display the Print MISC_Aging _ Report dialog box:
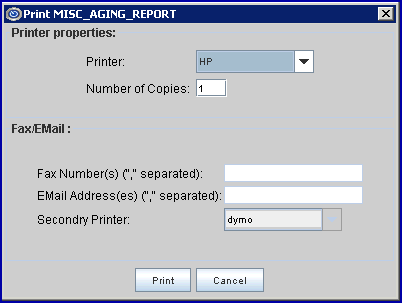
13.1.1 Printer Properties:
13.1.1.1 Printer: The default printer for the logged-in clinic and password is selected. To select a different printer, either click on the arrow, OR press the → (right arrow) on the keyboard to view the list of printer codes. In our example, the defaulted Printer is HP. This is just an example of a printer name and may or may not be set up on the system.
To select the printer type, click on the code, OR use the ↑ (up) and ↓ (down) arrows to highlight the correct code; then press the [Enter] key to select.
13.1.1.2 Number of Copies: This field defaults to either 0 (zero) or 1. Both print 1 copy. To print more than one copy, enter the number of copies.
13.1.2 Fax/Email:
In addition to printing reports, Intellect provides the capability to export reports to Email, Fax, Disk, or Archive. A secondary printer may also be selected, if one is set up, by clicking on the arrow to display the drop-down list.
13.1.3 Select the [Print] button to send the request to the printer (or as a Fax or email).
13.1.4 Select the [Cancel] button to clear the screen and return to the <Who> field without saving or printing.
13.2 Click [Clear] to clear all information and return the focus to the <Who> field without saving.
13.3 Click [Exit] to clear the screen and return the focus to the main Intellect screen without saving.
Sample Misc Aging Reports based on the <Group By> field.