
Intellect™
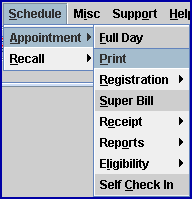
SCHEDULE MENU OPTIONS

Appointment
This option is used to print registration forms, super bills, sign-in sheets, and several different types of appointment schedules for one or more dates for one or more providers. There is also a Print Doctor's Appointment option within the Appointment Scheduler used to print a single provider's schedule for a selected day.
See details for printing Provider's appointment schedules.
Video Available: Click Appointment Print to access the link. Depending on the system set up, the media player may need to be activated. Speakers need to be attached to the workstation to hear the instructions.
Note: To view the videos, log-in through the www.primeclinical.com website. Current support is required.
Updates:
Effective version 9.12.10 New option - An optional 'Language' column is now available for most of the appointment lists printed from Schedule --►Appointment --►Print. This optional column lists the language spoken by a patient. To have the 'Language' column added to any of the appointment lists you print, call PCS support for a quote.
Effective version 9.12.01 New option - It is now possible to have a referring phone number and/or a fax number on the appointment report. To have this option, please contact Prime Clinical.
1. To print Providers' appointment schedules and related reports in Intellect, go to Schedule --► Appointment --► Print
The PRINT APPOINTMENT screen displays:
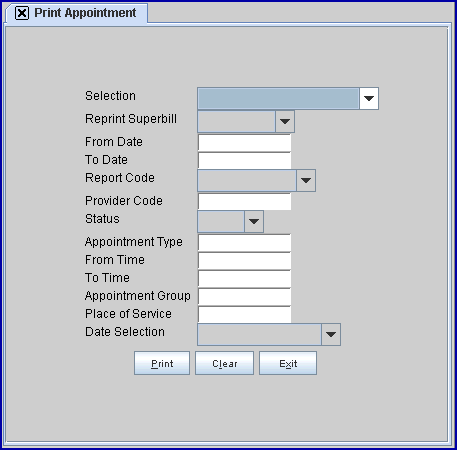
2.1 Use the drop-down list to make a selection for printing. There is no default and a selection must be made.
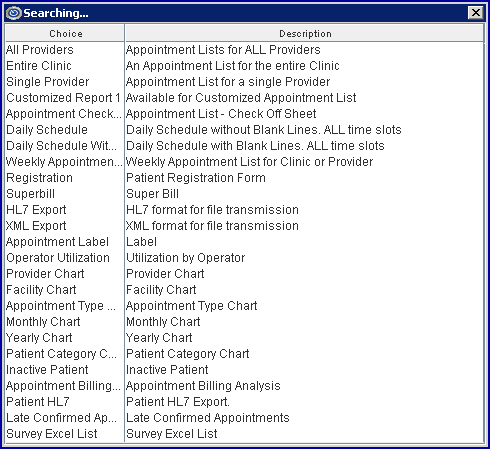
2.2 Press the [F2] search key OR click in the <Selection> field to display these valid choices:
Effective version 9.12.07 - Modification: The single-character code choices on the drop-down list were replaced with complete word choices for ease of selection. The values previously set up in the task manager still work with the complete word choices.
Brief Summary of Options
In the following brief summaries, the former single-character description appears in parenthesis behind the complete word choice added in version 9.12.07. Please contact PCS support for additional information.
Note: For the Appointment Listing reports, there is an optional column titled 'Treating Provider'. Because of limited space, to have the field printed on the appointment schedule, a column needs to be removed.
2.2.1 All Providers (A): Prints a schedule of appointments for ALL providers, but each individual provider is listed separately. Results are based on any one, or combination, of filters requested, with the exception of limiting by providers. This option is sorted by date and then appointment times.
2.2.2 Entire Clinic (C): Prints a schedule of appointments for the entire clinic, sorted by date and then appointment times. Results are based on any one, or combination, of filters requested. If a user wishes to filter by several providers in a clinic view, this is the correct option.
2.2.3 Single Provider (P): Prints schedules for individual provider(s) based on the Utility --► Provider <Provider Code> entered and on any one, or combination, of other filters requested. The information is sorted by date and then appointment times.
In software versions prior to 14.03.20, the patient’s cell phone number could display on the Single Provider report. Effective version 14.03.20, it is now possible to display either the patients’ cell phone number or the guarantor’s cell phone number on the Single Provider report. The patient’s cell phone number displays by default. To have the guarantor’s cell phone number to display, please contact PCS support.
2.2.4 Customized Report 1: Available for a customized appointment list. Contact Prime Clinical Systems for more information.
2.2.5 Appointment Check List (S): Prints an appointment check-off list for scheduled patients. Results are based on any one, or combination, of filters requested. This option is sorted by appointment time. It is recommended to print this sheet for a one-day period only as results do not show the date next to the time.
2.2.6 Daily Schedule (Y): Prints a daily schedule showing all time slots. This option only accepts one day to print and returns individual pages per requested provider. If no provider is specified, all providers' schedules are printed in a contiguous format, grouped by provider.
2.2.7 Daily Schedule With Blank Lines (X): Prints a daily schedule showing all time slots with blank spaces between slots. This option only accepts one day to print and returns individual pages per requested provider. If no provider is specified, all providers' schedules are printed in a contiguous format, but grouped by provider. Effective version 9.12.20 - New Optional Column: Contact PCS to have a Billing Doctor column added to this report.
2.2.8 Weekly Appointment List (W): Prints an Appointment Weekly List with columns for each day, organized by times and Appointment Type.
2.2.9 Registration (R): Prints Patient Registration forms for all scheduled patients based on input criteria such as the Appointment Schedule <From/To Date>, or <Provider> fields.
2.2.10 Superbill (T): Prints selected Superbills for all scheduled patients based on input criteria such as the Appointment Schedule <From/To Date> fields.
2.2.11 HL7 Export (H): Creates an HL7 file for all appointments based on selected criteria such as <From Date>/<To Date>, <Provider Code> or <Place of Service>. This file includes SIU (Scheduling Information Unsolicited) messages and may be used to export scheduling information to a third-party.
2.2.12 XML Export (M): Creates an XML file for all appointments based on selected criteria such as <From Date>/<To Date>, <Provider Code> or <Place of Service>. This file includes SIU (Scheduling Information Unsolicited) messages and may be used to export scheduling information to a third-party.
2.2.13 Appointment Reminder (B): Prints a report based on the Appointment screen confirmation. Each type of confirmation (confirmed, cancelled, rescheduled, etc.) is displayed on a separate page. The report was intended to be used with CallSTAFF, but it can also be used with manually-marked appointments.
2.2.14 Appointment Label (L): Prints patient mailing labels based on the Appointment Schedule <From/To Date> fields. Effective version 9.12.07 New Feature: The <Provider Code> condition applies to Labels.
2.2.15 Customized Report 2 (U): Used for custom options. Contact Prime Clinical Systems for more information.
For reports 2.2.16 - 2.2.26:
• The report may be limited by <From/To Date>, <Provider Code>, and/or <Place of Service>.
• Adobe Acrobat Viewer must be used to view or print these charts. Make sure the correct path is entered in the <Acrobat Viewer Path> field of Utility --►Tools --►Configuration. After adding the path, Intellect needs to be shut down and then re-opened.
2.2.16 Operator Utilization: Effective version 12.12.06. Displays a bar graph showing the patient count where the patient count represents individual patients, not scheduled time slots.
2.2.17 Provider Chart: Effective version 12.12.06. Displays a bar graph showing the patient count where the patient count represents individual patients, not scheduled time slots.
2.2.18 Facility Chart: Effective version 12.12.06. Displays a bar graph showing the patient count where the patient count represents individual patients, not scheduled time slots.
2.2.19 Appointment Type Chart: Effective version 12.12.06. Displays a bar graph showing the patient count where the patient count represents individual patients, not scheduled time slots.
2.2.20 Monthly Chart: Effective version 12.12.06. Displays a bar graph showing the patient count where the patient count represents individual patients, not scheduled time slots.
2.2.21 Yearly Chart: Effective version 12.12.06. Displays a bar graph showing the patient count where the patient count represents individual patients, not scheduled time slots.
2.2.22 Patient Category Chart: Effective version 12.12.06. Displays a bar graph showing the patient count where the patient count represents individual patients, not scheduled time slots.
2.2.23 Inactive Patient: Effective version 12.12.06. Displays a list of patients who had an appointment within the <From/To Date> parameters but who have not scheduled an appointment after TODAY. This could be used to determine if a patient has scheduled a follow-up appointment or an annual appointment.
2.2.24 Appointment Billing Analysis: Based on the date range, this report looks for patients with charges that match the date range and the appointment doctor where the appointment doctor equals the rendering doctor. For appointments that match the posted charge, Intellect displays the charge detail on the report; i.e., provider, procedure, modifier, and amount billed. This could be used to verify charges posted for all active appointments.
2.2.25 Patient HL7 Export: This report does not display. Once HL7 is set up for both appointments and patients, patient information is sent through the HL7 settings of the server. For questions regarding HL7 set up, please contact PCS Support.
2.2.26 Late Confirmed Appointments: Effective version 17.08.16. Selecting this option generates a Cancelled Appointment List for patient appointments where the <Confirmation> field on the Modify Appointment screen is equal to 'Canceled' or 'Patient Canceled'. The fields on the Print Appointment screen that apply to this report are <From Date>, <To Date>, <Provider Code>, and <Place of Service>.
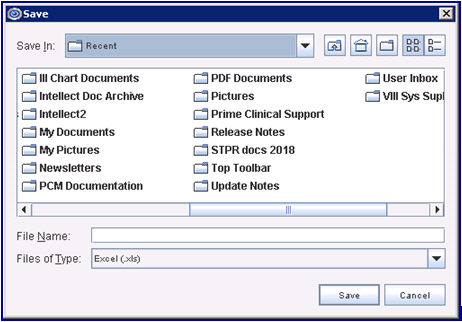
2.2.27 Survey Excel List: Effective version 18.07.18. Selecting this option generates a Patient Survey report, which is sent to an Excel file for review by selecting 'Excel' in the <Printer> field on the printer dialog box. When the [Print] box on the printer dialog box is clicked, a box opens (see sample below) where users can select where the report should be saved. The options displayed in the box are dependent on the user's computer.
The fields on the Print Appointment screen that apply to this report are <From Date>, <To Date>, <Provider Code>, <Appointment Type>, <Appointment Group>, and <Place of Service>.
3. Reprint Superbill 
3.1 This field is used only when the <Selection> field (above) equals 'Superbill.'
3.2 This field is dependent on the set up in Appointment Type or Provider.
3.3 Select from the drop-down list; there is no default.
Version 9.12.07 Modification: The single-character code choices on the drop-down lists for the <Reprint Superbill> field were replaced with complete word choices, making the appointment print parameter selection easier.
3.3.1 Please note that the values that have been previously set up in the task manager still work.
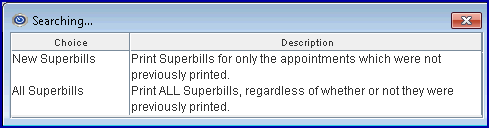
3.3.2 For your reference, New Superbills replaces U; All Superbills replaces A.
3.4 Press the [F2] search key OR click in the <Reprint Superbill> field to display these valid choices and descriptions:
4.1 For all selection options, type the desired beginning calendar date for the printing
4.2 This field is mandatory. It defaults to blank.
5. To Date 
5.1 This field is used for all <Selection> options EXCEPT Daily Schedule (Y) or Daily Schedule with Blank Lines (X). Type the desired ending date for the printing.
5.2 This field is mandatory EXCEPT when Daily Schedule (Y) or Daily Schedule with Blank Lines (X) are chosen in the <Selection> field, which causes the <To Date> field to be bypassed and disabled. It defaults to blank.
6. Report Code 
6.1 Currently disabled.
7. Provider Code 
7.1 This field allows the scheduler to either order the requested print selection for a specific provider by entering the Utility --► Provider <Provider Code> OR leaving it blank to request all providers.
7.2 This field accepts multiple values:
• separated by commas with no spaces:

• a range of codes entered with a hyphen and no spaces:

• an asterisk * to return all Providers starting with the portion of the code entered prior to the *. For example, 1* prints all Providers whose code begins with 1:

7.3 This field is optional for all <Selection> types EXCEPT for All Provider (A) where it has no effect and Single Provider (P) where it is recommended to enter a Provider Code, otherwise this returns the same as selection All Provider (A).
7.4 Users may use [F2] to search for a <Provider Code>.
8. Status 
8.1 This field allows the scheduler to order the requested print selection for a specific scheduling transaction entry (the same as a patient's Appointment History screen’s Status entry).
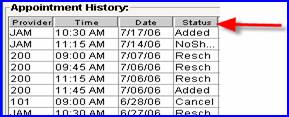
8.2 The Status entry is created by Intellect when a patient's appointment has been Added, Modified, Deleted, Rescheduled, or Canceled, or flagged as a No Show.
8.3 When this field is left blank, the print request only includes appointments where the Status is Added or Modify.
8.4 Select All to print all appointments which have been scheduled for that date, including the Reschedule, Postponed, Cancelled, or Deleted appointments. To have the status added to your appointment list, call our support department.
8.5 Enter Added, Modify, ReSch, Cancel, Delete, or NoShow to print a listing for ONLY those patient’s with that Status. For example, entering Cancel orders the requested print selection for patients whose appointment was canceled, providing the scheduler a list to work with in order to contact and reschedule those patients.
9. Appointment Type 
9.1 For all <Selection> field options, this field allows the scheduler to order the requested print selection for a specific Appointment <Type>, OR bypass this field to select all appointment types.
For example, the scheduler may want to print registration forms (select Registration) for ONLY new patients (new patient Appointment <Type> NP) in order to give it to the patient upon his/her arrival for completion of name, address, insurance information, etc.
9.2 This field accepts multiple values:
• separated by commas with no spaces:

• a range of codes entered with a hyphen and no spaces:

• an asterisk * to return all Appointment Types starting with the portion of the code entered prior to the *. For example, L* prints all Appointment Types whose code begins with L:

10.1 This field allows the scheduler to enter a time to order the requested print selection for ONLY patients scheduled From the requested time.
10.2 To order the requested print selection for the full day, bypass this field OR type the beginning time to print.
11.1 This field allows the scheduler to enter a time to order the requested print selection for ONLY patients scheduled To the requested time.
11.2 To order the requested print selection for the full day, bypass this field OR type the ending time to print.
12.1 This field allows the scheduler to enter an Appointment Group number to order the requested print selection for ONLY patients scheduled in the requested group.
12.2 To order the requested print selection for the all groups, bypass this field OR type the Appointment Group number to print.
13.1 This field allows the scheduler to enter a Utility --► Facility <Facility Code> to order the requested print selection for ONLY patients scheduled at the requested facility.
13.2 To order the requested print selection for the all facilities, bypass this field OR type the <Facility Code> to print.
13.3 OR, use [F2] to search for a Facility Code.
14. Date Selection 
14.1 Effective version 15.06.10 - New field
14.2 This field allows appointment reports to be generated either by appointment date or by the date the appointment was made.
14.3 Use the drop-down list to make a selection:
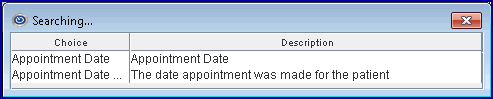
14.3.1 Appointment Date: When either this option or the ‘blank’ option are selected, the report includes all appointments that will take place within the date range of the <From Date>/<To Date> fields.
14.3.2 Appointment Date Made: When selected, the report includes all appointments that were scheduled during the date range of the <From Date>/<To Date> fields.
15. When the information is completely entered, select one of these options:

15.1 Select [Print] to display a printer dialog box:

15.1.1 Printer Properties
15.1.1.1 Printer: The default printer for the logged-in clinic and password is selected. To select a different printer, either click on the arrow, OR press the → (right arrow) on the keyboard to view the list of printer codes. In our example, the defaulted Printer is HP. This is just an example of a printer name and may or may not be set up on the system.
To select the printer type, click on the code, OR use the ↑ (up) and ↓ (down) arrows to highlight the correct code; then press the [Enter] key to select.
NOTE: Users who select 'Survey Excel List' in the <Selection> field must select 'Excel' in this field.
NOTE: If DISK is selected from the drop-down list and the schedule will not open on an iPhone, click here for troubleshooting information.
15.1.1.2 Number of Copies: This field defaults to either 0 (zero) or 1. Both print 1 copy. To print more than one copy, enter the number of copies.
15.1.2 Fax/Email:
In addition to printing reports, Intellect provides the capability to export reports to an Excel spreadsheet, Email, Fax, Disk, or Archive. A secondary printer may also be selected, if one is set up, by clicking on the arrow to display the drop-down list.
15.1.3 Select the [Print] button to send the request to the printer (or as a Fax or email).
15.1.4 Select the [Cancel] button to clear the screen and return to the Print Appointment screen without saving or printing.
15.2 Click [Clear] to clear all information and return the focus to the <Selection> field without saving.
15.3 Click [Exit] to clear the screen and return the focus to the main Intellect screen without saving.
Sample Schedule Appointment Print reports


