Intellect™
SCHEDULE MENU OPTIONS

Appointment
Reports
Appointment Statistical
This option displays reports of scheduling activity; i.e., appointments added, cancelled, no shows, etc.
1. To run a schedule activity report in Intellect, go to Schedule --►Appointment --►Reports --►Appointment Statistical:
The Print Appointment Statistical screen opens:
2. Report Options 
2.1 Version 9.12.10 Modification. The former single-character code choices on the drop-down list were replaced with complete word choices to make the code selection easier. The new option of Statistical by Clinic replaces option 'C,' Statistical by Provider replaces option 'P.'
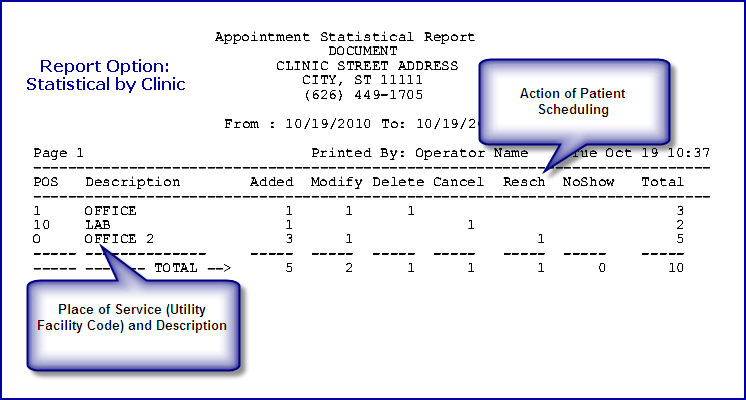
2.2 Select 'Statistical by Clinic' to get a report based on clinic, OR select 'Statistical by Provider' to get a report based on provider.
2.3 The default is 'Statistical by Clinic.'
3. Provider Code 
3.1 This field only filters results when 'Statistical by Provider' (formerly option 'P') is selected in the <Report Options> field.
3.2 To filter the results based on a specific Provider, type the Utility --► Provider --►Provider <Provider Code> or leave blank to return all providers with scheduling.
3.3 Each provider will have his/her own report.
3.4 This field does not accept multiple entries.
4. From Date 
4.1 Type the first date to include in the report’s date range.
4.2 This field defaults to the current calendar date if left blank.
5. To Date 
5.1 Type the last date to include in the report’s date range.
5.2 This field defaults to the current calendar date if left blank.
6. Date Selection 
6.1 Version 9.12.10 New field. This field was added to further refine the report. In prior versions, the report selected the appointments within the date range entered based on the calendar date of the appointment. It provides the option to select whether the date range should be the calendar date of the appointment OR the calendar date the appointment was scheduled.
6.2 Select 'Appointment Date' to get a report based on the actual date of the appointment, OR select 'Appointment Date Made' to get a report based on the date the appointment was made for the patient.

7. When the information is completely entered, select one of these options:

7.1 Select [Print] to display a printer dialog box:
7.1.1 Printer Properties:
7.1.1.1 Printer: The default printer for the logged-in clinic and password is selected. To select a different printer, either click on the arrow, OR press the → (right arrow) on the keyboard to view the list of printer codes. In our example, the defaulted Printer is HP. This is just an example of a printer name and may or may not be set up on the system.
To select the printer type, click on the code, OR use the ↑ (up) and ↓ (down) arrows to highlight the correct code; then press the [Enter] key to select.
7.1.1.2 Number of Copies: This field defaults to either 0 (zero) or 1. Both print 1 copy. To print more than one copy, enter the number of copies.
7.1.2 Fax/Email:
In addition to printing reports, Intellect provides the capability to export reports to Email, Fax, Disk, or Archive. A secondary printer may also be selected, if you have one set up, by clicking on the arrow to display the drop-down list. This report is NOT programmed for Excel import.
7.1.3 Select the [Print] button to send the request to the printer (or as a Fax or email).
7.1.4 Select the [Cancel] button to clear the screen and return to the Print Appointment Statistical screen without saving or printing.
7.2 Click [Clear] to clear all information and return the focus to the <Report Option> field without saving.
7.3 Click [Exit] to clear the screen and return the focus to the main Intellect screen without saving.
SAMPLE REPORTS