
Intellect™
SCHEDULE MENU OPTIONS

Appointment
Superbill
This option is used to print super bills and/or registration forms one account at a time. There is a Print Super Bill option within the Appointment Schedule, but it is limited to a single form. This option is useful for a new patient’s first appointment, allowing the printing of a registration form and a Super bill at the same time. The forms that are available to print may be set as desired.
PCM users only: SuperBill forms generated in Intellect may include a barcode. These forms may be printed in Intellect and then auto-scanned into Patient Chart Manager (PCM) via the barcode. To include a barcode on the Superbill, open the Superbill in Report Designer, select the Bar Code component (from the left side) and place it on the Superbill where it should print, dragging it so the field has enough characters for the barcode. The barcode properties need to look like this:
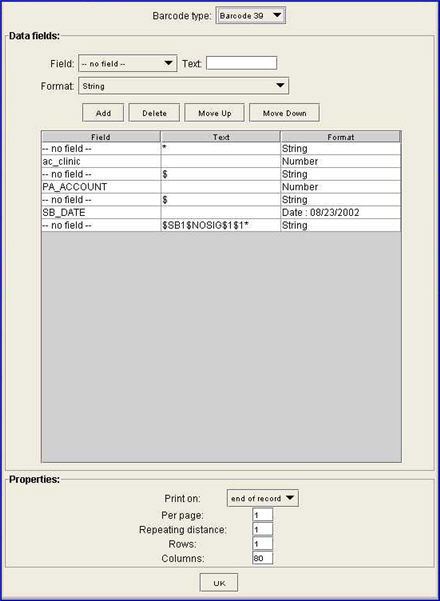
A code also needs to be set up in PCAP for the barcode. This is done in Utility --► Set Up --► Printer --► Capability --►Add.
For additional information on using Report Designer, see Utility --► Tools --► Report Designer --► Scanning and Programming Forms or Writing Custom Reports.
Most of the set up is in Intellect. The only set up in PCM is to have a Fax/Scan doc with a code that matches the form code set up in Intellect for the super bill, which is how PCM determines the doc name and chart tab.
1. To print Super Bills in Intellect, go to Schedule --► Appointment --► Super Bill
The Print SUPERBILL MENU screen opens:
2. Date 
2.1 Type the date of the desired Super Bill.
2.2 If left blank, Intellect completes this field with the current calendar date.
3. Account 
3.1 Type the patient’s account number.
3.2 The field is mandatory and must be completed. If left blank, an error message displays:
Click [Ok] to return the focus to the <Account> field.
3.3 Enter the account number, OR type up to 6 characters of the last name and press the [F2] key. To select the account from the list, either highlight the record, press the [Enter] key, OR double-click on the record.
4. Doctor 
4.1 Type the attending physician’s Utility --►Provider --►Provider <Provider Code>.
4.2 This field is mandatory and must be completed. If left blank, an error message displays:
Click [Ok] to return the focus to the <Doctor> field.
4.3 Enter the Utility --►Provider --►Provider <Provider Code>, OR type up to 6 characters of the last name and press the [F2] key. To select the provider from the list, either highlight the record, press the [Enter] key, OR double-click on the record.
5. SuperBill Code 
5.1 This field defaults any valid code set for this Utility --►Provider --►Provider <Super Bill Code>.
5.2 This field must have a value. Accept the default, OR use the drop-down list to make a selection.
6. Additional Form 
6.1 If desired, select an additional form to print.
7. After entering the information, select one of these options:

7.1 Select [Print] to display a printer dialog box:
7.1.1 Printer Properties:
7.1.1.1 Printer: The default printer for the logged-in clinic and password is selected. To select a different printer, either click on the arrow, OR press the → (right arrow) on the keyboard to view the list of printer codes. In our example, the defaulted Printer is HP. This is just an example of a printer name and may or may not be set up on the system.
To select the printer type, click on the code, OR use the ↑ (up) and ↓ (down) arrows to highlight the correct code; then press the [Enter] key to select.
7.1.1.2 Number of Copies: This field defaults to either 0 (zero) or 1. Both print 1 copy. To print more than one copy, enter the number of copies.
7.1.2 Fax/Email:
In addition to printing reports, Intellect provides the capability to export reports to an Excel spreadsheet, Email, Fax, Disk, or Archive. A secondary printer may also be selected, if one is set up, by clicking on the arrow to display the drop-down list.
7.1.3 Select the [Print] button to send the request to the printer (or as a Fax or email).
7.1.4 Select the [Cancel] button to clear the screen and return to the Print SUPERBILL MENU screen without saving or printing.
7.2 Select [Clear] to remove any information already entered in the <Date> field without saving.
7.3 Select [Exit] to clear the screen and return the user to the main Intellect screen without saving.