Intellect™
MANAGEMENT MENU OPTIONS

Aging
Previous Aging
Effective software version 18.10.02, a Table was added to the Intellect program which holds the Aging Totals at the time the month is closed. This table makes it possible for users to reprint the Aging report for the TOTAL aging amounts up to the month-end of the chosen month in the <Aging Date> field. With the focus in the <Aging Date> field, press [F2] to display the available months, and then click on the appropriate month-end date.
Note1: These totals are not just for the chosen month; they are the ‘entire’ AR in aged format up to the chosen month-end date in the <Aging Date> field.
Note2: This report is not retroactive.
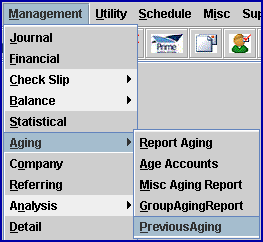
1. To reprint an Aging report, go to Management --► Aging --► Previous Aging:

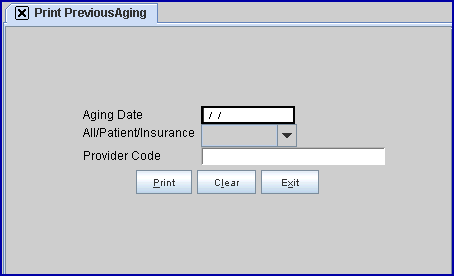
The Print PreviousAging screen opens:

2.1 This field allows users to select a previously-generated aging report.
2.2 With the focus in the <Aging Date> field, press [F2] to display the available months, and then click on the appropriate month-end date. Note: These totals are not just for the chosen month; they are the ‘entire’ AR in aged format up to the chosen month-end date in the <Aging Date> field.
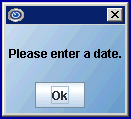
2.3 This field must be filled. If [Enter] is pressed without making a date selection, this message displays:

Click [Ok] to return to the <Aging Date> field.
3. All/Patient/Insurance 
3.1 This field determines whether the report data is pulled from the patient demographics, insurance information, or from the charges history.
3.2 Select the data location from the drop-down list.
3.3 To view the list of codes with descriptions, press the [F2] key OR click directly on the field. To view the list of only the codes, click on the arrow. To select, double-click on the correct code, OR use the ↑ (up) and ↓ (down) arrows to highlight the correct code, and then press the [Enter] key to select.

3.3.1 Select 'Total Balance' to pull the report data from the charge history at the time of charge posting.
3.3.2 Select 'Insurance' to pull the report data from the insurance information at the time of posting.
3.3.3 Select 'Patient' to pull the report data from the patient demographics at the time of posting.
4. Provider Code 
4.1 This field limits the report results by specific provider(s).
4.2 Press [Enter] to bypass this field to request ALL providers, OR to request a specific provider type its Utility --►Provider --►Provider <Provider Code>.
4.3 This field accepts multiple values:
• provider codes separated by commas with no space:

• a range of codes entered with a hyphen and no spaces:

• an asterisk * to return all providers starting with the portion of the code entered prior to the *. For example, 1* prints all providers whose code begins with 1.

• provider codes separated by commas with no spaces:
5. When the information is completely entered, select one of these options:

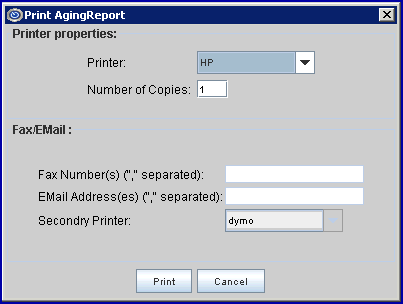
5.1 Click [Print] or press [Enter] to display the Print Aging Report dialog box:

5.1.1 Printer Properties:
5.1.1.1 Printer: The default printer for the logged-in clinic and password is selected. To select a different printer, either click on the arrow, OR press the → (right arrow) on the keyboard to view the list of printer codes. In our example, the defaulted Printer is HP. This is just an example of a printer name and may or may not be set up on the system.
To select the printer type, click on the code, OR use the ↑ (up) and ↓ (down) arrows to highlight the correct code; then press the [Enter] key to select.
5.1.1.2 Number of Copies: This field defaults to either 0 (zero) or 1. Both print 1 copy. To print more than one copy, enter the number of copies.
5.1.2 Fax/Email:
In addition to printing reports, Intellect provides the capability to export reports to Email, Fax, Disk, or Archive. A secondary printer may also be selected, if one is set up, by clicking on the arrow to display the drop-down list. The Procedure Analysis by Clinic and the Insurance Analysis by Clinic reports may also be exported to Excel.
5.1.3 Select the [Print] button to send a request to the printer (or as a Fax or email).
5.1.4 Select the [Cancel] button to clear the screen and return to the <Aging Date> field without saving or printing.
5.2 Click [Clear] to clear all information and return the focus to <Aging Date> field without saving.
5.3 Click [Exit] to clear the screen and return the focus to the main Intellect screen without saving.