Intellect™
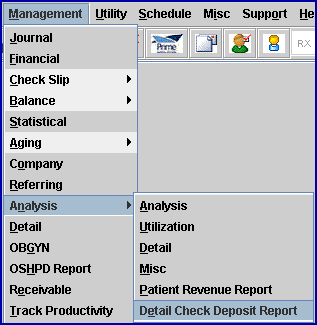
MANAGEMENT MENU OPTIONS

Analysis
Detail Check Deposit Report
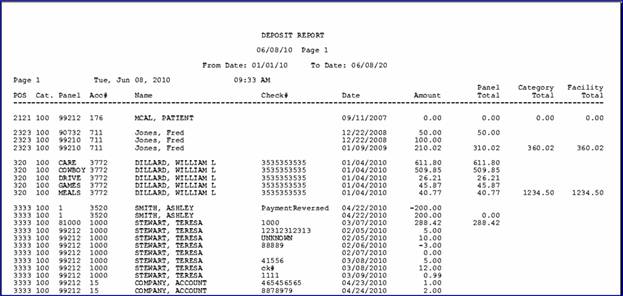
The Detail Check Deposit Report includes the place of service (POS), category, panel, account number, name, check number, date, amount, panel total, category total, and facility total. The information on the report can be limited by entering specific dates, insurance codes, category codes, facility codes, batch numbers, operators, or panel numbers.
1. To run a Detail Check Deposit Report in Intellect, go to Management --► Analysis --► Detail Check Deposit Report.
The Print Check Deposit Report screen displays:

2. From Date 
2.1 Type the beginning entry date for the data to include in this report.
2.2 If the [Tab], [Enter], or ↓(down) arrow keys are used to move through the fields on this screen, today's date is entered in the <From Date> field.
3. To Date 
3.1 Type the beginning entry date for the data to include in this report.
3.2 If the [Tab], [Enter], or ↓ (down) arrow keys are used to move through the fields on this screen, today's date is entered in the <To Date> field.
4. Insurance 
4.1 To request ALL insurance companies, press [Enter] to bypass this field.
4.2 To limit the results, enter a specific patient <Insurance Co. Code> as set up in Utility --► Insurance --► Insurance.
4.3 This field accepts multiple Insurance Co. Codes:
• separated by commas with no spaces:

• an asterisk * to return all Insurance Co. Codes starting with the portion of the code entered prior to the *. For example, M* prints all Insurance Co. Codes that begin with M:

5. Category 
5.1 To request ALL categories, press [Enter] to bypass this field.
5.2 To limit the results, enter a specific <Category Code> as set up in Utility --► Category.
5.3 This field accepts multiple Category Codes:
• separated by commas with no spaces:

• an asterisk * to return all Category Codes starting with the portion of the code entered prior to the *. For example, M* prints all Category Codes that begin with M:

6. Facility 
6.1 To request ALL facilities, press [Enter] to bypass this field.
6.2 To limit the results, enter a specific <Facility Code> as set up in Utility --►Facility.
6.3 This field accepts multiple Facility Codes:
• separated by commas with no spaces:

• an asterisk * to return all Facility Codes starting with the portion of the code entered prior to the *. For example, 2* prints all Facility Codes that begin with 2:

7. Batch 
7.1 To request ALL Batch numbers, press [Enter] to bypass this field.
7.2 To limit the results, enter a specific Batch number.
8. Operator 
8.1 To print this report for a specific operator, type their <User Number> as set up in Utility --►Set Up --►Security --►Login Users.
9. Panel 
9.1 To request ALL Panel Codes, press [Enter] to bypass this field.
9.2 To limit the results, enter a specific <Panel Code> as set up in Utility --►Procedure --►Procedure.
10. When the information is completely entered, select one of these options:

10.1 Click on the [Print] button OR press [Enter] after the <Panel> field to display the Print dialog box:
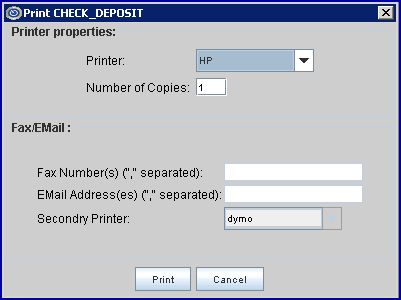
10.1.1 Printer Properties:
10.1.1.1 Printer: The default printer for the logged-in clinic and password is selected. To select a different printer, either click on the arrow, OR press the → (right arrow) on the keyboard to view the list of printer codes. In our example, the defaulted Printer is HP. This is just an example of a printer name and may or may not be set up on the system.
To select the printer type, click on the code, OR use the ↑ (up) and ↓ (down) arrows to highlight the correct code; then press the [Enter] key to select.
10.1.1.2 Number of Copies: This field defaults to either 0 (zero) or 1. Both print 1 copy. To print more than one copy, enter the number of copies.
10.1.2 Fax/Email:
In addition to printing reports, Intellect provides the capability to export reports to Email, Fax, Disk, or Archive. A secondary printer may also be selected, if one is set up, by clicking on the arrow to display the drop-down list.
10.1.3 Select the [Print] button to send the request to the printer (or as a Fax or email). If no values are entered in the fields of this screen, an error message displays:

Click on [OK] to return to the <From Date> field.
10.1.4 Select the [Cancel] button to clear the screen and return to the <From Date> field without saving or printing.
10.2 Click on the [Clear] button to return the focus to the <Option> field.
10.3 Click on the [Exit] button to return to Intellect's main menu.
A sample of the Detail Check Deposit Report: