
Intellect™
MANAGEMENT MENU OPTIONS

Journal
Journal
The figures on the Journal are updated each time the date is changed *. This report provides a listing of transactions posted during the day including charges, deleted/modified charges, payments, and adjustments. It also provides an indicator of new patient activity. The Journal report should be run each time the date is changed and is equivalent to a Day Sheet referred to in most physician offices. Any of these options may be run at any time for the purpose of gathering specific information which has occurred within a given time frame. The Journal is part of the End of Day Procedures. Note: When balancing the day, 'All Provider Journal' (formerly 'A') must be selected for the <Option> field to be sure all transactions have been pulled.
*Please note: When requesting 'All Provider Journal' or 'Provider Journal' reports (formerly options A and P) for a range of dates ending with the current clinic date, the return results do NOT include the clinic date. To return the current clinic date results, run a separate report with only the clinic date entered.
With this Management Report, Intellect provides the capability to print, export to Excel* spreadsheet, Email, or Fax.
* Note: Excel reports may vary from Intellect reports in information grouping, identifying headers, breaks, and subtotals.
Please note that with all management reports, the patient's Registration --►Regular --►Patient <Category> and Insurance at the time of posting from the Charge screen is associated with that item forever.
1. To display the Journal Screen in Intellect, go to Management --► Journal
![]()
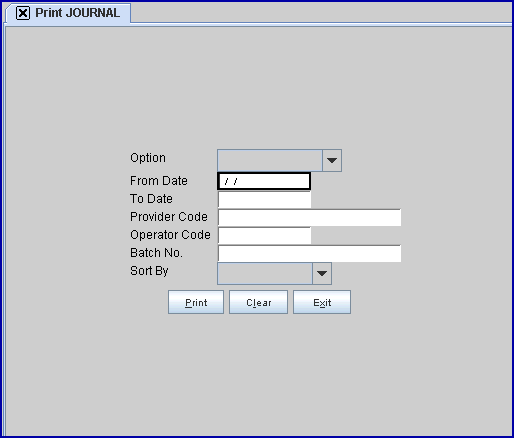
The Print JOURNAL screen opens:
Effective Version 9.12.10 Field Modification. The one- and two-character code choices on the drop-down lists have been replaced with explanatory choices, making the code selection more user-friendly and comprehensive.
Note: The drop-down list descriptions for the code choices have remained the same, allowing correlation between the old and new code choices.
2.1 Select the type of report from the drop-down list.
2.2 There is no default and a selection must be made.
2.3 Click on the field, OR press the [F2] key to display the valid choices.
To view the list of only the codes, click on the arrow. To select, click on the correct code, OR use the ↑ (up) and ↓ (down) arrows to highlight the correct code and then press the [Enter] key to select.
Effective version 9.12.10
All versions prior to 9.12.10
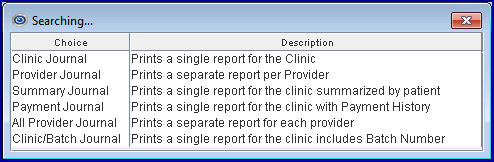
This is a brief summary of each option.
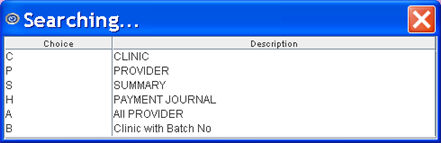
Note: The old one-character code choice is shown in parenthesis behind the new explanatory code choice.
2.3.1 Clinic Journal (C): Prints one report for the entire clinic.
2.3.2 Provider Journal (P): Prints a report for the specified provider.
2.3.3 Summary Journal (S): Prints a report summarizing all patient activity on one line for each patient.
2.3.4 Payment Journal (H): Prints a historical payment report which details the payment history of a procedure. The information is pulled based on the entry date of the payment, detailing the charge the payment was posted to.
2.3.5 All Provider Journal (A): Prints a separate report for ALL providers that have activity in the specified period. Note: When balancing the day, 'All Provider Journal' must be selected to be sure all transactions have been pulled.
2.3.6 Clinic/Batch Journal (B): Version 9.12.07 - New option - This option can now be exported to Excel. It prints a report for the entire clinic with the batch number(s).
3. From Date 
3.1 Type the beginning entry date for the data to include in this report.
3.2 The current Clinic date appears as a default.
3.3 To accept this date, press [Enter] OR clear the field and type the desired date.
*Please note: When requesting the 'All Provider Journal' or 'Provider Journal' reports (formerly options A and P) for a range of dates ending with the current clinic date, the return results do NOT include the clinic date. To return the current clinic date results, run a separate report with only the clinic date entered.
4. To Date 
4.1 Type the last entry date for the data to include in this report.
4.2 The current Clinic date appears as a default.
4.3 To accept this date, press [Enter] OR type the desired date.
5. Provider Code 
5.1 If 'Clinic Journal' (formerly C) is selected for the <Option> field, this field is disabled. Type a provider code if desired.
5.2 When 'Provider Journal' (formerly P) is selected for the <Option> field, a separate journal prints for each provider if the <Provider Code> is left blank.
6. Operator Code 
6.1 To print this report for a specific operator, enter the operators Utility --►Set Up --► Security --►Login Users <User Number>.
7. Batch No. 
7.1 To print this report for a specific batch, type that batch number here.
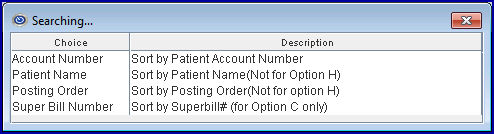
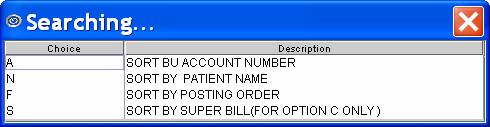
8. Sort By 
8.1 Select the sorting order from the drop-down list.
8.2 If no sort order is selected, the default is to sort by patient account number.
8.3 Click on the field, OR press the [F2] key to display the valid choices.
To view the list of only the codes, click on the arrow. To select, click on the correct code, OR use the ↑ (up) and ↓ (down) arrows to highlight the correct code and then press the [Enter] key to select.
Effective version 9.12.10
All versions prior to 9.12.10
9. When the information is completely entered, select one of these options:

9.1 Click the [Print] button OR press [Enter] to display the Print Journal dialog box:
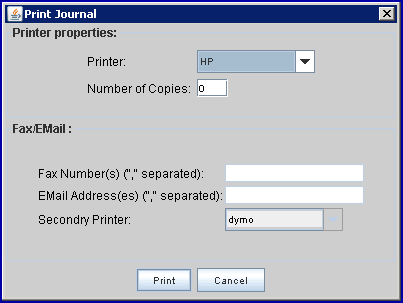
9.1.1 Printer Properties:
9.1.1.1 Printer: The default printer for the logged-in clinic and password is selected. To select a different printer, either click on the arrow, OR press the → (right arrow) on the keyboard to view the list of printer codes. In our example, the defaulted Printer is HP. This is just an example of a printer name and may or may not be set up on the system.
To select the printer type, click on the code, OR use the ↑ (up) and ↓ (down) arrows to highlight the correct code; then press the [Enter] key to select.
9.1.1.2 Number of Copies: This field defaults to either 0 (zero) or 1. Both print 1 copy. To print more than one copy, enter the number of copies.
9.1.2 Fax/Email:
In addition to printing reports, Intellect provides the capability to export reports to Email, Fax, Disk, or Archive. A secondary printer may also be selected, if one is set up, by clicking on the arrow to display the drop-down list.
9.1.3 Select the [Print] button to send the request to the printer (or as a Fax or email).
9.1.4 Select the [Cancel] button to clear the screen and return to the <Option> field without saving or printing.
9.2 Click on the [Clear] button to return the focus to the <Option> field.
9.3 Click on the [Exit] button to return to Intellect's main menu.
