
Intellect™
MANAGEMENT MENU OPTIONS

Analysis
Detail Report
Detail Report displays requested information as it was at the time of posting the charge. The heading of each report contains the Utility --►Set Up --►Clinic <Name>, <Address>, < Zip Code>, < City>, < State>, and <Phone> field entries. The report also contains the page number, when the report is prepared, the calendar date, military time, and the Utility --►Set Up --►Security --►Login Users <Operator Name> field entry. These reports provide 'a period-to-date' and 'a year-to-date' analysis of charges, payments, and adjustments. The information returned on any report is grouped by a combination of two different user-selected options.
This Management Report has the capability to print, email, or fax. For more information, click on Printing, Emailing, Faxing, Viewing, or send a request to Archive.
Please note that with all management reports, the patient’s Category and Insurance at the time of posting from the Charges --►Charge screen is associated with that item forever.
1. To display the Print Detail screen in Intellect, go to Management --► Analysis --► Detail
The Print DETAIL dialog box opens:
Effective Version 9.12.10 Field Modification. The one- and two-character code choices on the drop-down lists have been replaced with explanatory choices, making the code selection more user-friendly and comprehensive.
Note: The drop-down list descriptions for the code choices have remained the same, allowing correlation between the old and new code choices.
2.1 Use the drop-down list to select the type of report. There is no default and a selection must be made.
2.2 Click on the field, OR press the [F2] key to display the valid choices.
To view the list of only the codes, click on the arrow. To select, click on the correct code, OR use the ↑ (up) and ↓ (down) arrows to highlight the correct code and then press the [Enter] key to select.
Effective version 9.12.10

All versions prior to 9.12.10
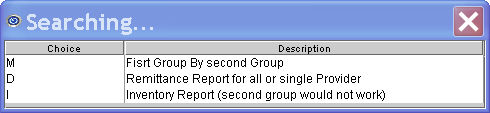
This is a brief summary of the Report Code Options.
Note: The old one-character code choice is shown in parenthesis behind the new explanatory code choice.
2.3 Financial Analysis Report (M): This report returns a summary of charges, payments, and adjustments sorted first by the selected <First Group> with its' description then by <Second Group> and its' name then sub-totaled by <First Group>. The entire financial return is totaled at the end of the report.
2.4 Remittance Report (D): This report returns a summary of charges, payments, and adjustments by providers or selected <Provider Code>. The entire financial return is totaled at the end of the report.
2.5 Inventory Report (I): This report returns a summary of charges, payments, and adjustments by Utility --►Procedure --► Inventory --► Vendor Company <Company Code> sorted first by the selected <First Group> description. The entire financial return is totaled at the end of the report.
3.1 For the Financial Analysis Report and Inventory Report Codes (formerly M and I), select the desired sort for the report. A selection must be made.
4.1 For the Financial Analysis Report (formerly M), select the desired second grouping for the report. A selection must be made.
5. From Date 
5.1 This is the beginning date used to determine the YTD (year-to-date) result for this report based on the entry, service, last payment, or first billing date as determined by the <Date Selection> field entry.
5.2 This field is mandatory and must be completed.
5.3 Exception: For the Remittance Report Code (formerly D), the first set of dates returns results based on the entry date of the charges, making the date selection field unnecessary.
6. To Date 
6.1 This is the ending date used to determine the YTD (year-to-date) result for this report based on the entry, service, last payment, or first billing date as determined by the <Date Selection> field entry.
6.2 This field is mandatory and must be completed.
6.3 Exception: For the Remittance Report Code (formerly D), the first set of dates returns the entry date making the date selection field unnecessary.
7. Provider Code 
7.1 Leave blank for the default of all providers for all code types.
7.2 To filter the results based on a specific provider, type the Utility --►Provider--►Provider <Provider Code>.
7.3 This field does NOT accept multiple values, but accepts the asterisk * to return all Providers starting with the portion of the code entered prior to the *. For example, J* prints all Providers whose code begins with J.

8. Billing Provider 
8.1 Leave blank for the default of all providers for all code types.
8.2 To filter the results based on a specific provider, type the Utility --►Provider --►Provider <Provider Code>
8.3 This field accepts multiple values:
• separated by commas with no spaces:

• a range of codes entered with a hyphen and no spaces:

• an asterisk * to return all Providers starting with the portion of the code entered prior to the *. For example, 1* prints all providers whose code begins with 1.

9. From Date
9.1 This is the beginning date used to determine the PTD (period-to-date) result for this report based on the entry, service, last payment, or first billing date as determined by the <Date Selection> field entry.
9.2 The field is mandatory and must be completed.
9.3 Exception: For the Remittance Report Code (formerly D), the second set of dates returns the DOS, making the date selection field unnecessary, and adds these results to those returned by the first set of dates.
10. To Date
10.1 This is the ending date used to determine the PTD (period-to-date) result for this report based on the entry, service, last payment, or first billing date as determined by the <Date Selection> field entry.
10.2 The field is mandatory and must be completed.
10.3 Exception: For the Remittance Report Code (formerly D), the second set of dates returns the DOS, making the date selection field unnecessary, and adds these results to those returned by the first set of dates.
11. Category Code 
11.1 Leave blank for the default of all categories for all code types.
11.2 To request the report for a specific category, type the Utility --► Category <Category Code>.
11.3 This field accepts multiple values:
• separated by commas with no spaces:

• an asterisk * to return all Categories starting with the portion of the code entered prior to the *. For example, M* prints all Categories whose code begins with M.

11.4 The report includes this information based on the category assigned to the patient at the time of posting charges, which at the time of running the report, may not be the patient's current category.
12.1 Leave blank for the default of no specific gender for all code types.
12.2 To filter the results based on a specific gender, use the drop-down to select Male, Female, or Unknown if the gender is unknown or not applicable (i.e., Company Accounts).
13. Age From 
13.1 This is the youngest age in whole years to filter the results by age determined by patient age at the time of DOS.
13.2 Leave blank for the default of all ages for all code types.
14. Age To 
14.1 This is the maximum age in whole years to filter the results by age determined by patient age at the time of DOS.
14.2 Leave blank for the default of all ages for all code types.
15.1 This field defaults to Entry Date.
15.2 Click on the field, OR press the [F2] key to display the valid choices.
To view the list of only the codes, click on the arrow. To select, click on the correct code, OR use the ↑ (up) and ↓ (down) arrows to highlight the correct code and then press the [Enter] key to select.
Effective version 9.12.10
All versions prior to 9.12.10

16. Facility Code 
16.1 Leave blank for the default of all facilities for all code types.
16.2 To request the report for a specific facility, type the Utility --►Facility <Facility Code>.
16.3 This field accepts multiple values:
• separated by commas with no spaces:

• a range of codes entered with a hyphen and no spaces:

• an asterisk * to return all facilities starting with the portion of the code entered prior to the *. For example, 1* prints all facilities whose code begins with 1.

17. Insurance Code 
17.1 Leave blank for the default of all primary insurers for all code types.
17.2 To request the report for a specific primary insurer, type the Utility --►Insurance --►Insurance <Insurance Co Code>.
17.3 This field accepts multiple values:
• separated by commas with no spaces:

• an asterisk * to return all insurers starting with the portion of the code entered prior to the *. For example, M* prints all Insurers whose code begins with M.

18. Referring Code 
18.1 Leave blank for the default of all referrals for all code types.
18.2 To request the report for a specific referral source, type the Utility --►Referring <Referring Code>.
18.3 This field accepts multiple values:
• separated by commas with no spaces:

• a range of codes entered with a hyphen and no spaces:

• an asterisk * to return all Referrers starting with the portion of the code entered prior to the *. For example, 1* prints all Referrers whose code begins with 1.

19. Employer Code 
19.1 Effective version 14.12.30 - New field.
19.2 Leave blank for the default of all employers/companies for all <Report Code> types.
19.3 To request the report for a specific employer/company, type the Utility --►Business <Company Code>.
19.4 This field accepts multiple values:
• separated by commas with no spaces:

• accepts the asterisk * to return all employers/companies starting with the portion of the <Company Code> entered prior to the *. For example, P* prints all employers/companies whose <Company Code> begins with P:

19.5 Via this field, Intellect can also pull data based on the employer attached to the charges. For the employer to attach to any charges, this information must be set up in Intellect:
Patient --►Registration <Employer Name>
Patient --►Worker --►Worker Insurance <Employer>
.
20. Cash/Accrual 
20.1 It is important to understand the basics of the two principal methods of keeping track of a business's income and expenses: cash method and accrual method (sometimes called cash basis and accrual basis). In a nutshell, these methods differ only in the timing of when transactions, including procedures and payments, are credited or debited to the clinics accounts. The accrual method is the more commonly used method of accounting.
Under the accrual method, transactions are counted when the procedure/services occur (DOS), regardless of when the money for them is actually received or paid. In other words, income is counted when the procedure occurs (DOS).
20.2 Under the cash method, income is not counted until cash (or a check) is actually received.
20.3 Accept the Cash default OR use the drop-down list to select Accrual.
21. Department Code 
21.1 Leave blank for the default of all departments for all code types.
21.2 To request the report for a specific department, type the Utility --►Provider <Department> name or number.
21.3 This field accepts multiple values:
• separated by commas with no spaces:

• a range of codes entered with a hyphen and no spaces:

• an asterisk * to return all Departments starting with the portion of the code entered prior to the *. For example, 1* prints all Departments whose code begins with 1.

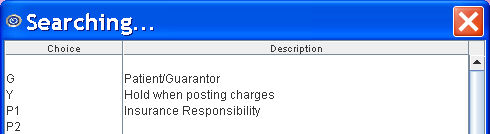
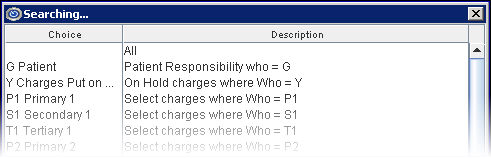
22. Who 
22.1 The default is blank, not filtering by the Ledger --►Accounting or Ledger --►Open Item <Who> column.
22.2 Accept the blank default, OR use the drop-down list to filter by the selected Who type. Partial lists are shown below:
All versions prior to 9.12.10
Effective version 9.12.10
23. Sorted By 
23.1 Effective version 18.04.11x, the <Sorted By> field includes the option to sort by description. The Description option is available to sort the data for both the <First Group> and <Second Group> selected on this screen.
Note: Spaces in the description of the option chosen in <First Group> and <Second Group> cause the data to sort based on the first description found without a space.
23.2 Accept the blank default, OR use the drop-down list to sort as selected.

24. When the information is completely entered, select one of these options:

24.1 Click [Print] OR press [Enter] to display the Print Remittance dialog box:
24.1.1 Printer Properties:
24.1.1.1 Printer: The default printer for the logged-in clinic and password is selected. To select a different printer, either click on the arrow, OR press the → (right arrow) on the keyboard to view the list of printer codes. In our example, the defaulted Printer is HP. This is just an example of a printer name and may or may not be set up on the system.
To select the printer type, click on the code, OR use the ↑ (up) and ↓ (down) arrows to highlight the correct code; then press the [Enter] key to select.
24.1.1.2 Number of Copies: This field defaults to either 0 (zero) or 1. Both print 1 copy. To print more than one copy, enter the number of copies.
24.1.2 Fax/Email:
In addition to printing reports, Intellect provides the capability to export reports to Email, Fax, Disk, or Archive. A secondary printer may also be selected, if one is set up, by clicking on the arrow to display the drop-down list.
24.1.3 Select the [Print] button to send the request to the printer (or as a Fax or email).
24.1.4 Select the [Cancel] button to clear the screen and return to the <Report Code> field without saving or printing.
24.2 Click [Clear] to clear all information and return the focus to the <Report Code> field without saving.
24.3 Click [Exit] to clear the screen and return the focus to the main Intellect screen without saving.


