Intellect™
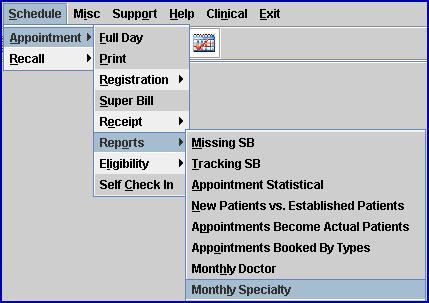
SCHEDULE MENU OPTIONS

Appointment
Reports
Monthly Specialty
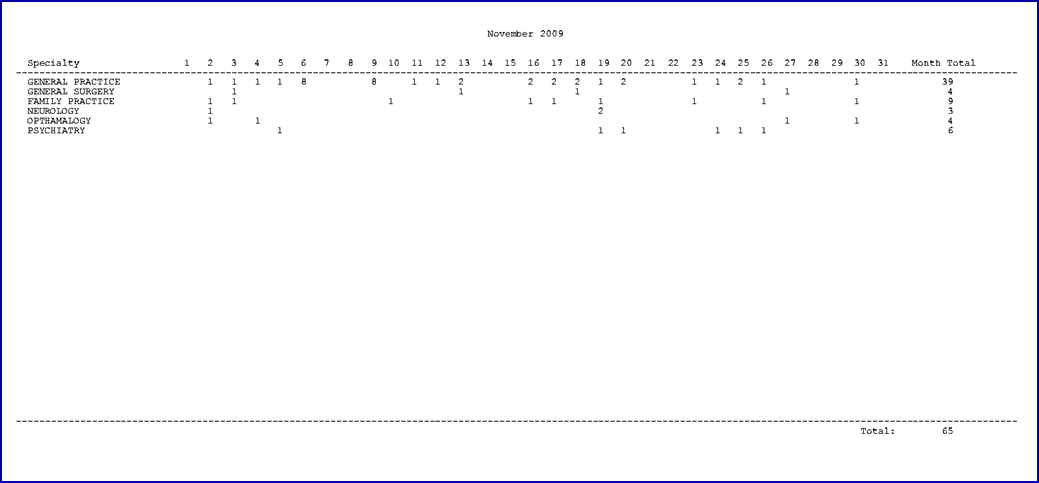
This option is used to create a report that calculates the number of patients per Specialty based on the Appointment Schedule (not charges posted). The Monthly Specialty option produces a report where Specialty indicates items such as General Practice, Cardiology, and Ophthalmology. This report displays each Specialty as shown in the Utility --►Provider --►Provider <Specialty> field and the number of patients (with a status of ‘Added’ or ‘Modified’) scheduled for each day. The report also shows a monthly and overall total for each specialty.
NOTE: Existing clients need to create Utility --►Messages --►Remarks for applicable Specialties within the practice. Contact your trainer or our support department for assistance.
1. To run a Monthly Specialty report, go to Schedule --►Appointment --►Reports --►Monthly Specialty:
The Monthly Specialty Appointment Report screen opens:
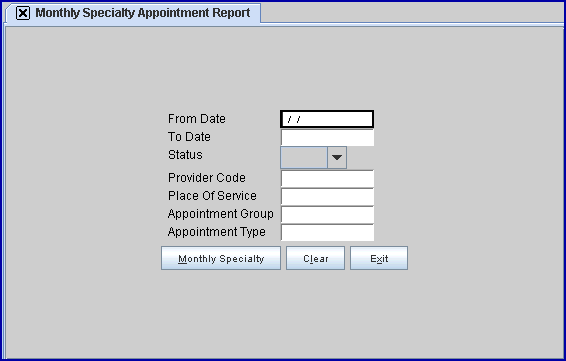
2. From Date: 
2.1 Type the beginning Appointment Schedule date (not charges posted date) to include on the report.
3. To Date: 
3.1 Type the ending Appointment Schedule date (not charges posted date) to include on the report.
4. Status: 
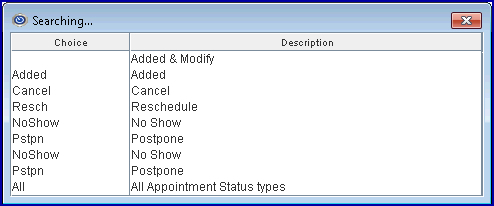
4.1 Indicates the categories in which patients may be selected. The categories correlate to those listed in the Appointment History.
4.2 Click on the arrow key to display the drop-down menu and make a selection.
4.3 To view the list of Status types and their descriptions, press the [F2] key to display a list of valid options:
5. Provider Code: 
5.1 This field is used to limit the report to specific patients based on Utility --►Provider --►Provider <Provider Code>.
5.2 More than one Utility --►Provider --►Provider <Provider Code> may be entered. A comma and a space must be between each code; for example: 4, 13, 22.
5.3 Enter the Utility --►Provider --►Provider <Provider Code>(s) of the doctor(s) for whom a report is requested.
5.4 Press the [F2] button twice to display a list of doctors and their associated Provider Codes.
6. Place of Service: 
6.1 This field is used to limit the report to specific patients based on Utility --►Facility <Place of Service>.
6.2 More than one Utility --►Facility <Place of Service> code may be entered. A comma and a space must be between each code; for example: AMI, CSMC, LBMH.
6.3 Enter the code(s) for the location where the appointment took place.
6.4 Press the [F2] button twice to display a list of service locations and their associated codes.
7. Appointment Group: 
7.1 This field is used to limit the report to specific patients based on Appointment Group (see 7.3).
7.2 More than one Appointment Group may be entered. A comma and a space must be between each code; for example: 4, 13, 22.
7.3 Enter the appropriate Appointment Group(s) as set up in Utility --►Set Up --►Security --►Login User <Appointment Group> and Utility --►Provider --►Provider <Appointment Group>.
8. Appointment Type: 
8.1 This field is used to limit the report to specific patients based on Appointment Type (see 8.3).
8.2 More than one Appointment Type may be entered. A comma and a space must be between each code; for example: NP, EKG, CARDIO.
8.3 Enter the appropriate Appointment Type(s) as set up in the Utility --►Set Up --►Appointment --►Appointment Type screen.
9. When the information is completely entered, select one of these options:

9.1 Select [Monthly Specialty] to display a printer dialog box:
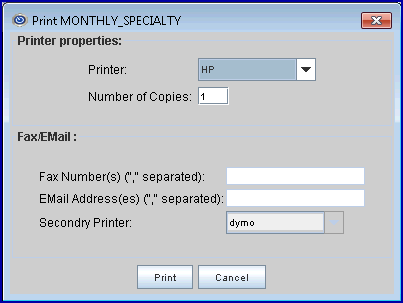
9.1.1 Printer Properties:
9.1.1.1 Printer: The default printer for the logged-in clinic and password is selected. To select a different printer, either click on the arrow, OR press the → (right arrow) on the keyboard to view the list of printer codes. In our example, the defaulted Printer is HP. This is just an example of a printer name and may or may not be set up on the system.
To select the printer type, click on the code, OR use the ↑ (up) and ↓ (down) arrows to highlight the correct code; then press the [Enter] key to select.
9.1.1.2 Number of Copies: This field defaults to either 0 (zero) or 1. Both print 1 copy. To print more than one copy, enter the number of copies.
9.1.2 Fax/Email:
In addition to printing reports, Intellect provides the capability to export reports to an Excel spreadsheet, Email, Fax, Disk, or Archive. A secondary printer may also be selected by clicking on the arrow to display the drop-down list.
9.1.3 Select the [Print] button to send the request to the printer (or as a Fax or email).
9.1.4 Select the [Cancel] button to clear the screen and return to the Monthly Specialty Appointment Report screen without saving or printing.
9.2 Select [Clear] to remove any information already entered on the Monthly Specialty Appointment Report screen.
9.3 Select [Exit] to close the Monthly Specialty Appointment Report screen.
Sample Monthly Specialty report: