
Intellect™
CHARGES MENU OPTIONS

Modify
This menu option is used to modify any posted charges, and/or their related information, incurred by a patient. Based on the user's security level, this option allows the user to:
• add/modify charge remarks and diagnoses
• modify charges and check numbers
• delete charges, charge remarks, and diagnoses
• modify from and to date, panel code, and individual charge information
The user is also able to view certain information relating to charge and payments.
For this menu, the security level defaults for the options of Modify and Delete are set as follows: MODIFY-60, DELETE-80. Security level defaults may be modified based on the needs in Utility --►Set Up --►Security --►Login Users <Security Level Group (1, 2, 3, 4) >.
Recommended security levels to start with are Administrators-99, Billers-60, Front Desk/Reception-40.
Security groups are used to limit menu access and are determined by daily tasks.
Security Groups are available to be added and maintained in Utility --►Set Up --►Menus --►Programs where every function may be assigned to a Security Group with a security level.
Video Available: Click Modify and Rebill Charges to access the link. Depending on the system set up, the media player may need to be activated. Speakers need to be attached to the workstation to hear the instructions.
Note: To view the videos, log-in through the www.primeclinical.com website. Current support is required.
In this topic:
Charge Modify Screen Field Definitions
Action Buttons at the Bottom of the Screen
Charge Modify Screen Field Definitions
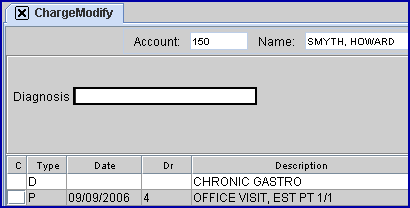
1. To modify a charge entry for a patient's account in Intellect, go Charges --► Modify

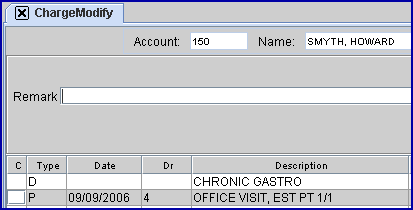
The Charge Modify screen displays:
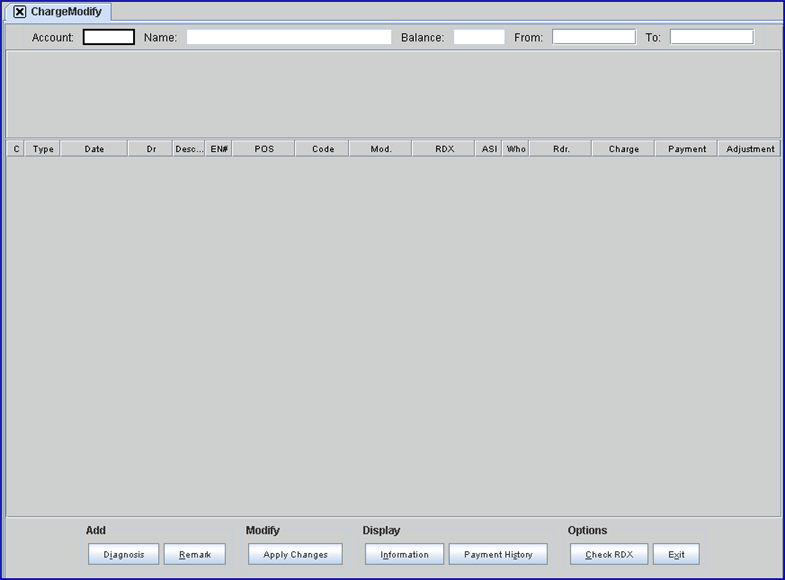
Depending on the monitor size, if the font size was increased, the entire screen/data may not be able to display at one time. Intellect now has a scroll bar for this screen, when needed, to provide access/view to all the data fields.
Effective version 16.02.22, the <Account>, <Name>, <Balance>, <From>, and <To> fields at the top of the screen become read-only after [Enter] is pressed on the <To> field and the charges are displayed. To return the focus to the <Account> field to start over, press [Esc] while in the table.
Field definitions:
2. Account 
2.1 Type the Patient Account Number to modify/view the charge information.
2.2 The field is mandatory for this screen and must be completed. If left blank, a message displays:
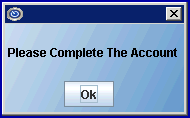
Press the [OK] button to return the focus to the <Account> field.
3. Name 
3.1 The patient name displays: Last Name, First Name.
3.2 This is a read-only field and may not be accessed.
4. Balance 
4.1 The account's entire balance amount displays, whether positive or a credit balance.
4.2 This is a read-only field and may not be accessed.
5. From 
5.1 This field always defaults to the current Intellect clinic date.
5.2 If desired, enter the beginning entry date of transactions to view.
5.3 Use the [Space Bar] to clear the field to view all patient transactions up until the <To> date field entry.
5.4 While one of the date fields may be empty to permit a total range, both cannot be or this prompt displays:
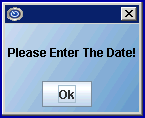
Press the [OK] button to return the focus to the <From> field.
6.1 This field always defaults to the current Intellect clinic date.
6.2 If desired, enter the latest entry date of transactions to view to create a date range.
6.3 Use the [Space Bar] to clear the field to view all patient transactions after the <From> date field entry.
6.4 Press [Enter] after the <To> date field to display the Multi-row Table Display which lists the requested charges, with the focus in the Command Column.
6.5 While one of the date fields may be empty to permit a total range, both cannot be or this prompt displays:
Press the [OK] button to return the focus to the <To> field.
6.6 When a date range is entered where there has not been any activity or using an account where there are no charges, Intellect displays this message:

Press the [OK] button to clear the screen and return the focus to the <Account> field.
The multi-row table display appears after pressing [Enter] with the focus in the <To> field. This table lists the charges requested via the <From> and <To> fields. It has a limited number of functions as shown either by pressing the [F2] key anywhere on the multi-row table display to access the Key's Help options or by placing the pointer in a highlighted field and right-clicking to access the context menu.
The table displays with the focus in the 'C' (command) column:

7.1 Press [F2] with the focus in this field to display the Key's Help pop-up. Key's Help provides a list of the various actions that may be performed by entering the specified key in the 'C' Command Column.
8. 
8.1 The type of transaction is displayed on this line; i.e., P, D, R (Procedure, Diagnosis, Remark).
8.2 Procedures that do not have a diagnosis attached at the time of posting appear in a burnt orange color (includes Finance Charges); all other entries are white.
8.3 May not be modified.
9. 
9.1 Displays the date of service (DOS) as entered in Charges --►Charge <From/Date> at the time of posting.
9.2 It is not recommended to change this date as it is only changing the CMS 1500 (HCFA) Box 24A From Date, resulting in incorrect claim information. Although not recommended, the <From Date> of service may be changed here as well as through the Open Item Ledger.
10. 
10.1 Displays the performing doctor (not the billing provider) in Utility --►Provider --►Provider <Provider Code> as entered in Charges --►Charge <Dr> at the time of posting.
10.2 This is the only access to change the provider of service for the selected charge. Changing the provider code changes this information for the selected charge only, thus modify each charge where appropriate.
11. 
11.1 Displays the panel description from Utility --►Procedure --►Procedure <Panel Description> for the posted procedure.
11.2 May not be modified.
12. 
12.1 Displays the Encounter number from Charges --►Encounter <Encounter #> as entered in Charges --►Charge <EN#> at the time of posting, if any.
12.2 May be modified here only.
13. 
13.1 Displays the place of service code in Utility --►Facility <Facility Code> as entered in Charges --►Charge <Facility>.
13.2 May be modified here, as well as through the Accounting Ledger.
13.3 May not be left blank.
14. 
14.1 Displays the Utility --►Procedure --►Procedure <Code R, C, E> or <Revenue Code> for this procedure as determined by Utility --►Insurance --►Insurance <Code (R/C/E/U)> for the patient’s insurer as assigned at the time of posting.
14.2 May not be modified.
15. 
15.1 Displays the modifier attached to this procedure in Charges --►Charge <Mod> as assigned at the time of posting, if any.
15.2 May be modified here, as well as through the Accounting and Open Item Ledgers.
15.3 Version 9.12.35 - Modification: On the Charges --►Charge and Charges --►Modify screens, the punctuation and spaces have been removed from the Modifier Code. Also, if the Modifier Code is not valid, the system gives the option to Edit or continue. Additionally, the system only accepts modifier codes that have 2, 4, 6, or 8 characters.
15.4 Version 9.12.16 - Modification. In versions prior to 9.12.16, the program accepts any Modifier entered in the Charges --►Charge or Charges --►Modify screens, and does not validate the modifier code. Effective update 9.12.16, the program cross-checks the Modifier entered in Charges --►Charge and Charges --►Modify against the Utility --►Procedure --►Modifier table. If the Modifier is not set up in the Utility --►Procedure --►Modifier table a warning message displays:
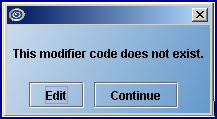
15.4.1 Click [Edit] to return to the Modifier field
15.4.2 Click [Continue] to post the Modifier entered even though it is not set up in Utility --►Procedure --►Modifier
15.5 If two Modifiers are entered for the same charge, the combination needs to be entered in Utility --►Procedure --►Modifier table; if not, the warning message displays.
NOTE: It is important to know that if the combination of two modifiers affect the charge; i.e., reduces the charge amount or should bill the Professional fee, etc., the combination must be set up in the Modifier screen. For example, if the patient is a high risk and the provider was the assistant surgeon ther office might bill with the combination of 2280. The Modifier Code 2280 must be set up in the Utility --►Procedure --►Modifier table for the system to calculate the assistant surgeon fee.
16. 
16.1 Displays the RDX line number for related diagnoses as assigned to Charges --►Charge <RDX> at the time of posting.
16.2 May be modified here, as well as through the Accounting Ledger.
Note: For CMS 1500 paper claims, this prints in Box 24E. For procedures with multiple Diagnosis pointers the standard format is a space between; i.e., 1 2.
An optional format may be requested in which the space is eliminated: i.e., 12.
16.3 Effective version 13.04.10: The number of characters allowed to be entered in the <RDX> field was increased to accommodate 2-digit pointers with comma separators.
17.1 Displays the assignment designation as associated with a Charges --►Charge <ASI> at the time of posting.
17.2 May be modified either here or through the Open Item Ledger.
18. 
18.1 Displays the responsibility code as assigned to a Charges --►Charge <Who> at the time of posting.
18.2 <Who> may be modified either here or through Ledger --►Accounting and Ledger --►Open Item.
18.2.1 When modifying an entry of a primary insurer to another primary insurer (for example P1 to P2) this message displays:
Any change changes the insurance on file in the treatment history table and affects billing and reports.
18.2.2 When attempting to modify the Who entry to an invalid value, an error message displays:
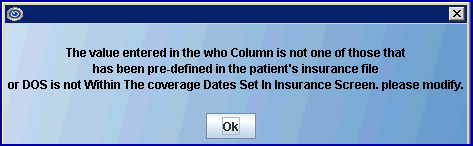
This error applies when either the Who value entered does not have a patient insurance record with the same value, or the DOS is not within the coverage date range.
19.1 Displays the referring provider code (doctor/other) in Utility --►Referring <Referring Code> as assigned to Charges --► Charge <Ref Prv> at the time of posting.
19.2 May be modified either here or through the Accounting Ledger.
20.1 Displays the procedure charge at the time of posting in Charges --►Charge <Charge>.
20.2 May only be modified here.
21. 
21.1 Displays the total of any or all payments made to this procedure whether through Charges --►Charge <Payment >, Payment --►Open Item <Payment>, or Payment --►Auto Payment.
21.2 May not be modified here.
22.1 Displays the total of any or all payment adjustments made to this procedure whether through Charges --► Charge <Adjustment> or Payment --►Open Item <Adjust>.
22.2 May not be modified here.
All modifications and additions made on this page are automatically committed.
For ease in using the multi-row table display, keep in mind the short cut keys accessed by pressing [F2] with the focus anywhere on the multi-row table display. Remember that a line must be selected to perform an action.
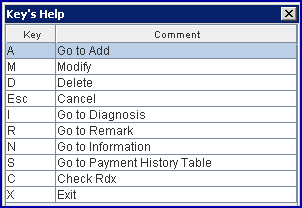
23. A: Type 'A' in the Command Column to send the focus to the [Diagnosis] button in the Add area at the bottom of the screen. Press [Enter] to activate a <Diagnosis> entry field (above the multi-row table display) and send the focus there, allowing a diagnosis code to be entered.
23.1 Effective version 15.08.06, if the date in the <ICD10 Effective Date> field on the Utility --►Set Up --►Parameter screen is equal to or greater than October 1, 2015, two selection boxes are available for the <Diagnosis> field:
23.1.1 When an ICD-9 code is entered in the <Diagnosis> field, Intellect displays a selection list from which to choose an appropriate ICD-10 code. Highlight the appropriate ICD-10 code and click the [Select ICD-10] button to add the diagnosis to the multi-row table display, OR click [Exit] to close the selection screen.
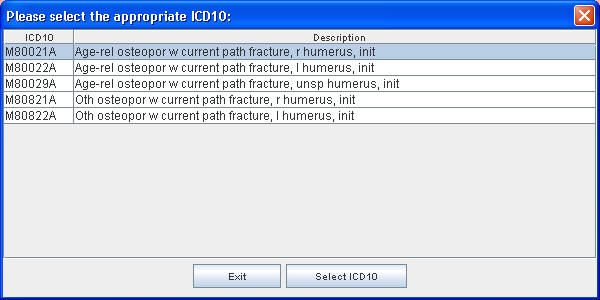
23.1.2 When users enter either a keyword or partial ICD-10 diagnosis description in the <Diagnosis> field, Intellect displays an ICD-10 Lookup screen which includes ICD-10 code options for the keyword/description displayed in the <Search Phrase> field. For example, entering hand fracture in the <Diagnosis> field and pressing [Enter] displays:
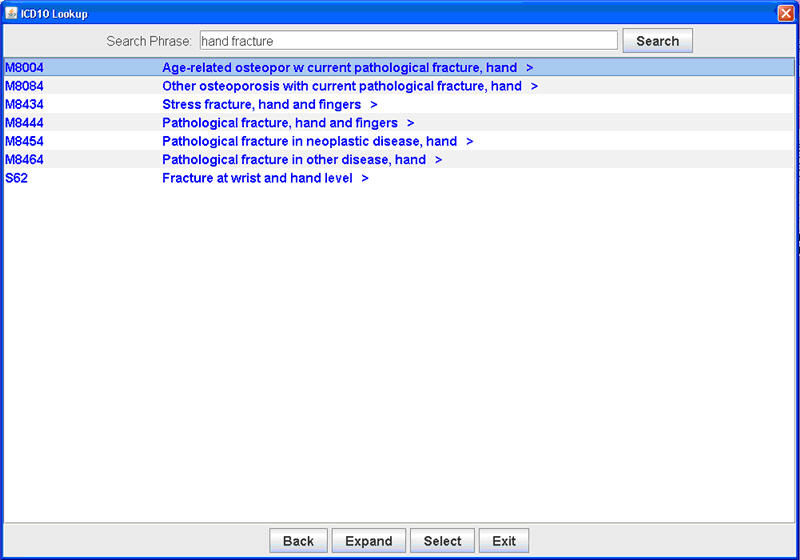
23.1.3 If options are displayed in blue, as shown above, users can click on a code to expand it to the next level by double-clicking on the code OR clicking the [Expand] button at the bottom of the pop up window. The next level of codes is then displayed:
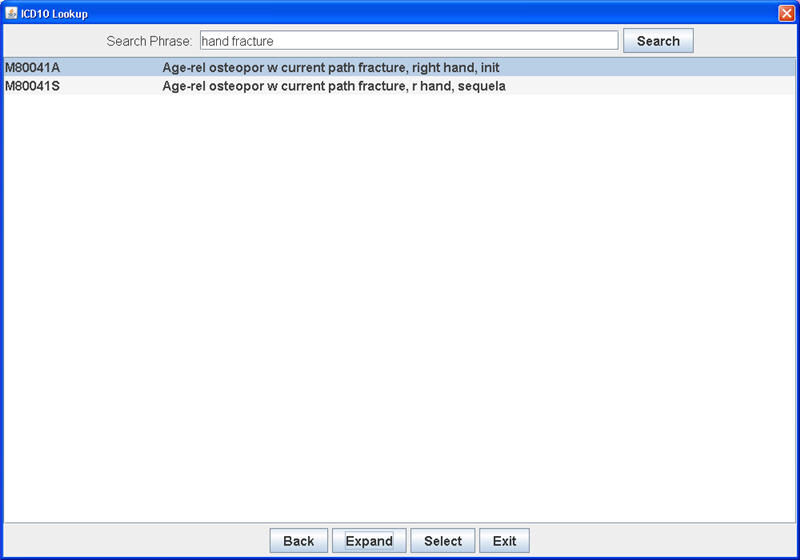
23.1.4 Click [Back] to return to the original list, click [Select] to choose the highlighted code for the charge, OR click [Exit] to close the ICD10 Lookup screen.
24. M: Type 'M' in the Command Column when a procedure or remark line is highlighted to make modifications to that line. Only these Procedure's columns may be modified : <Date>, <Dr>, <EN#>, <POS>, <Mod>, RDX>, <ASI>, <Who>, <Rdr>, and <Charge>.
24.1 Version 9.12.08 - New Feature - You may modify diagnosis codes. Type 'M' in the Command Line of a Diagnosis entry; the focus moves to the <Diagnosis> field shown above. Press the [Delete] key to remove the existing diagnosis, type in the new/correct diagnosis, then press the [Enter] key.
Note: If an existing Diagnosis Code is modified, the change is retroactive; i.e., modifying an existing Diagnosis Code changes ALL the diagnoses that have previously been used in the charge records. Instead of modifying an existing Diagnosis Code, it is suggested to ADD a new Diagnosis Code as a replacement for the one to be changed.
24.2 You may also modify the text of a Remark. Type 'M' in the Command Line of a Remark entry to display and then send the focus to the Remark Text area:

24.3 At the <Who> column, if the value is changed from P1 to P2, or S1 to S2, etc., the program prompts to change the treatment history to the appropriate insurance. For example, if the patient has two primary insurances and <Who> is changed from P1 to P2, if YES is selected, the program modifies the insurance code stored in the treatment history file from the P1 insurance code to the P2 insurance code.
25. D: Type 'D' in the Command Column to delete the highlighted line. Intellect displays this message:
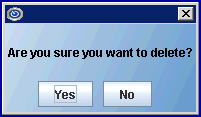
25.1 Press [Yes] to delete the line and send the focus to the next line in the Command Column.
25.2 Press [No] to cancel the delete and send the focus to the same line in the Command Column.
When Utility --►Parameter <Delete Entry (T/A)> = 'T,' only today’s entered charges may be deleted (Intellect does not allow deletion of charges entered on a previous entry date). When a payment and/or adjustment has been applied against a charge, first reverse the payment and/or adjustment.
25.3 Press [Yes] to reverse payment and adjustment. This deletes the charge, and sends the focus to the next line in the Command Column.
25.4 Press [No] to cancel the delete and send the focus to the same line in the Command Column.
26. Esc: Press [Esc] while in the Command Column to clear the Command Line area. Press [Esc] while in the middle of an action to cancel that action and return the focus to the top line of the Command Column.
27. I: Type 'I' in the Command Column to activate a <Diagnosis> entry field and send the focus to that field.
28. R: Type 'R' in the Command Column next to a procedure that does not already have a remark attached to display an area to add a remark.
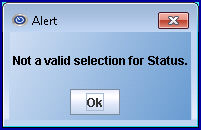
29. N: Type 'N' in the Command Column next to a procedure to display a detailed information panel for that procedure. Effective version 18.10.02 - Field modification: When users edit the Information Panel, Intellect checks the value entered in the <Status> field. The system displays the message shown below if any value other than A, C, P, or O are entered. If a user leaves the <Status> field blank, Intellect restores the <Status> to its' previous valid value.
30. X: Type 'X' in the Command Column to close this screen and return the user to the main screen.
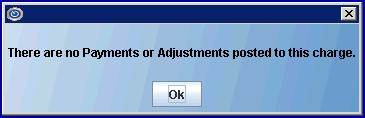
31. S: Type 'S' in the Command Column next to a procedure to change the screen to display any payments and/or adjustments specifically related to that charge, if there is a payment history.

31.1 Press [Esc] OR type 'Q' to return to the charge line.
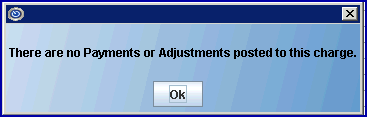
31.1.1 If there is not a payment history, Intellect displays this message:
Press the [OK] button to return the focus to the Command Column for that charge.
After highlighting a row In the Multi-Row Table Display, right-click to display the Context Menu:
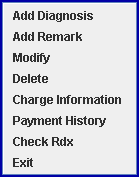
32. Add Diagnosis: Click on this option to perform the same function as entering 'A' in the command column; i.e., a <Diagnosis> field is displayed, with the focus in it.
33. Add Remark: Click on this option to perform the same function as entering 'R' in the command column; i.e., a <Remark> field is displayed with the focus in it.
34. Modify: Click on this option to move the focus to a completed <Diagnosis> field to modify the diagnosis.
35. Delete: Click on this option to display this pop-up message:
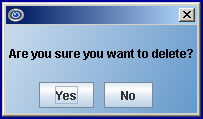
35.1 If [No] is selected, the message box leaves without deleting the selected item.
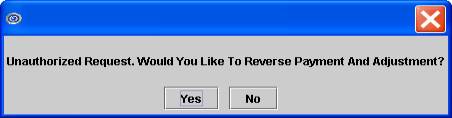
35.2 If [Yes] is selected, the charge is deleted if there are neither payments nor adjustments posted to it. If the selected charge has either payments or adjustment posted to it, this message displays:
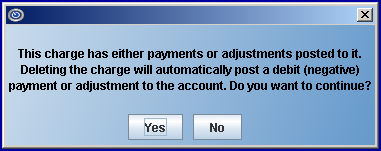
35.3 If [No] is selected, the message box leaves without deleting the selected item.
35.4 If [Yes] is selected, the charge is deleted, regardless of whether or not there are payments or adjustments posted to it, and a debit (negative) payment or adjustment is made to the account.
36. Charge Information: Right-click with the pointer in the Charge field for a highlighted procedure to display the detailed information panel for that procedure.
37. Payment History: If there is a payment history, the screen changes to display any payments and/or adjustments specifically related to that charge. See information in option 'S' in the Command Column, and/or the [Payment History] button.
38. Check Rdx: Results are the same as for clicking on the [Check RDX] button.
39. Exit: Closes out the Charge --►Modify screen.
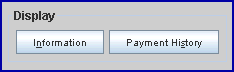
This panel provides detailed information for a selected procedure. After highlighting a procedure on the multi-row table display, display the information panel any of the following ways:
• selecting the Charge Information option on the context menu
• typing 'N' in the command column
• clicking on the [Information] button at the bottom of the screen when the focus is in the command column

See field definitions.
40. Note1: Some versions differ in the order of the fields.
40.1 Effective version 9.12.33, new fields added:
40.1.1 <Cost>: Displays the amount shown in the <Cost> field on the Utility --►Procedure screen. For <Cost> calculation information, please refer to the online documentation.
40.1.2 <Revenue>: Displays the code selected in the <Revenue Code> field of the Utility --►Procedure screen.
40.1.3 <Copay Due>: Displays the same co-pay shown in the <Co-Pay> field on the Charges --►Charge screen. This is set up in the <Co Payment> field on Registration --►Regular --►Patient Insurance --►Add Insurance.
40.2 Effective version 9.12.33, field names were changed as follows:
40.2.1 <Pay Plan Code> now displays as <Pay Plan>
40.2.2 <Insurance Code> now displays as <Primary>
40.2.3 <Approved Amount> now displays as <Approved>
40.3 Effective version 9.12.33, field removed:
40.3.1 The <Assignment> field has been removed since it already exists in the Charge Modify table.
41. Note2: Effective version 9.12.26, in the Information panel, press the [F3] key to view the appropriate utility screen for the <Category>, <Referring>, <Billing Provider>, <Insurance Code (Primary)>, <Secondary> and <Tertiary> fields. For example, if the focus is on the <Prim Insurance> field and [F3] is pressed, the patient's primary Utility --►Insurance --►Insurance record displays in View mode. The program has always contained this feature in the <Dr>, <POS (Facility)>, and <Rdr (Referring)> columns when pressing 'M' to modify a charge line.
42. Note3: Fields that have an asterisk are affected when the 'Apply to All' box is checked.
43. Note4: Important: To save changes in the detailed information panel, press [Enter] all the way through. When the detailed information panel is no longer visible, then the changes have been saved, otherwise the field(s) reverts back to the data that was previously entered.
Effective version 12.12.06: A [Save] button was added to the detailed information panel. Press the [Save] button to save changes made in the fields on this panel.
44. Note5: To leave the detailed information panel, press [ESC].
Important: Use the [ESC] key to exit from the detailed information panel before displaying the charges for a different account.
45. Note6: Effective version 13.03.01: After selecting 'N' (Information) in the Command Column, when users change the <Primary*> insurance, Intellect changes the CPT code for that charge, according to the new insurance.
Also, the search table on all three insurance fields (i.e., <Primary*>, <Secondary*>, and <Tertiary*>) has been changed to search the patient insurance table instead of Utility --►Insurance. This means that users may now press [F2] on any of the above insurance fields to search the patient's insurances.
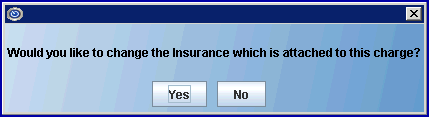
46. Note7: Effective version 13.06.24: As of this update, on the Charge --►Modify screen when a user changes the insurance, the CPT Code changes according to the insurance requirement. For all of the following different ways that users can change the insurance, the CPT Code changes too:
46.1 Under option N (Information), users can change the insurance code for the selected charge or all charges.
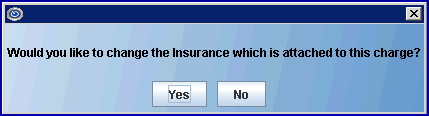
46.2 Under option N, if a user modifies the Who from Px to Py (e.g., P1 to P2), Intellect asks the user:
"Would you like to change the Insurance which is attached to this charge?"
46.2.1 If 'Yes' is selected, the insurance, pay plan, and CPT code for that charge changes.
46.2.2 If 'Apply to All' is selected, these changes are applied to all charges on the screen.
46.3 When a user presses 'M' on a charge record and modifies the Who from Px to Py, Intellect does the same thing as above.
Information Panel Field Definitions
47.  : Displays the Charges --►Charge <From/Date> service date as entered when posting this procedure's charge(s). It may be modified here.
48.  : Displays the Charges --►Charge <To> service date as entered when posting this procedure's charge(s). It may be modified here. Intellect uses these dates to complete CMS Form 1500 (HCFA) Box 24 A
![]()
49.  : If there is a Pay Plan associated with the patient's account at the time of posting, Intellect looks to this procedure. Utility --►Procedure --►Procedure <Conversion> value (0,1,2,3,4) then looks at the Pay Plan <Conversion 0,1,2,3,4> fields for the corresponding value which is displayed here. Otherwise, a value of '0' displays.
50.  : Displays the Utility --►Procedure --►Procedure <Unit Value> or, <Prof Unit Value>, or computed Technical based on any modifier at the time of posting.
51.  : If a Pay Plan is associated with the patient's account at the time of posting, Intellect first looks to the Utility --►Procedure --►Procedure <Conversion> value (0,1,2,3,4) and then uses the field corresponding to Pay Plan <Percent 0,1,2,3,4> value. This is displayed here, otherwise, if there is no value, a default of 100% displays.
52.  : Displays this procedure's Utility --►Procedure --►Procedure <Days/Units> value at the time of posting. This field may not be blank.
53.  : Displays the patient's assigned Utility --►Category <Category Code> as it was at the time of posting.
Note: In versions prior to 9.12.35, if the information is changed in the <Category> field to a non-existent category, the system accepts it.
53.1 As of version 9.12.35, when a user changes the <Category>, the system checks to see if the entered category exists. If the category does not exist, the system displays this error message:
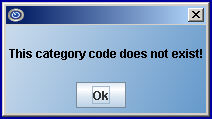
Click [OK] and enter a valid category code in the <Category> field.
Also, in version 9.12.25 and greater, while in this field, a user may change the Category by pressing the space bar to clear the field and then pressing [F2] to display a 'Searching ...' screen where an alternate Category may be selected.
53.2 Effective version 12.12.06: Intellect checks the validity of the data as it is entered into this field. In prior software versions, users had to press [Enter] after entering data to check that the data was valid.
54.  This is hard-coded and is dependent upon the patient's Category at the time of posting; indicating the type of claim.
• A: Capitated or Auto Pay - The charge is included in the distribution of the Capitated check when applied through the Auto Payment feature. If the charge should not be included in the capitation distribution, change the status to C. Changing it to P does NOT adjust off the charge.
• P: Prepaid - Adjusts off at the time the charge is being posted. Modifying the status does NOT reverse the adjustment. It is recommended to NOT change the status if it is set to P.
• C: Regular - The charge is not adjusted off at the time of posting, nor is it included in the Capitated payment distribution through the Auth Payment feature. If the charge should be included in the capitation distribution, change the status to C. Changing it to P does NOT adjust off the charge.
• O: Company Account - These charges print only on the Company Statement, and cannot be printed on a patient statement. If the Status is something other than O, changing it to O does NOT put the charge on the Company Statement. There are other required data elements which are set at the time of posting, therefore, delete the charge and re-enter it for it to print on the Company Statement.
54.1 Effective version 12.12.06: Intellect checks the validity of the data as it is entered into this field. In prior software versions, users had to press [Enter] after entering data to check that the data was valid.
55.  : Version 9.12.32 - New Field. Displays the amount shown in the <Cost> field on the Utility --►Procedure --►Procedure screen.
55.1 Cost is calculated as follows:
• If Utility --►Procedure --►Procedure = X and Utility --►Procedure --►Procedure <QTY(Y/N/X) = X or Utility --►Procedure --►Procedure <GLOBAL(Y/N/X)> = Y, then <Cost> = (procedure/cost) * dayUnit
55.2 dayUnit is calculated as follows:
• If Utility --►Procedure --►Procedure <GLOBAL(Y/N/X)> = Y and Utility --►Procedure --►Procedure <QTY(Y/N/X) = X, dayUnit = <Qty> (from the Charge --►Charge screen) * days
• If Utility --►Procedure --►Procedure <GLOBAL(Y/N/X)> = X and Utility --►Procedure --►Procedure <QTY(Y/N/X) = X, dayUnit = <Qty> (from the Charge --►Charge screen); otherwise, dayUnit = days
56.  : Displays the Utility --►Provider <Provider Code> entered in Charges --►Charge <Billing Prv> at the time of posting this procedure to this account.
56.1 Effective version 12.12.06: Intellect checks the validity of the data as it is entered into this field. In prior software versions, users had to press [Enter] after entering data to check that the data was valid.
56.2 Effective version 19.09.23, when this field is modified to another provider, if the new provider is a non-billing doctor (i.e., cost center), this pop up displays:
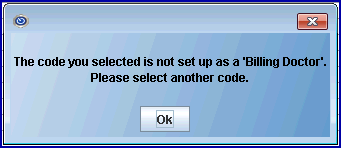
If the new provider entered in the <Billing Prv> field is retired, this pop up displays:

Click [Ok] on either pop up to return the focus to the <Billing Pr> field where a valid provider code may be entered.
57.  : Displays the Utility --►Procedure --►Procedure <Panel Code> used in posting this charge in the Charges --►Charge <Panel>. When posting charges, the Panel/Procedure Code is used to determine many aspects of the claim. As of version 9.12.12, if the Panel/Procedure Code needs to be modified, delete the existing record and post the correct code.
58.  : Version 9.12.31 - New field. To modify the Batch number, delete the existing number and enter the correct Batch number.
59.  : Version 9.12.32 - New field. Displays the code selected in the <Revenue Code> field of the Utility --►Procedure --►Procedure screen.
60.  (Super Bill): Version 13.06.24 - New field. If, while posting charges, a Super Bill number was entered in the <SB> field, that Super Bill number displays in this field. This field allows the Super Bill to be added or changed.
Effective version 19.08.12, the program does not allow the <SB> field on either the Charges --►Charge screen or the Charges --►Modify screen to be left blank. An actual valid Super Bill (charge ticket) number must be entered. The program now defaults a zero in the Super Bill field if one is not entered.
NOTE: If users enter a SuperBill number that has already been assigned to another patient, this pop-up message displays: 'The SuperBill number entered is assigned to a different patient. Please correct your entry'.
61.  : Effective version 18.07.18 - New field. Prior to this release, it was found that when posting charges with an encounter that also had a lab in the encounter and the encounter was no longer attached to the charge, the lab was still attached to the charges and printing in Box 32 and was also being included in the electronic 837 submission in NM1-77. As of version 18.07.18, a <Lab> field was added to the Charge Information window to allow the user to remove the LAB from the charge history.
62.  : If selected, the changes made to the displayed charge record are applied to all the charges currently displayed in Charges --►Modify. You still must press [Enter] through the <Approved Amount> field for the changes to be saved. This option applies only to the fields with asterisks: <Category Code>, <Billing Date>, <Sec Bill Date>, <Pay Plan Code>, <Insurance Code>, <Sec. Insurance>, <Lab>, and <Who>.
Warning: Only display the charges intended to be changed when this option is selected as this feature changes ALL dates of services listed on the screen.
63.  : Displays the original billing date for primary insurance.
63.1 Removing the <Billing Date> and/or <Sec. Bill Date> information indicates the claim has not been billed. If automation is set up for both Primary and Secondary claims, the claims transmit at night. For automation, Intellect's default is set to go back 365 days to transmit unbilled Primary and Secondary claims.
63.2 Leaving the <Billing Date> and/or <Sec. Bill Date> information indicates the claim has been billed. To produce the claim, rebill. To manually rebill:
• For electronic billing, see Billing --►Tele Com --►Submit Claim --►Batch of Patients or Group of Patients.
• For paper billing, see Billing --►Insurance --►Batch of Patients or Group of Patients.
64.  : Displays the original billing date for secondary insurance.
64.1 Removing the <Billing Date> and/or <Sec. Bill Date> information indicates the claim has not been billed. If automation is set up for both Primary and Secondary claims, the claims transmit at night. For automation, Intellect's default is set to go back 365 days to transmit unbilled Primary and Secondary claims.
64.2 Leaving the <Billing Date> and/or <Sec. Bill Date> information indicates the claim has been billed. To produce the claim, rebill. To manually rebill:
• For electronic billing, see Billing --►Tele Com --►Submit Claim --►Batch of Patients or Group of Patients.
• For paper billing, see Billing --►Insurance --►Batch of Patients or Group of Patients.
65.  : Displays the date payment is posted for this procedure.
66.  : Used in anesthesiology posting. This displays the beginning time as it was entered at the time of posting in Charges --►Charge <Time>.
67.  : Used in anesthesiology posting. This displays the ending time as it was entered at the time of posting in Charges --►Charge <Time To>.
68.  (shown as Pay Plan Code in versions prior to 9.12.32): Displays the patient's primary insurance assigned Pay Plan <Plan Code> as it was at the time of posting.
69.  (shown as Insurance Code in versions prior to 9.12.32): Displays the primary Utility --►Insurance --►Insurance <Insurance Co Code> for this patient for this procedure at the time of posting.
69.1 Effective version 9.12.25 and greater, while in this field, a user may change the Primary insurance by pressing the space bar to clear the field and then pressing [F2] to display a 'Searching ...' screen where an alternate Primary insurance may be selected.
69.2 Effective version 12.12.06: Intellect checks the validity of the data as it is entered into this field. In prior software versions, users had to press [Enter] after entering data to check that the data was valid.
69.3 Effective version 13.03.01: When users change the <Primary*> insurance, Intellect changes the CPT code for that charge, according to the new insurance. Also, users may now press [F2] on this field to search the patient's insurances.
70.  : Displays the secondary Utility --►Insurance --►Insurance <Insurance Co Code> for this patient for this procedure at the time of posting.
70.1 Effective version 9.12.25 and greater, while in this field, a user may change the Secondary insurance by pressing the space bar to clear the field and then pressing [F2] to display a 'Searching ...' screen where an alternate Secondary insurance may be selected.
70.2 Effective version 12.12.06: Intellect checks the validity of the data as it is entered into this field. In prior software versions, users had to press [Enter] after entering data to check that the data was valid.
70.3 Effective version 13.03.01: Users may now press [F2] on this field to search the patient's insurances.
71.  : Displays the tertiary Utility --►Insurance --►Insurance <Insurance Co Code> for this patient for this procedure at the time of posting.
71.1 Effective version 9.12.25 and greater, while in this field, a user may change the Tertiary insurance by pressing the space bar to clear the field and then pressing [F2] to display a 'Searching ...' screen where an alternate Tertiary insurance may be selected.
71.2 Effective version 12.12.06: Intellect checks the validity of the data as it is entered into this field. In prior software versions, users had to press [Enter] after entering data to check that the data was valid.
71.3 Effective version 13.03.01: Users may now press [F2] on this field to search the patient's insurances.
72.  : Displays the responsibility code as assigned to a Charges --►Charge <Who> at the time of posting.
72.1 Effective version 9.12.26, when modifying an entry of a primary insurer to another primary insurer (for example P1 to P2, or, if entering only the numeric value and not entering the alpha character) this message displays:
Note: When trying to change it to a single character, using only the letter and omitting the number, the program verifies which insurances the patient has on file for the Date of Service and selects what it feels is the most appropriate.
Any change changes the insurance on file in the treatment history table and affects billing and reports.
72.2 When attempting to modify the Who entry to an invalid value, an error message displays:
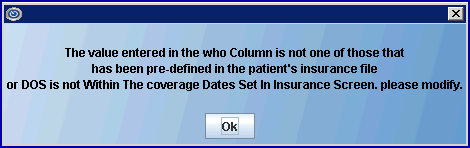
This error applies when either the Who value entered does not have a patient insurance record with the same value, or the DOS is not within the coverage date range.
72.3 Effective version 12.12.06: Intellect checks the validity of the data as it is entered into this field. In prior software versions, users had to press [Enter] after entering data to check that the data was valid.
73.  : Effective version 9.12.32 - New Field. Allows users to add or modify the unpaid copay amount after the charge is posted.
73.1 This field displays the <Excepted Co-Pay> entered through the ‘Bill Co-pay/Deductible’ context (right-click) menu option on the Charges --►Charge screen.
73.2 When patient statements are printed and the <Who> field is NOT ‘G’, this amount is included in the charge line labeled ‘Co-payment/Deductible due’.
73.3 For Informational purposes, this field is automatically updated to the copay amount on the ERA file when posted through the Payment --►Auto Payment screen.
74.  : Effective version 15.03.10 Allows users to add or modify the expected deductible amount after the charge is posted.
74.1 This field displays the <Expected Deductible> entered through the ‘Bill Co-pay/Deductible’ context (right-click) menu option on the Charges --►Charge screen.
74.2 When patient statements are printed and the <Who> field is NOT ‘G’, this amount is included in the charge line labeled ‘Co-payment/Deductible due’.
75.  : Effective version 15.03.10. Allows users to add or modify the expected co-insurance amount after the charge is posted.
75.1 This field displays the <Excepted Co-Insurance> entered through the ‘Bill Co-pay/Deductible’ context (right-click) menu option on the Charges --►Charge screen.
75.2 When patient statements are printed and the <Who> field is NOT ‘G’, this amount is included in the charge line labeled ‘Co-payment/Deductible due’.
76. Assignment (not in versions 9.12.32 and greater as this information already exists in the Charge modify table): Displays the Charge <ASI> value entered at time of posting this procedure to this account.
77.  (shown as Approved Amount in versions prior to 9.12.32): Displays the calculated approved amount. See the detailed document 'Approved Amount' on how the Approved Amount is calculated. Press [Enter] with the pointer in this field to save changes.
78. ![]() : Effective version 12.12.06: A [Save] button was added to the detail information panel. Press the [Save] button to save changes made in the fields on this panel.
: Effective version 12.12.06: A [Save] button was added to the detail information panel. Press the [Save] button to save changes made in the fields on this panel.
Action Buttons at the Bottom of the Screen

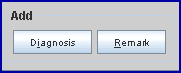
79. [Diagnosis]: When the focus is in the Command Column, clicking [Diagnosis] opens the Add Diagnosis text entry field.
For additional information on entering Diagnosis codes, see Key's Help, option A.
80. [Remark]: When the focus is in the Command Column for a procedure that does not already have a remark attached, clicking [Remark] activates an area to add a remark.
81. [Apply Changes]: This button is only active if changes have been made on the multi-row table display that have not yet been saved. Click this button to save/apply the changes/modifications.
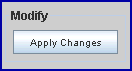
82. [Information]: When the focus is in the Command Column for a Procedure, click [Information] to display a detailed information panel for that procedure (described above). Alternately, on the keyboard, press Alt-n to display the detailed information panel.
83. [Payment History]: When the focus is in the Command Column line for a procedure, click [Payment History] (alternately, on the keyboard, press Alt-s to display patient history):
83.1 If there is no payment history, Intellect displays this message:
- OR -
83.2 If there is a payment history, the screen changes to display any payments and or adjustments specifically related to this charge.
![]()
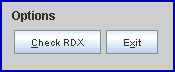
84. [Check RDX]: Version 9.12.27 - New Button. Use this button to verify that the Rdx (Diagnosis Pointer) matches the entered Diagnoses if changes have been made to the diagnoses. If the Rdx contains pointers for which there is not a valid diagnosis, a warning pops up. Notice in the example we have Diagnosis 1, but the RDX column has 1,2.

84.1 If the RDX and number of Diagnoses entered are correct, this displays after clicking on [Check RDX]:

NOTE: This does not mean billing was completed using the correct Diagnosis Codes, only that the RDX (diagnosis pointer) is linked to an entered Diagnosis.
85. [Exit]: Click [Exit] to clear, commit, and return the focus to the main Intellect screen.


