Home > Billing > Tele Com > Claim Status > Group of Patient
Intellect™
BILLING MENU OPTIONS

Tele Com
Claim Status
Group of Patient
This option allows a claim status request (276) to be sent to the clearinghouse for a group of claims where the original electronic submission was accepted by the clearinghouse or direct carrier. The claim status is returned as a 277 and prints on the selected printer OR is available for later pick-up by using Billing --►Tele Com --► Acknowledgement with '2' selected for the <Status> field.
NOTE: Not all clearinghouses and direct carriers support this request. Effective version 19.03.26, the Claims Status option can now check the status of a claim for clients using TriZetto as their clearinghouse.
For Claim Status Inquiry, these conditions must exist:
• A charge/date of service exists within the requested date range.
• The requested insurance(s) is listed as one of the patient's insurance screen(s).
• The date(s) of service must fall within the patient's insurance screen's <Coverage From> and <Coverage To> date range.
• Utility --►Insurance --►Insurance <Electronic Billing > must have a value that matches the <Carrier Type> on this screen.
• Utility --► Insurance --► Tele Com with <276 Script> completed according to the carrier's specifications.
• An account must be set up with a receiving agency.
• There must be a carrier-approved method of transmittal: modem, secure FTP, or FTP.
1. To submit a claim status request for a group of electronic claims in Intellect, go to Billing --►Tele Com --► Claim Status --►Group of Patient

The Claim Status GOP EBilling screen displays:
Effective Version 9.12.10 Field Modification. The one- and two-character code choices on the drop-down lists have been replaced with explanatory choices, making the code selection more user-friendly and comprehensive.
Note: The drop-down list descriptions for the code choices have remained the same, allowing correlation between the old and new code choices.
2.1 Enter the beginning date of the date range for the status request based on the <Date> field selection.
3. To Date 
3.1 Enter the latest date of the date range for the status request based on the <Date> field selection.
4.1 Enter the Utility --► Insurance --► Insurance <Electronic Billing> code for the clearinghouse or direct carrier.
5. Selection Criteria 
5.1 Allows accounts to be defined based on alphabetical criteria.
5.2 Leave blank to select all patients that meet any other criteria entered below, OR define the parameter using a hyphenated alphabetical range (such as A-L) to return patient accounts where the last name begins with any letters in the range.
6.1 This is the beginning number for a specific range of patient account numbers.
6.2 Press [Enter] to bypass this field and request ALL accounts, OR enter the beginning account number to be billed.
7. Account Number To 
7.1 This is the ending number for a specific range of patient account numbers.
7.2 Press [Enter] to bypass this field to request ALL accounts greater than the value entered in <Account Number> (open ended), OR enter the ending account number to be billed.
7.3 When pressing [Enter] without entering an account number in either the <Account Number> or <Account Number To> field, this query displays:
8. Primary/Sec/All(P/S/A) 
8.1 This field is used to select claims based on the responsible insurance.
8.2 Accept the 'P All Primary Ins' default (formerly P) for this group of patients, OR use the drop-down list to make an alternate selection.
8.3 Click on the field, OR press the [F2] key to display the valid choices.
To view the list of only the codes, click on the arrow. To select, click on the correct code, OR use the ↑ (up) and ↓ (down) arrows to highlight the correct code and then press the [Enter] key to select.
Effective version greater than 9.12.10
All versions prior to 9.12.10

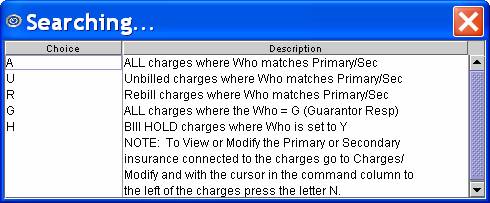
9.1 This field is used to select claims based on billing status.
9.2 Select 'All Charges' or 'Rebill Charges' to request status for claims that were previously submitted to the clearinghouse or direct carrier.
9.3 Click on the field, OR press the [F2] key to display the valid choices.
To view the list of only the codes, click on the arrow. To select, click on the correct code, OR use the ↑ (up) and ↓ (down) arrows to highlight the correct code and then press the [Enter] key to select.
Effective version greater than 9.12.10
All versions prior to 9.12.10
10. Category 
10.1 The default is to request status for all patient categories.
10.2 Press [Enter] to bypass this field to request ALL categories, OR enter a specific category by typing its' Utility --► Category <Category Code>.
10.3 This field accepts multiple values:
• category codes separated by commas with no spaces:

• a range of codes entered with a hyphen and no spaces:

• an asterisk * to return all Categories starting with the portion of the code entered prior to the *. For example, M* prints all Categories whose code begins with M.

11. Insurance Code 
11.1 Type the Utility --► Insurance --► Tele Com <Insurance Code> for the clearinghouse or direct carrier.
11.2 This is required.
12. Billing Code 
12.1 For use with <All/Unbill/Rebill/(A/U/R/H)> = 'R' Rebill.
12.2 Leave blank (the default) to request status for all billing codes.
12.3 To filter the claim status request based on specific billing codes, enter the Ledger --►Open Item or Ledger --►Accounting [Message] code.
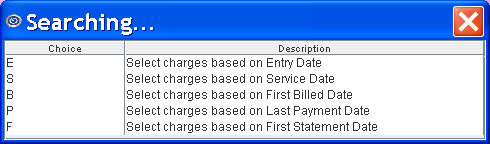
13.1 Accept the 'Entry Date' default OR use the drop-down to make an alternate selection.
13.2 Click on the field, OR press the [F2] key to display the valid choices.
To view the list of only the codes, click on the arrow. To select, click on the correct code, OR use the ↑ (up) and ↓ (down) arrows to highlight the correct code and then press the [Enter] key to select.
Effective version 9.12.10
All versions prior to 9.12.10
14. Provider 
14.1 Leave blank (the default) to request the status for all providers.
14.2 To filter the claim status request based on a specific provider, type the Utility --►Provider --►Provider <Provider Code>.
14.3 This field accepts multiple values:
• provider codes separated by commas with no spaces:

• a range of codes entered with a hyphen and no spaces:

• an asterisk * to return all providers starting with the portion of the code entered prior to the *. For example, 1* prints all Providers whose code begins with 1.

15. Claim Type 
15.1 Accept the 'Professional' default OR use the drop-down to make an alternate selection.
15.2 Click on the field, OR press the [F2] key to display the valid choices.
To view the list of only the codes, click on the arrow. To select, click on the correct code, OR use the ↑ (up) and ↓ (down) arrows to highlight the correct code and then press the [Enter] key to select.
All versions prior to 9.12.10: Type in the appropriate code: 1 = UB04 (CMS 1450), 2 = CMS 1500, 4 = CHDP PM 160
Effective version 9.12.10
16. User# 
16.1 Leave blank (the default) to request the status for all users (operators).
16.2 To filter the claim status request based on a specific user, type the Utility --► Set Up --► Security --► Login Users <User Number>.
17. POS 
17.1 Leave blank (the default) to request status for all POS (facilities).
17.2 To filter the claim status request based on a specific POS, type the Utility --►Facility <Facility Code>.
17.3 This field accepts multiple values:
• facility codes separated by commas with no spaces:

• a range of codes entered with a hyphen and no spaces:

• an asterisk * to return all facilities starting with the portion of the code entered prior to the *. For example, 1* prints all facilities whose code begins with 1.

18. Department 
18.1 Leave blank (the default) to request status for all Provider Department Numbers.
18.2 To filter the claim status request Gbased on a specific Department, type the Utility --► Provider --►Provider <Department>.
18.3 This field accepts multiple values:
• department codes separated by commas with no spaces:

• a range of codes entered with a hyphen and no spaces:

• an asterisk * to return all departments starting with the portion of the code entered prior to the *. For example, 1* prints all departments whose code begins with M.

19. When the information is completely entered, select one of these options:

19.1 Select the [Claim Status] button OR press [Enter]to display the printer dialog box:
19.1.1 Printer Properties:
19.1.1.1 Printer: The default printer for the logged-in clinic and password is selected. To select a different printer, either click on the arrow, OR press the → (right arrow) on the keyboard to view the list of printer codes. In our example, the defaulted Printer is HP. This is just an example of a printer name and may or may not be set up on the system.
To select the printer type, click on the code, OR use the ↑ (up) and ↓ (down) arrows to highlight the correct code; then press the [Enter] key to select.
19.1.1.2 Number of Copies: This field defaults to either 0 (zero) or 1. Both print 1 copy. To print more than one copy, enter the number of copies.
19.1.2 Fax/Email:
In addition to printing reports, Intellect provides the capability to export reports to an Excel spreadsheet, Email, Fax, Disk, or Archive. A secondary printer may also be selected, if one is set up, by clicking on the arrow to display the drop-down list.
19.1.3 Select the [Print] button to send the request to the printer (or as a Fax or email).
19.1.4 Select the [Cancel] button to clear the screen and return to the Claim Status GOP EBilling screen without saving or printing.
19.2 Click [Clear] to clear all information and return the focus to the <From Date> field without saving.
19.3 Click [Exit] to clear the screen and return the focus to the main Intellect screen without saving.
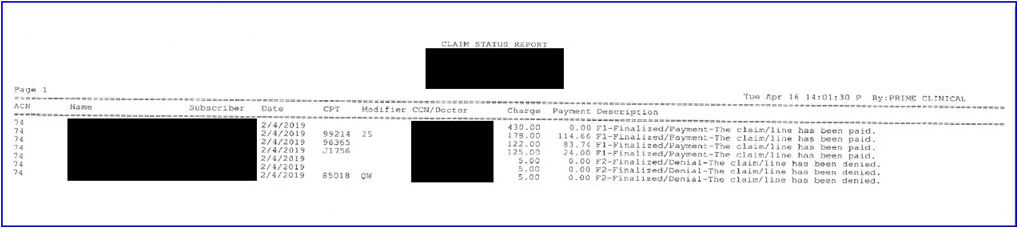
Sample Claim Status Report:
Effective version 19.03.26: The CSI Return (277 response) from Trizetto now includes the CCN; i.e., original Claim Control Number for that Date of Service. As shown on the sample below, this information displays on the report and is strictly from the Payer.
Information Displayed:
1. Patient Account Number
2. Patient Name
3. Subscriber Id
4. Date of Service
5. Modifier
6. CCN: Original Claim Control Number for that Date Of Service - new in this release
7. Doctor: Billing Provider Name
8. Charges – Charge Amount attached to the listed DOS
9. Payment: any payment made by the Payer for the listed DOS
10. Description: Payer(s) Status response for the listed DOS