
Intellect™
BILLING MENU OPTIONS

Tele Com
Submit Claim
Group of Patients
Videos Available: Click Billing Tele Com Submit Claim or Modify and Rebill Charges to access the link. Depending on the system set up, the media player may need to be activated. Speakers need to be attached to the workstation to hear the instructions.
Note: To view the videos, log-in through the www.primeclinical.com website. Current support is required.
This menu option is used to electronically submit groups of Insurance billing for patients' accounts. Very often a client's billing is set for automation so this screen would be most useful for manually submitting specific groups of claims.
Create a group of electronic claims in Intellect.
Note: For Tele Com billing and rebilling, these conditions must exist:
• A charge/date of service exists within the requested date range.
• The requested insurance(s) is listed as one of the patient's insurance screen(s).
• The date(s) of service must fall within the patient's insurance screen's <Coverage From> and <Coverage To> date range.
• Utility --►Insurance --►Insurance <Electronic Billing> must have a value that matches the <Carrier Type> on this screen.
• Utility --► Insurance --► Tele Com must be completed according to the carrier's specifications.
• An account set up with a receiving agency.
• A carrier-approved method of transmittal: modem or secure FTP (SFTP) or FTP. Additionally, electronic billing can now use SFTP (Secure File Transfer Protocol) with Central Coast Alliance. Offices interested in submitting to Central Coast Alliance using STP, please contact Prime Clinical Systems Support Department for assistance in setting up the system.
Learn more about how Medicare EDI claims are processed.
Note: Because some clearinghouses and/or payers require procedures to be transmitted in the order of entry, Intellect accommodates that requirement. The Electronic Claims are sorted by the patient account number, the date the charges were posted, and the order in which the procedures were entered.
Updates:
Effective version 20.10.22, A new segment was added to the ANSI 837P file - CLM REF D9. Note: The REF D9 is already included in the 837I.
To Include this segment in the ANSI 837P, the Utility --►Insurance --►Telecom <Clearing House> field must = N.
This new segment is required when this information is deemed necessary by transmission intermediaries (Automated Clearinghouses, and others) who need to attach their own unique claim number.
TR3 Notes: 1. Although this REF is supplied for transmission intermediaries to attach their own unique claim number to a claim, 837-recipients are not required under HIPAA to return this number in any HIPAA transaction. Trading partners may voluntarily agree to this interaction if they wish.
REF✽D9✽TJ98UU321~
In software versions prior to 15.03.10, claims submitted without the member out-of-pocket information were being rejected for some payers. Effective version 15.03.10, when a value greater than zero is submitted in the AMT segment, a CAS segment (Copay, Deductible, and Coinsurance) MUST ** be submitted in Loop 2430, WITH a group code PR (patient responsibility) indicator AND a reason code indicator of 1 (deductible), 2 (coinsurance), or 3 (copay) in the CAS*PR* segment. This change was made especially for Health Net insurance, however, this can apply to any insurance. Note: At the time of this release, this option is only available for professional claims.
To accommodate this change, two drop-down options were added:
• Utility --►Insurance --►Insurance, <Include Payment> field, option C: Include CoPay/Ded IN ANSI 837P (Electronic billing only)
• Utility --►Insurance --►Telecom, <Special Requirement> field, option H: Include copayment
Both options must be selected for the EB to include the correct loops and segments.
Attention: When the clearinghouse accepts electronic claims with attachments, then the PDF files saved in the EB_ATTACHMENT folder and associated with a claim on the Charges --► Encounter screen are submitted electronically with the claims. At this time the only partnered vendor accepting attachments electronically is Data Dimensions/WorkCompEDI.
NOTE: Prior to submitting electronic claims with attachments, the <Report Type Code>, <Report Transmission Code> and <Identification Code> fields must be completed on the Charges --► Encounter screen associated with the charge.
Effective version 15.03.10, when an attachment file is imported from PCM into the EB_ATTACHMENT folder as a corrupt file, an internal function deletes the corrupt file and then continuously makes attempts to reload the attachment. Because this is an internal function, no actions are required.
Effective version 13.12.12, when Utility --►Category <POS Type> is set to send a proof of service packet as part of the electronic attachments, the file now includes segment ‘K3’ to indicate the parties that Data Dimensions/WorkCompEDI will serve after receiving the Workers’ Compensation claims. In order for the K3 Qualifier to populate in the EB file, the Utility --►Insurance --►Telecom <Special Requirement> must be equal to ‘W.’
ATTENTION: In all versions prior to 9.12.10, when billing the secondary carrier the electronic claim would bill using the same procedure code as the primary insurance. Effective version 9.12.10, the secondary claim is billed using either Utility --►Procedure --►Procedure <Code R>, <Code C>, or <Code E> dependent on the Utility --►Insurance <Code R/C/E/U> field for the secondary insurance.
ATTENTION: Effective version 9.12.10, to meet the requirements for Cahaba billing, an optional data segment in the electronic claim file has been removed.
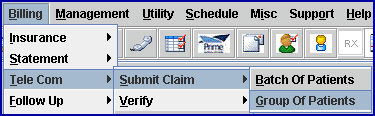
Create a Group of Electronic Claims in Intellect
1. To create a group of electronic claims in Intellect, go to Billing --►Tele Com --► Submit Claim --►Group of Patients
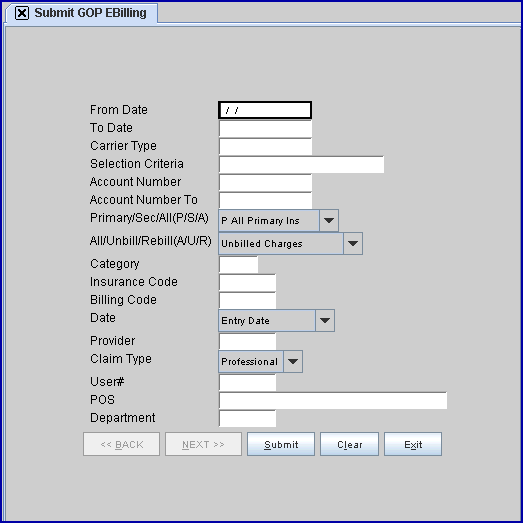
The Submit GOP EBilling screen displays:
Effective Version 9.12.10 Field Modification. The one- and two-character code choices on the drop-down lists have been replaced with explanatory choices, making the code selection more user-friendly and comprehensive.
Note: The drop-down list descriptions for the code choices have remained the same, allowing correlation between the old and new code choices.
2.1 Enter the beginning date of the date range for charges to be billed/rebilled based on the <Date> field selection.
2.2 This field defaults to Intellect's Clinic Date.
3. To Date 
3.1 Enter the latest date of the date range for charges to be billed/rebilled based on the <Date> field selection.
3.2 This field defaults to Intellect's Clinic Date.
4.1 Type the designated carrier type code for this billing. This is a required field.
4.2 Enter the Utility --► Insurance --► Insurance <Electronic Billing> code for this carrier:
I - Clearinghouse of your choice
M - Medicare
X - Medi-Cal (for older versions, this may be 'S')
W - Data Dimensions/WorkCompEDI
NOTE: The options available for electronic claims submission may vary based on the clearinghouse(s) and/or payor(s) for which enrollment was completed for professional and/or institutional claims.
5. Selection Criteria 
5.1 Allows the selection of accounts to bill based on alphabetical criteria.
5.2 Leave blank to select all patients that meet any other criteria entered below OR define the parameter using a hyphenated alphabetical range, such as A-L, to return patient accounts where the last name begins with any letters in the range of A-L.
6.1 This is the beginning number for billing by a specific range of patient account numbers.
6.2 Press [Enter] to bypass this field to request ALL accounts, OR enter the beginning account number to be billed.
7. Account Number To 
7.1 This is the ending number for billing by a specific range of patient account numbers.
7.2 Press [Enter] to bypass this field to request ALL accounts greater than any value entered in <Account Number> (open ended) OR enter the ending account number to be billed.
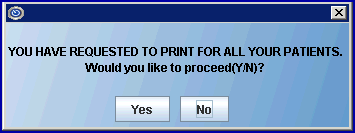
7.3 When pressing [Enter] without entering an account number in either the <Account Number> or <Account Number To> field, a notice displays suggesting values be entered:
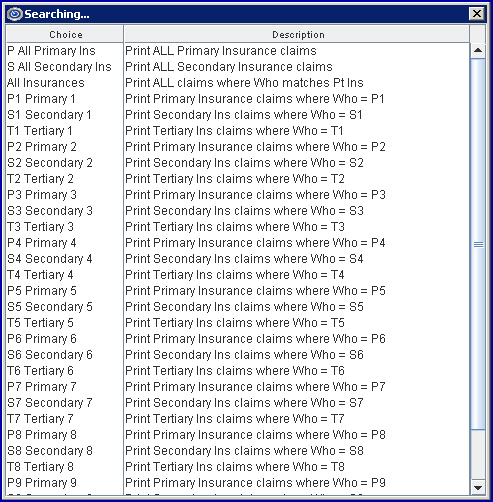
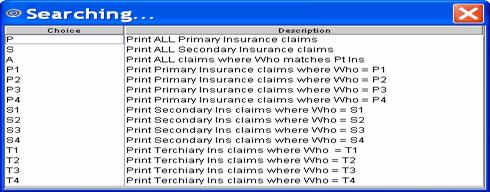
8. Primary/Sec/All(P/S/A) 
8.1 Used to select which insurance bill to print.
8.2 Accept the 'P All Primary Insurances' default (formerly P) for this group of patients OR use the drop-down list to make an alternate selection.
8.3 Click on the field, OR press the [F2] key to display the valid choices.
To view the list of only the codes, click on the arrow. To select, click on the correct code, OR use the ↑ (up) and ↓ (down) arrows to highlight the correct code and then press the [Enter] key to select.
Effective version 9.12.10
All versions prior to 9.12.10
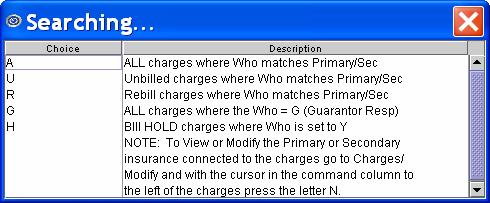
9. All/Unbill/Rebill(A/U/R/H) 
9.1 Used to select which status of claims to print.
9.2 Accept the default 'Unbilled Charges' (formerly U) OR use the drop-down list to make an alternate selection.
9.3 Click on the field, OR press the [F2] key to display the valid choices.
To view the list of only the codes, click on the arrow. To select, click on the correct code, OR use the ↑ (up) and ↓ (down) arrows to highlight the correct code and then press the [Enter] key to select.
Effective version 9.12.10
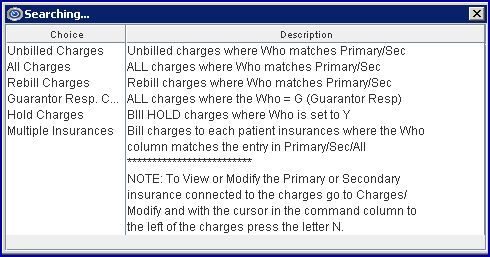
All versions prior to 9.12.10
10. Category 
10.1 Limits the billing results by specific patient category.
10.2 Press [Enter] to bypass this field to request ALL categories, OR use a specific category by typing its Category <Category Code>.
10.3 This field accepts multiple values:
• category codes separated by commas with no spaces:

• a range of codes entered with a hyphen and no spaces:

• an asterisk * to return all Categories starting with the portion of the code entered prior to the *. For example, M* prints all Categories whose code begins with M.

11. Insurance Code 
11.1 Type the Utility --► Insurance --► Tele Com <Insurance Code>.
11.2 MANDATORY
12. Billing Code 
12.1 For use with <All/Unbill/Rebill/(A/U/R/H)> = 'R' Rebill.
12.2 The default is submit billing for all billing codes (leave blank).
12.3 To filter the billing based on specific billing codes, type the Ledger <Billing Code>.
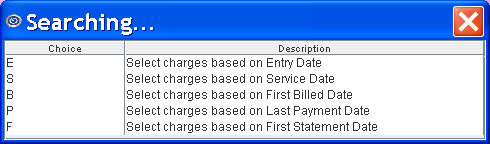
13.1 Accept the Entry Date default OR use the drop-down to make an alternate selection
13.2 Click on the field, OR press the [F2] key to display the valid choices.
To view the list of only the codes, click on the arrow. To select, click on the correct code, OR use the ↑ (up) and ↓ (down) arrows to highlight the correct code and then press the [Enter] key to select.
Effective version 9.12.10
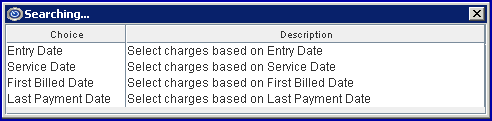
All versions prior to 9.12.10
Note: For versions prior to 9.12.10, select 'S' for MIRCal.
14. Provider 
14.1 The default is submit billing for all providers (leave blank).
14.2 To filter the billing based on a specific provider, type the Utility --►Provider --►Provider <Provider Code>.
14.3 This field accepts multiple values:
• provider codes separated by commas with no spaces:

• a range of codes entered with a hyphen and no spaces:

• an asterisk * to return all Providers starting with the portion of the code entered prior to the *. For example, 1* prints all Providers whose code begins with 1.

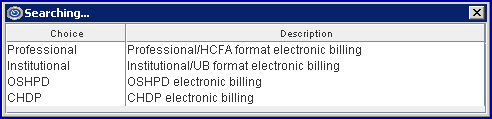
15.1 Accept the 'Professional' default OR use the drop-down to make an alternate selection.
15.2 When selecting the OSHPD option, first generate an OSHPD file. See Billing --►OSHPD MIRCal for more information.
Note: Effective August 2021, OSHPD became HCAI (Department of Health Care Access and Information).
15.3 Click on the field, OR press the [F2] key to display the valid choices.
To view the list of only the codes, click on the arrow. To select, click on the correct code, OR use the ↑ (up) and ↓ (down) arrows to highlight the correct code and then press the [Enter] key to select.
All versions prior to 9.12.10: Type in the appropriate code: 1 = UB04 (CMS 1450), 2 = CMS 1500, 4 = CHDP PM 160.
Effective version 9.12.10
16. User# 
16.1 The default is submit billing for all users (operator) (leave blank).
16.2 To filter the billing based on a specific user, type the Utility --► Set Up --► Security --► Login Users <User Number>.
17. POS 
17.1 The default is submit billing for all POS (leave blank).
17.2 To filter the billing based on a specific POS, type the Utility --►Facility <Facility Code>.
17.3 This field accepts multiple values:
• facility codes separated by commas with no spaces:

• a range of codes entered with a hyphen and no spaces:

• an asterisk * to return all facilities starting with the portion of the code entered prior to the *. For example, 1* prints all facilities whose code begins with 1.

18. Department 
18.1 The default is submit billing for all Provider Department Numbers (leave blank).
18.2 To filter the billing based on a specific Department, type the Utility --►Provider <Department>.
18.3 This field accepts multiple values:
• department codes separated by commas with no spaces:

• a range of codes entered with a hyphen and no spaces:

• an asterisk * to return all facilities starting with the portion of the code entered prior to the *. For example, 1* prints all facilities whose code begins with 1.

19. When the information is completely entered, select one of these options:

• Click [Clear] to clear all information and return the focus to the <From Date> field without saving.
• Click [Exit] to clear the screen and return the focus to the main Intellect screen without saving .
• Click [Submit] OR press [Enter] to display the printer dialog box:
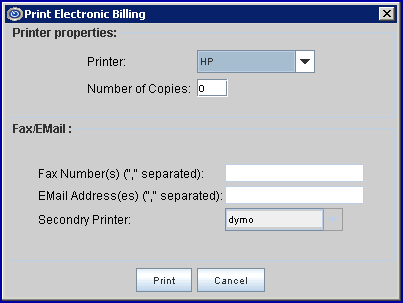
Printer Properties:
19.1 Printer: The default printer for the logged-in clinic and password is selected. To select a different printer, either click on the arrow, OR press the → (right arrow) on the keyboard to view the list of printer codes. In our example, the defaulted Printer is HP. This is just an example of a printer name and may or may not be set up on the system.
19.1.1 Select the printer type, change the number of copies, if needed, and then click [Print].
19.1.2 Effective version 16.10.11, EB Reports may be sent via email. Select EMAIL from the drop-down list and continue to step 19.4.

19.2 Number of Copies: This field defaults to either 0 (zero) or 1. Both print 1 copy. To print more than one copy, enter the number of copies.
Fax/Email:
19.3 Fax Number(s) ("," separated): Not valid for sending EB reports.
19.4 EMail Address(es) ("," separated): Effective version 16.10.11, EB Reports may be sent via email.
19.4.1 Enter the appropriate email address. If multiple addresses are needed, they should be separated by a comma.
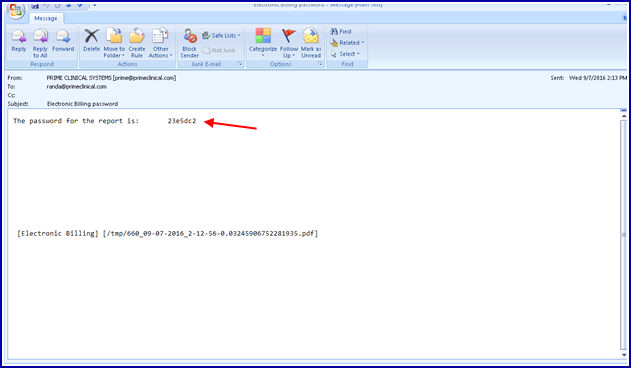
19.4.2 Click the [Print] button. Once [Print] is clicked, Intellect sends the EB report to the designated email, along with a password to open the email.
In the example below, notice there is an indication that the password was sent in a separate email. See Email in this documentation for additional information on sending email with attached reports.
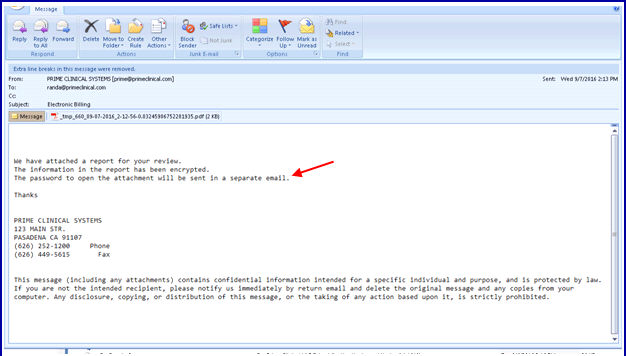
The following example is of an email with the password to open the received report.
19.5 Secondary Printer: Not used for sending EB reports.
19.6 [Print] Click to send the request to the printer or email.
19.7 [Cancel] Click to clear the screen and return to the <From Date> field without saving or printing.
Following a successful transmission of a claim to a clearinghouse or payor, an electronic billing report immediately prints. See Electronic Billing Report samples.


