Intellect™
MANAGEMENT MENU OPTIONS

OSHPD Report
OSHPD Report
The OSHPD screen allows summary information to be obtained based on certain patient demographics, procedures, and diagnoses performed to aid in the OSHPD reporting requirements.
With this Management Report, Intellect provides the capability to print, export to Excel spreadsheet, Email, or Fax.
Note: When the Utilization by Age and Gender report is exported to Excel, all of the information is grouped together whereas, in Intellect, the information is separated by Female, Male, and Unknown.
Please note that with all Management reports, the patient's <Category> and <Insurance> at the time of posting from the Charge screen is associated with that item forever.
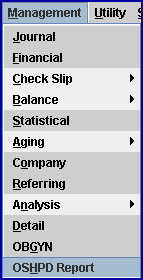
1. To display the Print OSHPD Screen in Intellect, go to Management --► OSHPD Report

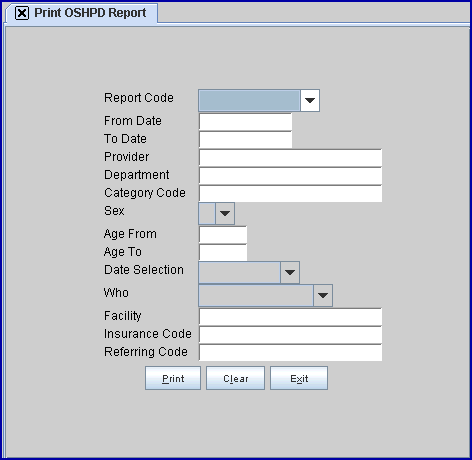
The Print OSHPD Report screen displays:

Effective Version 9.12.10 - Field Modification. The one- and two-character code choices on the drop-down lists have been replaced with explanatory choices, making the code selection more user-friendly and comprehensive.
Note: The drop-down list descriptions for the code choices have remained the same, allowing correlation between the old and new code choices.
2. Report Code 
2.1 Use the drop-down list to select the type of report. There is no default and a selection must be made.
2.2 Click on the field, OR press the [F2] key to display the valid choices.
To view the list of only the codes, click on the arrow. To select, click on the correct code, OR use the ↑ (up) and ↓ (down) arrows to highlight the correct code and then press the [Enter] key to select.
After version 9.12.10

All versions prior to 9.12.10

This is a brief summary of the Report Options.
Note: The old one-character code choice is shown in parenthesis behind the new explanatory code choice.
2.3 Utilization by Age and Gender (formerly A): The Age Analysis Report shows the total visitor and patient count per place of service per gender as defined in the Registration --►Regular --►Patient <Gender> field. Since the input requires age parameters, the returns are based on information completed in the Registration --►Regular --►Patient <DOB> field.
2.4 Utilization by Procedure Category (formerly C): The Procedure Analysis Report shows the total visitor and patient count per place of service. The returns are displayed by Utility --►Procedure --►Procedure <Category> field.
2.5 Utilization by Diagnosis Group (formerly D): The Diagnosis Analysis Report shows the total visitor and patient count per place of service for patient diagnoses based on the <Group> field of Utility --►Diagnosis --►Diagnosis.
2.6 Utilization by Poverty Level (formerly P): The Poverty Analysis Report shows the total visitor and patient count per place of service. The returns are displayed based on information completed in the Registration --►Regular --►Patient <Poverty Level> field.
2.7 Utilization by Race (formerly R): The Ethnicity Analysis Report shows the total visitor and patient count per place of service. The returns are displayed based on information completed in the Registration --►Regular --►Patient <Ethnicity> field.
3. From Date 
3.1 The beginning date for the date range of this report.
3.2 Type the first entry date for the data to include in this report.
3.3 The <From Date> field is not required. Leave it blank to search all records up until the <To Date> field.
4. To Date 
4.1 Type the last entry date for the data to include in this report.
4.2 The <To Date> field is not required. Leave it blank to search all records from the <From Date> field until today’s date.
5. Provider 
5.1 Leave blank for the default of all providers.
5.2 To filter the results based on a specific provider, type the Utility --►Provider --►Provider <Provider Code>.
5.3 This field accepts multiple codes:
• provider codes separated by commas with no space:

• a range of codes entered with a hyphen and no spaces:

• an asterisk * to return all Providers starting with the portion of the code entered prior to the *. For example, M* prints all providers whose code begins with M.

6. Department 
6.1 Leave blank for the default of all departments for all code types.
6.2 To request the report for a specific department, type the Utility --►Provider --►Provider <Department> name or number.
6.3 This field accepts multiple codes:
• separated by commas with no spaces:

• a range of codes entered with a hyphen and no spaces:

• an asterisk * to return all Departments starting with the portion of the code entered prior to the *. For example, M* prints all Departments whose code begins with M.

7. Category 
7.1 Leave blank for the default of all categories for all code types.
7.2 To request the report for a specific category, type the Utility --►Category <Category Code>.
7.3 This field accepts multiple codes:
• separated by commas with no spaces:

• an asterisk * to return all Categories starting with the portion of the code entered prior to the *. For example, M* prints all Categories whose code begins with M.

8.1 Leave blank for the default of no specific gender for all code types.
8.2 To filter the results based on a specific gender, use the drop-down to select Male, Female, or Unknown if the gender is unknown or not applicable (i.e., Company Accounts).
9.1 Required when Age and Gender is selected for the <Report Code>.
9.2 Type the minimum age for patients to be included in this report, determined by patient age at the date of service.
10. Age To 
10.1 Required when Age and Gender is selected for the <Report Code>.
10.2 Type the maximum age for patients to be included in this report, determined by patient age at the date of service.
NOTE: Management reports for Age do not show actual age so proper age groupings must be determined here.
11 Date Selection. 
11.1 This field defaults to 'Entry Date.'
11.2 Accept the default OR use the drop-down list to make an alternate selection.
11.3 Click on the field, OR press the [F2] key to display the valid choices.
To view the list of only the codes, click on the arrow. To select, click on the correct code, OR use the ↑ (up) and ↓ (down) arrows to highlight the correct code and then press the [Enter] key to select.
Effective version 9.12.10

All versions prior to 9.12.10

12. Who 
12.1 Leave blank for the default of not filtering by the Ledger --►Accounting or Ledger --►Open Item <Who> column.
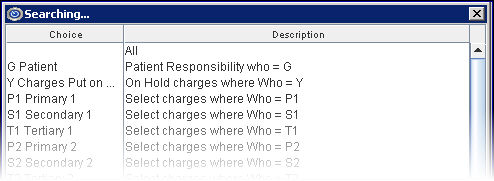
12.2 Accept the blank default OR use the drop-down list to filter by the selected Who type. Partial lists are shown below:
After version 9.12.10

All versions prior to 9.12.10

13.1 Leave blank for the default of all facilities for all code types.
13.2 To request the report for a specific facility, type the Utility --►Facility <Facility Code>.
13.3 This field accepts multiple codes:
• separated by commas with no spaces:

• a range of codes entered with a hyphen and no spaces:

• an asterisk * to return all Facilities starting with the portion of the code entered prior to the *. For example, 1* prints all Facilities whose code begins with 1.

14. Insurance Code 
14.1 Leave blank for the default of all primary insurer for all code types.
14.2 To request the report for a specific primary insurer, type the Utility --►Insurance --►Insurance <Insurance Co Code>.
14.3 This field accepts multiple codes:
• separated by commas with no space:

• an asterisk * to return all Insurers starting with the portion of the code entered prior to the *. For example, M* prints all Insurers whose code begins with M.

15. Referring Code 
15.1 Leave blank for the default of all referrals for all code types.
15.2 To request the report for a specific referral source, type the Utility --►Referring <Referring Code>.
15.3 This field accepts multiple codes:
• separated by commas with no space:

• a range of codes entered with a hyphen and no spaces:

• an asterisk * to return all Referrers starting with the portion of the code entered prior to the *. For example, 1* prints all Referrers whose code begins with 1.

16. When the information is completely entered, select one of these options:

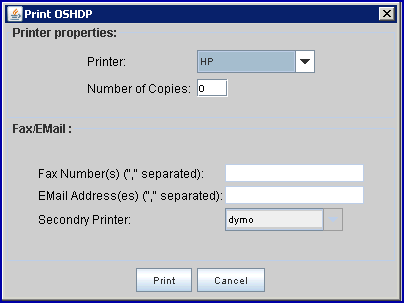
16.1 Click [Print] OR press [Enter] to display the Print OSHPD dialog box:

16.1.1 Printer Properties:
16.1.1.1 Printer: The default printer for the logged-in clinic and password is selected. To select a different printer, either click on the arrow, OR press the → (right arrow) on the keyboard to view the list of printer codes. In our example, the defaulted Printer is HP. This is just an example of a printer name and may or may not be set up on the system.
To select the printer type, click on the code, OR use the ↑ (up) and ↓ (down) arrows to highlight the correct code; then press the [Enter] key to select.
16.1.1.2 Number of Copies: This field defaults to either 0 (zero) or 1. Both print 1 copy. To print more than one copy, enter the number of copies.
16.1.2 Fax/Email:
In addition to printing reports, Intellect provides the capability to export reports to an Excel spreadsheet, Email, Fax, Disk, or Archive. A secondary printer may also be selected, if one is set up, by clicking on the arrow to display the drop-down list.
16.1.3 Select the [Print] button to send the request to the printer (or as a Fax or email).
16.1.4 Select the [Cancel] button to clear the screen and return to the <Report Code> field without saving or printing.
16.2 Click [Clear] to clear all information and return the focus to the <Report Code> field without saving.
16.3 Click [Exit] to clear the screen and return the focus to the main Intellect screen.