
Intellect™
WEBSTAFF MENU OPTIONS

Administrative Console
Effective version 17.07.21
WebStaff provides clinics with remote access to their appointment schedule via the internet. To connect from anywhere there is internet, at anytime, open a web browser, enter the WebStaff address, then complete your Login and Password.
Note: Minimal setup is required before using WebStaff. See WebStaff --►WebStaff Setup for details.
This document discusses the [Admin Console] option in WebStaff and the associated menus.
In this Topic Hide
1. Log-in to Webstaff via the internet
2. Log-in to WebStaff via the Login screen
2. Facility Editor (previously Hospital Editor)
1.1 From within the office, use the Internal IP address.
• if the port is other than the default ‘80’port, it must be entered: http://IPaddress:8080/webstaff/LoginServlet
1.2 From outside the office, use the External IP address.
• if the port is other than the default ‘80’port, it must be entered: http://IPaddress:8080/webstaff/LoginServlet
The Login screen opens:
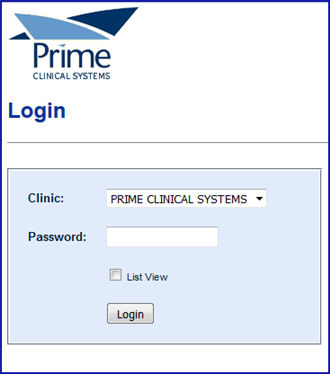
2.1 <Clinic>:
2.1.1 Effective version 17.07.21, the <Username> field was replaced with the <Clinic> field.
2.1.2 Select your clinic name from the drop-down list.
2.2 <Password>:
2.2.1 Effective version 17.07.21, enter the password used when signing-in to Intellect.
2.2.2 Users who do not have an Intellect password need to have one set up for them in Utility --►Set Up --►Security --►Log In Users.
2.2.3 Utility --►Set Up --►Security --►Log In Users <WebStaff Security Level> must be setup.
2.3 Click the [Login] button to open WebStaff in the schedule - Calendar View.
2.4 Scroll down to the bottom of screen, and click the [Admin Console] button to begin setting up WebStaff. Only users with their Utility --►Set Up --►Security --►Log In Users <WebStaff Security Level> set to '2' have this button available:

NOTE: As of 10/23/2017, the Main Menu, and each option under the Admin Console Button, no longer has the ☐ [Include Archive Records] option. Any changes are managed in OnStaff Intellect.
Click the [Admin Console] button to open the Administrative Console. See the Menu Options section below for Administrative Console details.
A successful log-in opens the Administrative Console (shown below) where you, as the Administrator, will be setting up the users by clicking the ‘User Setup’ option to select the doctor(s) whose schedule you wish to view.
NOTE: Since Webstaff uses Intellect's password, all users using Webstaff must be added as a user in Intellect (see 9. User Setup).
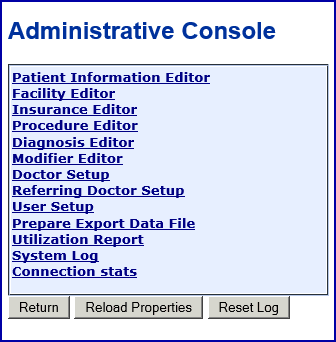
[Return]: Returns you to the Calendar View.
[Reload Properties]: For support.
[Reset Log]: For support.
Detailed information for each of the Administrative Console menu options may be accessed simply by scrolling down this document OR through the links in the Table of Contents' Menu Options section.
This screen allows users to search for a particular patient, edit or modify the information, or add a new patient to the program. It works the same as the [Patient Info Editor] button on the main menu (discussed in Webstaff --►Overview).
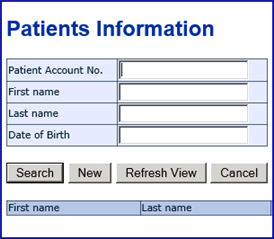
1.1 [Search]: To search by patient name or date of birth (DOB), click on the appropriate field, enter the name or DOB, then click the [Search] button.
1.2 [New]: If a patient is not found in a search, click [New] to add a new patient. See details on adding patients in Webstaff --►Overview, Patients Editor screen, 3.3.2 [New] button.
1.3 [Refresh View]: After adding a new patient, click [Refresh View] to see the patient you added.
1.4 [Cancel]: Click to return to the Current Schedule (Calendar View).
Select this option to display the list of OnStaff Intellect facilities whose Utility --► Facility <WebStaff Access> field is set to ‘Y’. Facilities are added and/or removed from this list by toggling the Utility --► Facility <WebStaff Access> field from 'Y' to 'N' and vice versa.

2.1 <Facility> (previously Hospital): Lists the names of hospital or office locations where patients are seen.
2.2 <Phone>: Displays the phone of the facility as entered in Intellect.
2.3 <Facility Code> (previously <External ID>): The Utility --►Facility <Facility Code> from OnStaff Intellect.
2.4 [Cancel]: Clicking this button takes you to the Administrative Console.
2.5 [Refresh View]: Click this button to redraw the screen if a Facility has been added to OnStaff Intellect.
Click on Insurance Editor to display the list of OnStaff Intellect insurance companies whose Utility --►Insurance --►Insurance <Webstaff Access> is set to ‘Y’.

Column information for the Insurances screen:
3.1 <Insurance>: The insurance name.
3.2 <Address>: Displays the insurance address.
3.3 <Insurance Code>: Displays the code for the insurance as set up in Intellect under Utility --►Insurance --►Insurance <Insurance Co. Code>.
3.4 <Action>: Contains an Edit link (see red arrow above). Clicking on Edit opens the Insurance Editor screen for the selected insurance. For example:
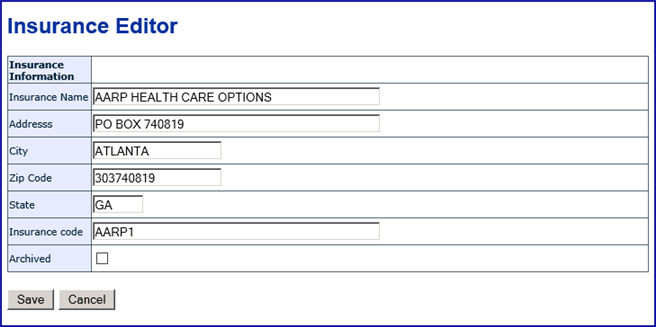
The same information as shown on the Insurances screen displays. Users may edit the information and/or select/deselect the ☐ Archived box. After making changes, click the [Save] button. To return to the Insurances screen without saving changes, click [Cancel].
Button information for the Insurances screen:

3.5 [Cancel]: Click to return to the Administrative Console
3.6 [New]: Clicking this button opens the Insurance Editor screen (see 3.4 above for screen information) allowing you to add a new insurance not previously listed. Complete the Name, Address, and Insurance Code fields.
Note: If you add a new insurance on this screen, you must complete the insurance setup in OnStaff Intellect before billing via Utility --►Insurance --►Insurance --►Modify.
3.7 [Refresh View]: Click this button to redraw the list to include the added insurance.
Click this option for a list of OnStaff Intellect procedures whose Utility --►Procedure --►Procedure --►Modify <WebStaff Access> = ‘Y’. The list includes the procedure description, CPT code, price, and an <Action> column with an Edit link. Clicking Edit displays a Procedure Editor screen which works the same as the Insurance Editor option in regard to editing or adding a new entry. See section 3.4 for more information.
Note: It is preferable to add a new procedure in OnStaff Intellect to set ALL fields for the new procedure. If you add a new procedure on the Procedures screen (using the [New] button), you must complete the procedure setup in OnStaff Intellect by selecting Utility --►Procedure --►Procedure --►Modify.
Click this option for a list of OnStaff Intellect diagnoses whose Utility --►Diagnosis --►Diagnosis <WebStaff Access> is set to ‘Y’. The list includes the diagnosis description, ICD9/10 code, and an <Action> column with an Edit link. Clicking Edit displays a Diagnosis Editor screen which works the same as the Insurance Editor option in regard to editing or adding a new entry. See section 3.4 for more information.
Note: It is preferable to add a new diagnosis in OnStaff Intellect to set ALL fields for the new diagnosis. If you add a new diagnosis on the Diagnosis screen (using the [New] button), you must complete the diagnosis setup in OnStaff Intellect by selecting Utility --►Diagnosis --►Diagnosis --►Modify.
Click this option to list all modifiers in OnStaff Intellect whose Utility --► Procedure --► Modifier --► Modify <WebStaff Access> set to ‘Y’. The list includes the modifier, modifier code, and an <Action> column with an Edit link. Clicking Edit displays a Modifier Editor screen which works the same as the Insurance Editor option in regard to editing or adding a new entry. See section 3.4 for more information.
Note: The modifiers used for posting should all be setup in Intellect prior to posting. If you add a new modifier on the Modifiers screen (using the [New] button), you must complete the modifier setup in OnStaff Intellect by selecting Utility --►Procedure --►Modifier --►Modify.
Click to list all providers that have Utility --► Provider --►Provider --► Modify <WebStaff Access> set to ‘Y’ in OnStaff Intellect. The list displays the doctor's first name, last name, and Doctor Code (as set up in Utility --►Provider --► Provider <Provider Code>).
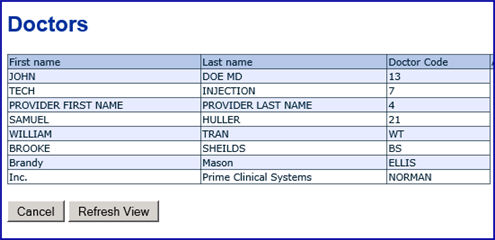
7.1 [Cancel]: Click to return to the Administrative Console screen.
7.2 [Refresh View]: Click to redraw the screen if a new doctor has been added in OnStaff Intellect.
Click this option to return a list of OnStaff Intellect referring providers whose Utility --► Referring <WebStaff Access> set to ‘Y’. The list on the Referring Doctors screen includes the referring doctor's name, zip code, Referring Code, and an <Action> column with an Edit link. Clicking Edit displays a Referring Doctor Editor screen which works the same as the Insurance Editor option in regard to editing or adding a new entry (see section 3.4 for more information). Be aware that the Referring Doctor Editor screen includes information not shown on the prior screen:

Except for the <Location> field, this information is pulled from OnStaff Intellect Utility --►Referring. For the <Location> field, if the referring doctor is within your practice, select 'Internal'; if the referring doctor is outside your practice, select 'External'.
Note: If you add a new referring doctor on the Referring Doctors screen (using the [New] button), you must complete the referring doctor setup (such as adding an NPI number) in OnStaff Intellect by selecting Utility --►Referring --►Modify.
Note: If you skip this option, the user does not see a schedule when he/she logs in.
Click to return a list of users. Effective version 17.07.21, users login with the same password used in Intellect; therefore, Utility --►Setup --►Security --►Login Users --►Modify <Webstaff Security Level> must be completed for each user. Also effective in version 17.07.21, the Edit and Password columns were removed from this screen.
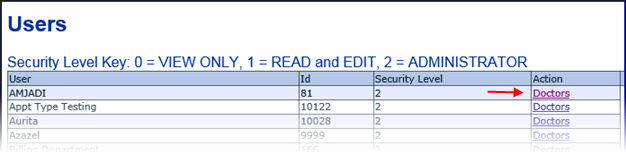
9.1 [Cancel]: Click to return to the Administrative Console screen.
9.2 [Refresh View]: Click to redraw the screen if a new user has been added in OnStaff Intellect via Utility --►Setup --►Security --►Login Users --►Add.
9.3 <Action> column: The Doctors link, as indicated by the red arrow in the <Action> column above, opens the User Preferences screen (see below) for the selected user. The User Preferences screen allows you to select which Doctors this user sees on the schedule and for whom charges may be posted.
In the example below, since Samuel Huller is the only doctor selected, only his appointments display and this user may only post charges for him:
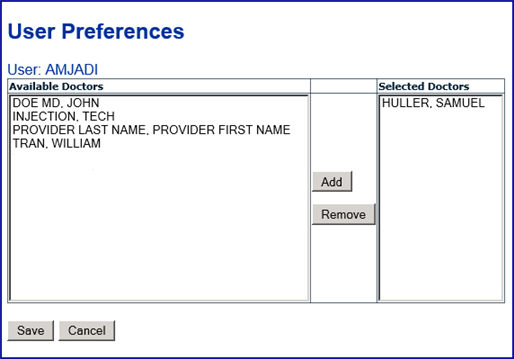
9.3.1 To add a doctor: Click the doctor name under Available Doctors, then click the [Add] button to move the Doctor to the ‘Selected Doctors’ column.
• To select more than 1 doctor listed in consecutive order, press the [Shift] and arrow down. Or [Shift] and click with the mouse.
• To select multiple providers not in consecutive order, hold [Control] and click to select doctors, then click the [Add] button to move to 'Selected Doctors'.
9.3.2 To remove a doctor: Highlight the name on the right under ‘Selected Doctors’, then click on the [Remove] button.
9.3.3 [Save]: Click to save changes to return to the User List.
9.3.4 [Cancel]: Click to return to the User List.
Continue updating each user with the Doctors they will view on the schedule.
This option is used to manually export charges entered in WebStaff to OnStaff Intellect. Clicking on Prepare Export Data File returns a list of charges that have been posted in WebStaff:
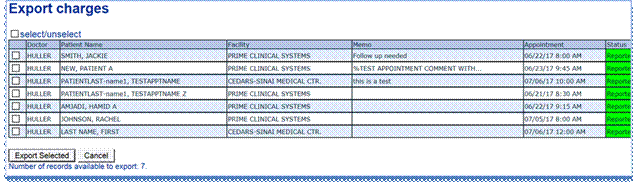
To export charges:
10.1  : Click the box to select (adds a check mark) or deselect (removes a check mark).
10.2  :Check the box by the name to select the patient(s) to export. Uncheck to remove a patient from being exported.
10.3 [Status] column: Shows the status of the charge.
10.4 
10.4.1 Indicates the number of records available to export. The example above shows 7.
10.4.2 [Cancel]: Click to return to the Current Schedule-Calender View.
10.4.3 [Export Selected]: After selecting patients to be exported (see 10.2 ), click this button to open the list of selected patients:
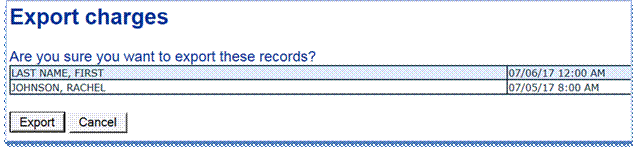
Are you sure you want to export these records?
[Export]: Click to continue exporting charges to Intellect and return to the Export Charges list.
[Cancel]: Click to return to your previous list with check boxes.
Based on the samples above: If you only selected 1 patient, clicked [Export Selected], then [Export] to continue, the program returns you to your list but only shows 6 records and the exported charge was removed from the list.
Select to display doctor statistics:
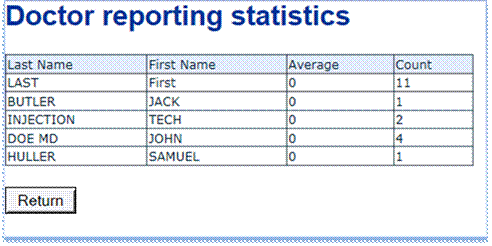
11.1 <Last Name/ First Name>: These columns display the doctor's name.
11.2 <Average>: This column displays the average time since the appointment was added for the charge to be posted.
11.3 <Count>: This column displays the number of appointments for this doctor.
11.4 [Return]: Click this button to return to the Current Schedule (Calendar View).