
Intellect™
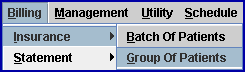
BILLING MENU OPTIONS

Insurance
Group of Patients
This menu option is used to print groups of Insurance billing for patients' accounts. Very often a client's billing is set for automation; hence, this screen would be most useful for printing specific groups of claims. The option to create a Pre-Billing Report is included (see <Form Type> for details).
Note: When a patient changes insurance, the old insurance information should be left in the patient's demographic screens until all charges/payments have been completed for the old carrier. If the old insurance is removed prior to completion of charges/payments, Intellect does not generate the information for the old insurance on the statements.
For billing and rebilling, these conditions must exist:
• A charge/date of service exists within the requested date range.
• The requested insurance(s) is listed as one of the patient's insurance screen(s).
• The date(s) of service must fall within the patient's insurance screen's <Coverage From> and <Coverage To> date range.
See details for opening and populating the Print GOP Insurance screen.
Updates:
Effective version 21.11.09: In previous releases, the treating provider was added to Box 77 of the UB04 form. However, this box was only to be used when there was a surgical procedure being done and the assistant surgeon needed to be listed on the claim.
The new changes now omit the information from Box 77 when the Utility --► Procedure <POS> is Surgical and the conditions are met in Report Designer. If at the time the user adds a referring provider to the charges, the referring providers name and information are printed in this box.
Effective version 9.12.14
Users have the option to select which insurances should be billed for zero balances and which should not when they are the patient’s secondary or tertiary insurance. To facilitate this change, a <Bill Zero Balance> field was added to the Utility --►Insurance screen (this field is for paper billing only). Please refer to Utility --►Insurance --►Insurance <Bill Zero Balance> for set up information.
Prior to version 9.12.14, if when the primary payment and adjustment are posted the balance was zero and the patient has secondary insurance the program would bill the secondary insurance unless the Who column was modified to G before billing was run.
Videos Available: Click Billing Insurance Form, Pre-Billing Report, or Modify and Rebill Charges to access the links. Depending on the system set up, the media player may need to be activated. Speakers need to be attached to the workstation to hear the instructions.
Note: To view the videos, log-in through the www.primeclinical.com website. Current support is required.
1. To open the Print GOP Insurance screen in Intellect, go to Billing --► Insurance --► Group of Patients
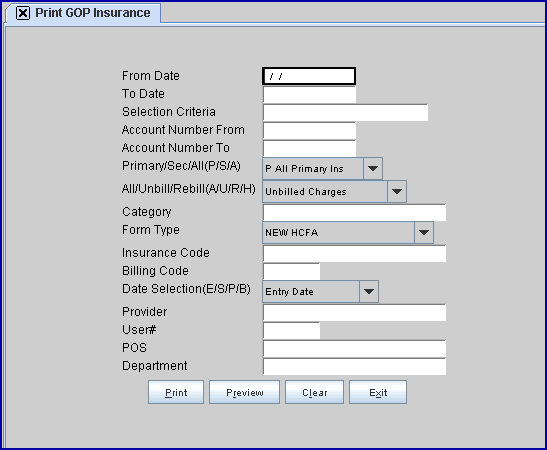
The Print GOP Insurance screen displays:
Effective Version 9.12.10 Field Modification. The one- and two-character code choices on the drop-down lists have been replaced with explanatory choices, making the code selection more user-friendly and comprehensive.
Note: The drop-down list descriptions for the code choices have remained the same, allowing correlation between the old and new code choices.
2.1 This is the beginning date of the date range for charges to be billed/rebilled based on the <Date Selection (E/S/P/B)> field criteria.
3. To Date 
3.1 This is the last date of the date range for charges to be billed/rebilled based on the <Date Selection (E/S/P/B)> field criteria.
4. Selection Criteria 
4.1 Allows the accounts to be selected to bill based on alphabetical criteria.
4.2 Leave blank to select all patients that meet any other criteria entered below OR define the parameter using a hyphenated alphabetical range such as A-L to return patient accounts where the last name begins with any letters in the range of A-L.
5. Account Number From 
5.1 This is the beginning number for billing by a specific range of patient account numbers.
5.2 Press [Enter] to bypass this field which requests ALL accounts, OR use this field as the beginning account number to be billed.
6. Account Number To 
6.1 This is the ending number for billing by a specific range of patient account numbers.
6.2 Press [Enter] to bypass this field which requests ALL accounts greater than any value entered in <Account Number From> (open ended), OR use this field as the ending account number to be billed.
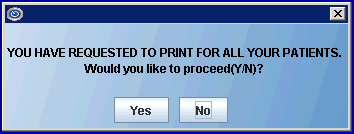
Note: When pressing [Enter] without entering an account number in one of the fields, the following message displays, suggesting values be entered. Click the appropriate button.
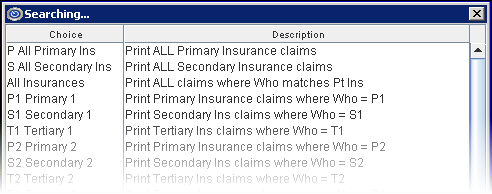
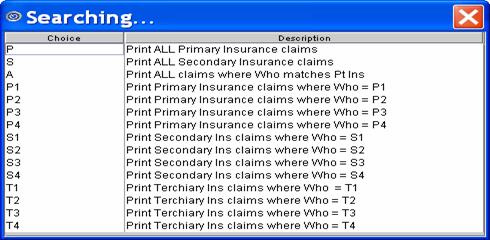
7. Primary/Sec/All (P/S/A) 
7.1 This field is used to select which insurance bills to print.
7.2 Accept the All Primary Insurances default (formerly P) for this group of patients, OR use the drop-down list to make an alternate selection.
7.3 Click on the field, OR press the [F2] key to display the valid choices.
To view the list of only the codes, click on the arrow. To select, click on the correct code, OR use the ↑ (up) and ↓ (down) arrows to highlight the correct code and then press the [Enter] key to select.
Effective version 9.12.10
All versions prior to 9.12.10
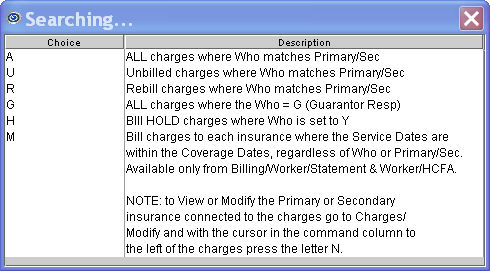
8.1 This field is used to select which status of claims to print.
8.2 Accept the Unbilled Charges default (formerly U) all primary/secondary, OR use the drop-down list to make an alternate selection.
8.3 Click on the field, OR press the [F2] key to display the valid choices.
To view the list of only the codes, click on the arrow. To select, click on the correct code, OR use the ↑ (up) and ↓ (down) arrows to highlight the correct code and then press the [Enter] key to select.
Effective version 9.12.10
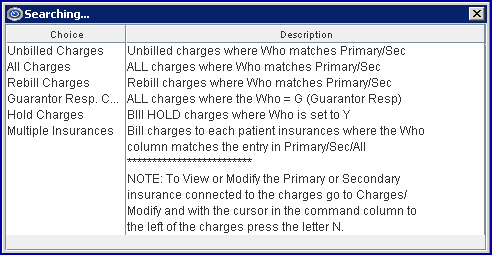
Effective version 16.12.02 the 'Multiple Insurance' drop-down option now allows the HCFA 1500 to print for charges to each patient insurance.
NOTE: Use the Multiple Insurances option (formerly M) only for Workers Compensation claims.
All versions prior to 9.12.10
9. Category 
9.1 This field limits the billing results by specific patient category.
9.2 Press [Enter] to bypass this field which requests ALL categories, OR use a specific category by typing its Utility --► Category <Category Code>.
9.3 This field accepts multiple values:
• Category codes separated by commas with no spaces:

• a range of codes entered with a hyphen and no spaces:

• an asterisk * to return all Categories starting with the portion of the code entered prior to the *. For example, M* prints all Categories whose code begins with M.

10.1 Select the desired form type for this billing (see form samples). Lists of valid codes for the form types are given in step 10.2. Additional information for some form types is listed below in alphabetical order:
10.1.1 CHDP
10.1.1.1 Effective version 16.10.11, the drop-down options of CHDP 6 and CHDP 7 were removed. An option of CHDP was added to accommodate the most current version (CHDP 8, at the time of the update).
10.1.2 Explanation of Benefits
10.1.2.1 The EXPLANATION OF BENEFITS option only prints if the <Who> field for the requested charges is set to ‘S1’ (or an alternate secondary insurance ‘S2’, ‘S3’, etc.).
10.1.3 HCFA 1500 Form (this is the default - formerly 'C')
10.1.3.1 Version 14.03.20 or higher is required to use the HCFA 1500 Form (02-12) mandated for use beginning April 1, 2014.
• For black and white forms, select NEW HCFA
• For the red and white forms, select NEW HCFA RED
10.1.3.2 Claims only print when this <Form Type> selection matches the Utility --► Insurance --► Insurance <Form Type>.
10.1.4 Ingenix Message.
10.1.4.1 When the 'Ingenix Message ' option is selected, the same information is gathered as for billing reports, only it is saved in a special format, like HL7. The file name begins with IMF, and is saved under ut_path/ingenix.
10.1.5 Pre Billing Report
10.1.5.1 For the 'PRE BILLING REPORT' option (formerly 'P'), please see Pre-Billing Report for other required settings.
The ‘Pre-Billing Report’ may not be run using Billing --► Insurance --► Batch of Patients.
Also, please note the changes in these updates:
10.1.5.2 Effective version 9.12.10
Changes were made to the report column headings of the Pre-Billing report. The headings that changed are:
• Name/DR was changed to Pt Name/Ref Dr
• ACC/UPIN was changed to Acct/Ref NPI
• SS/FROM was changed to Sub#From DOS
• Group/To was changed to Group/To DOS
All versions prior to 9.12.10: If the Subscriber Number is not completed, the column is left blank.
Effective Version 9.12.10: The report displays ***** to bring attention to missing information.
Effective version 9.12.13
Some of the columns on the Pre-Billing Report include two types of data and the headings for these columns were placed in two rows. Additionally, the wording changed in some of the headings on the Pre-Billing Report. The headings with wording changes are:
• Pt Name/Ref Dr is now Pt Name/Ref Prv
• Sex/Who is now Gender/Who
• Sub#/Dr-FromDOS is now Subscriber#/TxPrv/FromDOS
• Group/BDr-ToDOS is now Group#/BIPrv/ToDOS
10.1.5.4 Effective version 9.12.16
These changes were made to the Pre-Billing Report:
• The patient Zip Code, City, and State were added above the Charge, Credit, and Balance columns. If Zip, City, or State were blank, **** is displayed instead
• Total Patients and Total Balance were added to the report
• A space was added between CPT and Modifier
• The size of the Modifier was increased to print all 8 characters
• The Category and RDX columns’ locations were swapped
10.1.6 NEW HCFA RED
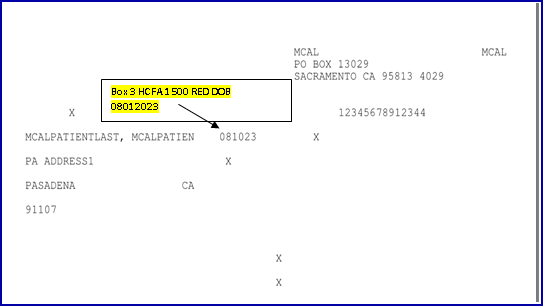
10.1.6.1 Effective version 23.10.04: When the Utility --►Insurance <Insurance Type> is D (Medi-Cal) and Billing --► Insurance <Form Type> is NEW HCFA RED, Box 3 (DOB) prints as a 6-digit date (MM/DD/YY) as required by Medi-Cal (see CMS-1500 Completion, Item 3).
10.2 To display the valid choices, click on the field OR press the [F2] key .
To view the list of only the codes, click on the arrow. To select, click on the correct code, OR use the ↑ (up) and ↓ (down) arrows to highlight the correct code and then press the [Enter] key to select.
Sample code lists are shown below for these versions:
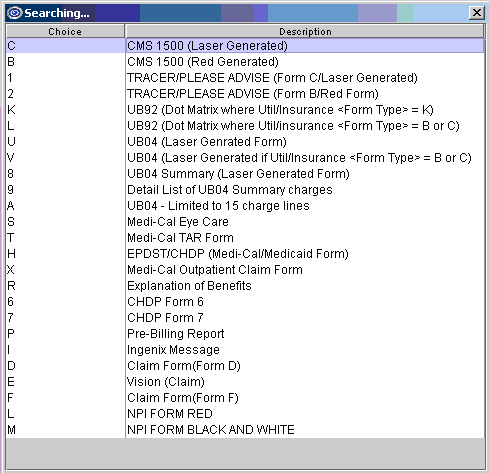
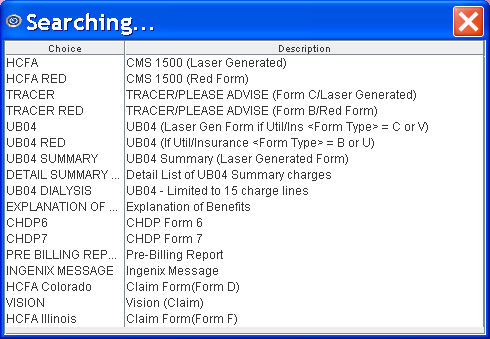
Note: In the 9.12.10 version, some unused codes were removed from this list.
NOTE: In order to accommodate Medi-Cal billing restrictions for Dialysis claims on UB-04, which limit charge lines to 15 instead of the usual 22, Form Type UB04 Dialysis (formerly 'A') may be selected. The Utility --► Insurance screen does not require any change.
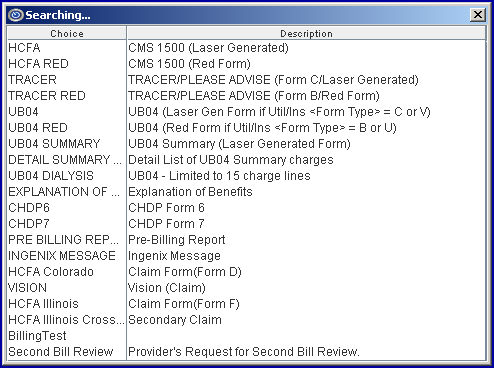
In the 13.06.24 update, the Second Bill Review option was added. The Second Bill Review option works in conjunction with Payment --►Open Item in requesting that a DWC Second Bill Review (SBR) form be printed for submitting a Worker's Compensation payment appeal. In Payment --►Open Item, see set up information for the Message and Comment columns.
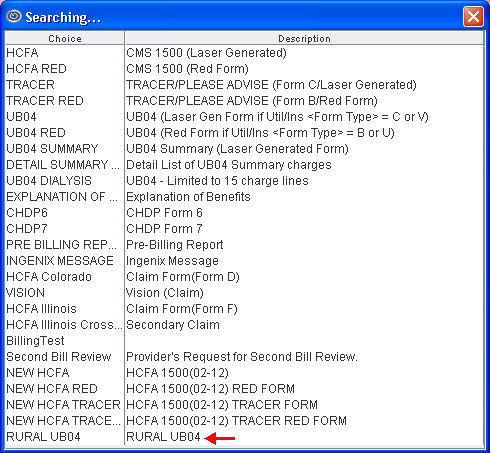
Version 13.12.12: A RURAL UB04 report was added for clients using Managed Care. This report is similar to UB04 SUMMARY, and works with the Utility --►Insurance --►Insurance <Form Type> options C and 8, the same as the UB04 Summary report. As a result, clients that used to print the UB04 Summary do not need to change their insurance screen settings for the new RURAL UB04 report.
The RURAL UB04 report option differs from the UB04 Summary as follows:
Box 18 always prints '80'
Box 42 is blank
Box 43 prints 'Managed care diff rate'
Box 44 prints '18'
Box 50, when billing S or T insurances, only prints the address to insurance information
Box 58 through Box 62 are Blank
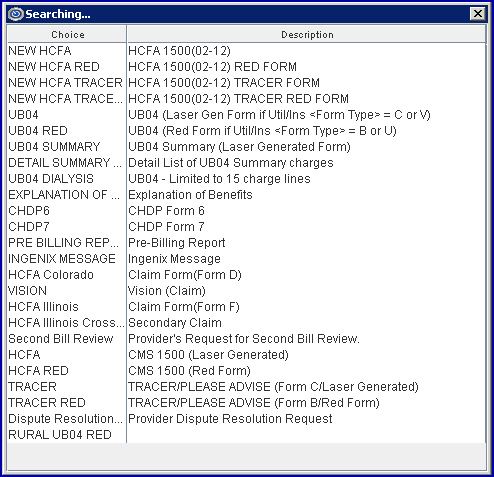
Version 16.02.22: A Dispute Resolution Request form was added for use by the office to dispute payments or underpayments. When generating the form, Intellect pulls the insurance attached to the patient record, the provider name and address, the provider tax id number, the patient name and date of birth, and the patient subscriber ID.
The amounts that print on the form are based on the provider for whom the form is printed/generated, the From and To dates of service, and the total billed. If the form needs to be generated for more than one provider, each provider must be requested separately in the <Provider> field.
Before a dispute resolution form may be requested:
• Each provider for whom a dispute resolution form is generated must have their own PDR code set up in <Message Code> on the Utility --►Messages --►Message screen.
• The appropriate PDR code must be added in the Message column on either the Payment --►Open Item screen or the Ledger --►Open Item screen for the charge/payment in dispute.
11. Insurance Code 
11.1 This field limits the billing results by specific patient insurance companies.
11.2 Press [Enter] to bypass this field which requests ALL insurance companies, OR select a specific insurance by typing its Utility --► Insurance --► Insurance <Insurance Co. Code>.
11.3 This field accepts multiple values:
• Insurance codes separated by commas with no spaces:

• a range of codes entered with a hyphen and no spaces:

• an asterisk * to return all Insurers starting with the portion of the code entered prior to the *. For example, B* prints all Insurers whose code begins with M.

12. Billing Code 
12.1 For use with <All/Unbill/Rebill/(A/U/R/H)> = 'R' Rebill.
12.2 The default (blank) submits billing for all billing codes.
12.3 To filter the billing based on specific billing codes, type the Ledger --► Open Item <Message>.
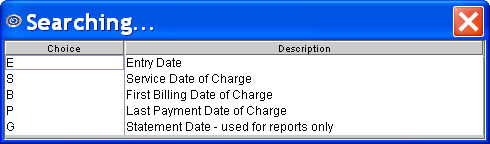
13.1 This field defaults to the Entry Date.
13.2 Accept the default OR use the drop-down list to make an alternate selection.
13.3 Click on the field, OR press the [F2] key to display the valid choices.
To view the list of only the codes, click on the arrow. To select, click on the correct code, OR use the ↑ (up) and ↓ (down) arrows to highlight the correct code and then press the [Enter] key to select.
Effective version 9.12.10
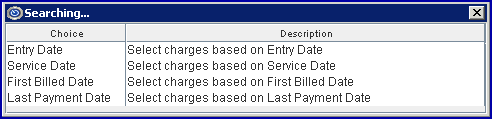
All versions prior to 9.12.10
14.1 The default (blank) submits billing for all providers.
14.2 To filter the billing based on a specific provider, type the Utility --► Provider <Provider Code>.
14.3 This field accepts multiple values:
• provider codes separated by commas with no spaces:

• a range of codes entered with a hyphen and no spaces:

• an asterisk * to return all Providers starting with the portion of the code entered prior to the *. For example, 2* prints all Providers whose code begins with 2.

15. User# 
15.1 The default (blank) submits billing for all users (operators).
15.2 To filter the billing based on a specific user, type the Utility --► Set Up --► Security --► Login Users <User Number>.
16.1 The default (blank) submits billing for all places of service (POS).
16.2 To filter the billing based on a specific POS, type the Utility --► Facility <Facility Code>.
16.3 This field accepts multiple values:
• facility codes separated by commas with no spaces:

• a range of codes entered with a hyphen and no spaces:

• an asterisk * to return all facilities starting with the portion of the code entered prior to the *. For example, 1* prints all facilities whose code begins with 1.

16.4 Effective version 21.11.09, changes were made when a surgical facility is entered in this field. See the Updates section at the beginning of this document for details.
17. Department 
17.1 The default (blank) submits billing for all Provider Department Numbers.
17.2 To filter the billing based on a specific Department, type the Utility --► Provider --► Provider <Department> name or number.
17.3 This field accepts multiple values:
• departments separated by commas with no spaces:

• a range of codes entered with a hyphen and no spaces:

• an asterisk * to return all facilities starting with the portion of the code entered prior to the *. For example, 1* prints all facilities whose code begins with 1.

18. When the information is completely entered, select one of these options.
Effective version 9.12.10: New [Preview] button

18.1 Click the [Print] button OR press [Enter] to display a printer dialog box:
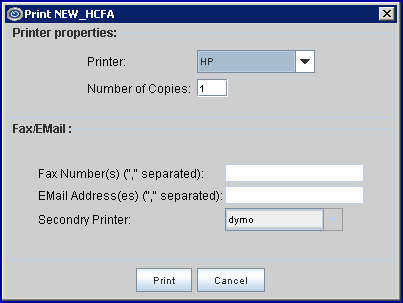
18.1.1 Printer Properties:
18.1.1.1 Printer: The default printer for the logged-in clinic and password is selected. To select a different printer, either click on the arrow, OR press the → (right arrow) on the keyboard to view the list of printer codes. In our example, the defaulted Printer is HP. This is just an example of a printer name and may or may not be set up on the system.
To select the printer type, click on the code, OR use the ↑ (up) and ↓ (down) arrows to highlight the correct code, and then press the [Enter] key to select.
18.1.1.2 Number of Copies: This field defaults to either 0 (zero) or 1. Both print 1 copy. To print more than one copy, enter the number of copies.
18.1.2 Fax/Email:
In addition to printing reports, Intellect provides the capability to export reports to Email, Fax, Disk, or Archive. A secondary printer may also be selected, if one is set up, by clicking on the arrow to display the drop-down list.
18.1.3 Select the [Print] button to send the request to the printer (or as a Fax or email). NOTE: After printing claim forms, the remark ‘BILL WAS SENT TO THE INSURANCE’ From: [date of service] To: [date of service]’ with <Flag> set to ‘I’ is automatically added to the Ledger remarks on both the Ledger --► Accounting --► Display and Ledger --► Open Item --► Display screens for each patient if Utility --► Set Up --► Parameter <Message (Y/N)> is set to ‘Y.’
18.1.4 Select the [Cancel] button to clear the screen and return to the Print Group of Patients screen without saving or printing.
18.2 Click [Preview] (Effective Version 9.12.10 - New Option) to display the following screen, displaying the selected claims:
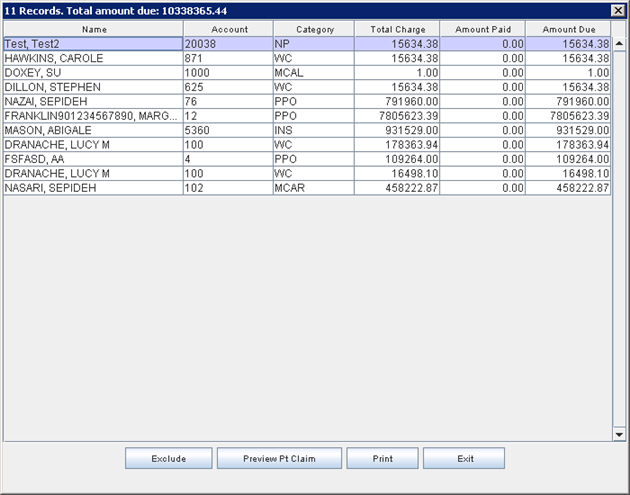
The information on this screen is a list of claims ready to be printed or sent electronically and is initially displayed in Name order, from A-Z. The order of the information may be changed per column headings. For example, clicking on the Account column heading displays the screen information in account number order from the lowest number to the highest; double-clicking on the Account column heading displays the information in account number order from the highest to lowest account number.
The buttons at the bottom of the screen affect the screen information as follows:
18.2.1 [Exclude]: Click on an account and then click the [Exclude] button to change the highlighting color, indicating this account will not be included when the displayed claims are printed. Highlighting an entry does NOT change the patient set up or prevent future claims from printing; it only affects the current claims file. If the screen is closed without printing claims, the record(s) do NOT stay highlighted and the claims print.
NOTE: To stop all claims from printing for an account, go to the patient's demographic screen and select the desired option from the <Patient Stmt Override> field drop-down options. <Patient Stmt Override> is an optional field and may not be displayed on the screen. To have the field added, contact our support or training departments for assistance.
18.2.2 [Preview Pt Claim]: Click on an account and then click the [Preview Pt Claim] button to display a claim for the selected account.
18.2.3 [Print]: Click the [Print] button to display a print dialog box, enabling the printing of all non-excluded claims. NOTE: After printing claim forms, the remark ‘BILL WAS SENT TO THE INSURANCE’ From: [date of service] To: [date of service]’ with <Flag> set to ‘I’ is automatically added to the Ledger remarks on both the Ledger --► Accounting --► Display and Ledger --► Open Item --► Display screens for each patient if Utility --► Set Up --► Parameter <Message (Y/N)> is set to ‘Y.’
18.2.4 [Exit]: Click on the [Exit] button to return to the Print GOP Insurance screen.
18.3 Click [Clear] to clear all information and return the focus to the <From Date> field without saving.
18.4 Click [Exit] to clear the screen and return the focus to the main Intellect screen without saving.


