
Intellect™
REGISTRATION MENU OPTIONS

Worker
Worker Insurance
Add Worker insurance
This screen allows users to add insurance, adjuster, employer, attorney, and injury information for patients registered through the Registration --►Worker --►Worker screen. The information contained on this screen is used to generate insurance billing, statements and forms for patients with Workers’ Compensation, Personal Injury, Auto Accident or Attorney Lien cases.
This screen enables tracking of multiple injury dates, continuous trauma dates, claims numbers, Adjudication (ADJ) numbers, and body parts on a single patient record.
Effective version 13.04.10:
• When adding or modifying an insurance record from the Worker Insurance screen, Intellect copies the employer information from worker insurance to the patient table.
• Worker Insurance now has an automatic default of 20 (Employee) as the relation to insured.
1. There are a variety of ways a user may open the Add WORKER_INSURANCE screen:
1.1 The most direct way, though not necessarily the preferred option, is through Registration --► Worker --►Worker Insurance --►Add Insurance:
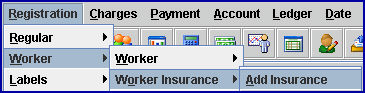
- OR -
1.2 When a new account is registered through Registration --► Worker --►Worker --►Add, selecting [Add] on the Add WORKER screen displays a prompt if the patient’s Category is not set up as no insurance (Utility--►Category <Type (C/P/W/O/F/G)> = G).
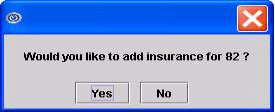
1.2.1 Select [Yes] to continue adding an insurance screen.
- OR -
1.3 When updating an existing account through Registration--►Worker--►Worker--►Modify, on the Modify WORKER screen there are two options:

1.3.1 [Modify]: When there is no existing insurance AND Utility--►Category <Type (C/P/W/O/F/G)> is not 'G', for the patient's <Category>, selecting [Modify] to save changes displays this message:
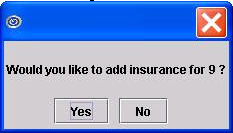
1.3.1.1 Select [Yes] to continue adding an insurance screen.
1.3.2 [Add Insurance]: This option allows the user to add a new insurance even if the patient has an existing insurance screen.
Add WORKER_INSURANCE screen:
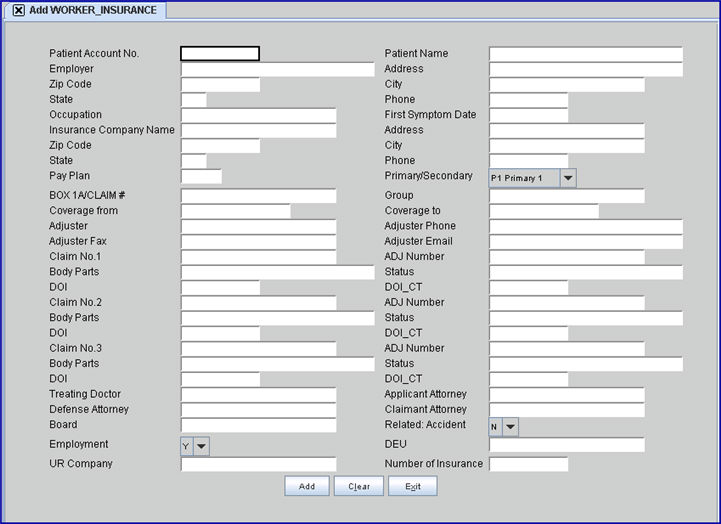
This screen, like many in Intellect, has several optional fields. The graphics in this documentation may vary slightly from your actual clinics'. See the screen options at the bottom of this document and/or the documentation on adding/removing fields.
Effective version 13.10.29, the <Name> fields in conjunction with the <Treating Doctor>, <Applicant Attorney>, <Defense Attorney>, <Claimant Attorney>, and <Board> fields were removed.
Effective version 14.02.04, the <Employer Code>, <Nature of Business>, <Insurance Code>, <Case Type>, and <Case Status> fields have been removed.
2. Patient Account No 
2.1 When adding insurance from the Add WORKER screen (see step 1.2 above) or Modify WORKER screen (see step 1.3 above), press [Enter] to accept the patient's account number which automatically defaults.
2.2 When adding insurance through Registration--►Worker--►Worker Insurance--►Add Insurance (see step 1.1 above), you may need to search for the patient's account number.
2.2.1 Press the [Space Bar] to clear the field.
2.2.2 Press the [F2] key to display Searching PATIENT_ACCTBAL:
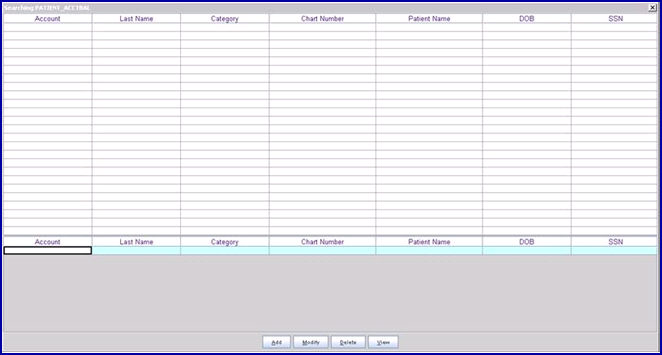
2.2.3 With the cursor focus on the last line (below the column headings), enter the patient's last name in the <Last Name> column OR the patient's partial full name (formatted as LASTNAME, FIRSTNAME) in the <Patient name> column OR the patient's date of birth in the <DOB> column, and then press [F2] to search.
2.2.4 Highlight the correct account using the up/down arrows or your mouse, then press [Enter] or double-click.
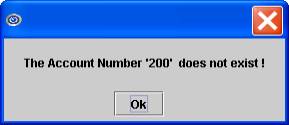
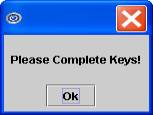
2.3 This field is mandatory. If left blank, a pop-up message displays:
3. Patient Name 
3.1 The patient's name displays Last Name, First Name. This is a read-only field and may not be modified.
4.1 Effective version 14.02.04, the <Employer Code> field was removed. Functions associated with that field are now connected to the <Employer> field, as indicated below.
4.2 Intellect uses the Employer information to populate the appropriate fields with company and insurance coverage information.
Note: Employers are set up in the Utility --►Business screen.
Attention PCM users:
• When importing information into PCM forms/documents, the database field inserter tree always requires the Employer to have been entered into Intellect during registration in order to import the employer information.
• If your office prefers to type the employer name, address, etc., you should use the right-click menu option to import employer information. It is recommended you use only one method to import employer information when setting up your forms. Using the right-click method can import the employer information whether or not an Employer was used.
• Employer information for regular patients and worker's comp patients come from two different tables. For additional information, contact your trainer or PCS support.
4.3 Enter a name (or portion of a name) in the <Employer> field and then press [Enter]. Intellect displays a record search screen (similar to the [F2] screen) which lists all the available options from which to choose.
4.3.1 Effective version 14.03.20, the display was changed for ease of use. In the prior version, only the name displayed. As of this update, both the code and name display, separated by a '/'.
4.3.2 Effective version 14.03.20, this field may be set to search either by Utility --►Business <Name> or <Company Code>. If you would like to search by code, please contact PCS support to request this change. Note: The <Employer Name> field on the Registration Regular Patient screen and the <Employer Name> field on the Registration--►Regular--►Patient Insurance screen will be set to the same search criteria.
4.4 Select the code from the displayed list by either highlighting the record and pressing the [Enter] key or double-clicking on the record.
4.5 When a new or invalid employer name is entered, Intellect displays:

4.5.1 Clicking on [OK] displays the record search window.
4.5.2 If this is a new Employer Name, clicking [Add] displays the Utility--►Business--►Add--►Add EMPLOYER screen where the appropriate information may be entered and saved.
4.6 Based on the Utility--►Business screen for the selected <Company Code>, the following may occur:
4.6.1 Intellect automatically completes the employer's <Address>, <Zip Code>, <City>, <State>, and <Phone> fields, if available.

4.6.2 When the optional field for the <Insurance Code> is completed on the Utility--►Business screen for the selected <Company Code>, the following will be displayed:
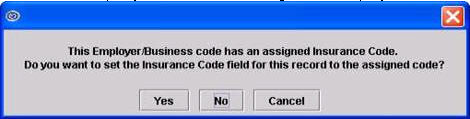
4.6.2.1 Clicking [Yes] populates appropriate insurance fields, if available on the Utility--►Business screen for the selected <Company Code>, and moves the focus to the employer <Address> field.
4.6.2.2 Clicking [No] moves the focus to the <Insurance Company Name> field without completing the insurance fields.
4.6.2.3 Clicking [Cancel] moves the focus to the <Insurance Company Name> field without completing the insurance.
4.6.3 When the <Insurance Code> field is blank on the Utility--►Business screen for the selected <Company Code>, the following will be displayed:
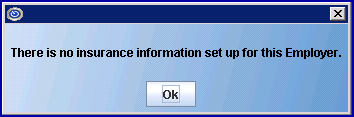
4.6.3.1 Clicking [OK] moves the focus to the <Insurance Company Name> field.
6.1 If not automatically populated for the <Employer>, type the street address with number for the patient's employer.
6.2 Effective version 9.12.29 (March 2012), the information from the <Address> field prints in Box 80 on the UB04 for Worker patients. The change to UB04 forms is not automatically added with the update. If you want this change, you must call Prime Clinical Systems and request the form be updated.
7. Zip Code 
7.1 If not automatically populated for the <Employer>, type the Zip Code for the patient's employer.
8. City 
8.1 If not automatically populated for the <Employer>, type the city for the patient's employer.
Note: This field must be left blank if the <Zip Code> field is left blank.
9. State 
9.1 If not automatically populated for the <Employer>, type the state for the patient's employer.
Note: This field must be left blank if the <Zip Code> field is left blank.
10. Phone 
10.1 If not automatically populated for the <Employer>, type the phone number for the patient's employer.
IMPORTANT: When the employer name entered in the <Employer> field is set up in Utility--►Business, the <Occupation> and <First Symptom Date> fields are automatically bypassed. If the focus stops in the <Insurance Company Name> field, the insurance-related fields must be completed before using the mouse or up arrow key to move the focus back to the <Occupation> or <First Symptom> fields.
11.1 Type the occupation of the patient.
11.2 Prints in Box 10 on the Doctor's First Report of Occupational Injury or Illness (See Registration--►Worker--►First Report).
12. First Symptom Date 
12.1 Effective version 13.10.29 (October 30, 2013).
12.2 Type the date of the first symptom. This may or may not be the same day as the date of injury entered in the <DOI> field.
12.3 If the patient's category is NOT Worker's Comp (Utility Category <Type> is NOT'W' or 'F'), this date will print in Box 14 oon the CMS 1500 form with qualifier 431.

Or, when used for electronic claims submission, it is added to Loop 2400 dTP*431*D8.
13.1 Effective version 14.02.04, the <Insurance Code> field was removed. Functions associated with that field are now part of the <Insurance Company Name> field, as indicated below.
13.2 The field is mandatory and must be completed. If left blank, the following error message displays:
Pressing the [OK] button returns the focus to the <Insurance Company Name> field.
13.3 Enter an insurance name (or portion of a name) in the <Insurance Company Name> field and then press [Enter]. Intellect displays a record search screen (similar to the [F2] screen) which lists all the available options from which to choose.
13.3.1 Effective version 14.03.20, the display was changed for ease of use. In the prior version, only the name displayed. As of this update, both the code and name display, separated by a '/'.
13.3.2 Effective version 14.03.20, this field may be set to search either by Utility Insurance Insurance <Name> or <Insurance Co Cdoe>. If you would like to search by code, please contact PCS support to request this change.
Note 1: The <Insurance Company Name> field on the Registration--►Regular--►Patient Insurance screen will be set to the same search criteria.
Note 2: The default search is set to the Utility--►Insurance--►Insurance <Name> field, not the Utility--►Insurance--►Insurance <Insurance Co. Code> field. For example, if the <Insurance Co. Code> is 'WC001' and the <Name> is WORKERS COMP INSURANCE, entering 'WC001' in the <Insurance Company Name> field will display the message 'Match Not Found!.
13.4 Select the insurance from the displayed list by either highlighting the record and pressing the [Enter] key, or double-clocking on the record.
13.5 When a new insurance company or invalid search criteria is entered, Intellect displays:

13.5.1 Clicking [OK] displays the Searching INSUR_CO screen.
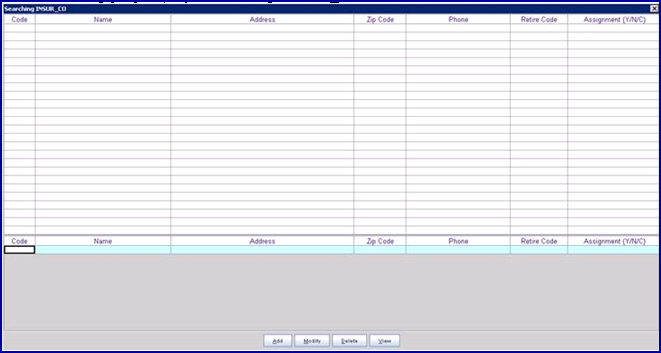
13.5.2 If this is a new Insurance Company, press [Add] to display the Utility--►Insurance--►Insurance Add screen where the appropriate information may be entered and saved. WARNING: It is strongly recommended that you search by address to avoid adding duplicate records.
13.5.3 With the cursor focus on the last line (below the column headings), enter search criteria for any column (Code, Name, Address), and then press [F2] to search. Highlight the correct record using the up/down arrows or your mouse, then press [Enter] or double-click to select the record.
Note: When searching, you may use the * (asterisk) as a wild card to replace any portion of the data. For example: Type *2000 in the <Address> column to replace 'P O Box'.
14. Address 
14.1 Automatically displays the Utility--►Insurance--►Insurance <Address> for the selected Insurance Company. This is read-only field may not be modified.
15. Zip Code
15.1 Automatically displays the Utility--►Insurance--►Insurance <Zip Code> for the selected Insurance Company. This is read-only field may not be modified.
16. City 
16.1 Automatically displays the Utility--►Insurance--►Insurance <City> for the selected Insurance Company. This is read-only field may not be modified.
17. State
17.1 Automatically displays the Utility--►Insurance--►Insurance <State> for the selected Insurance Company. This is read-only field may not be modified.
18. Phone
18.1 Automatically displays the Utility--►Insurance--►Insurance <Phone> for the selected Insurance Company. This is read-only field may not be modified.
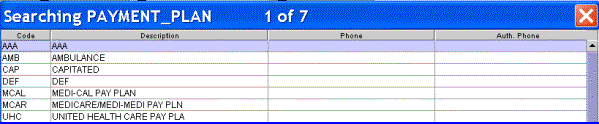
19.1 Type the code for a pre-defined payment plan if applicable.
19.2 Existing Pay Plans are defaulted first from Utility --►Business <Plan Code> when configured with a pay plan or next from Utility --►Category <Default Plan>.
19.3 Accept any default or press the [Spacebar] to clear the field and then enter the Plan Code, or type up to 6 characters of the description and press the [F2] key. Select the code from the list by either highlighting the record or pressing the [Enter] key, or double-clicking on the record. Alternatively, after clearing the field, press the [F2] key twice to view the entire list of codes.
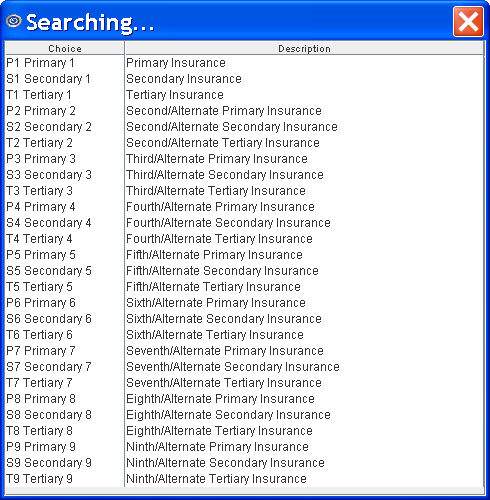
20. Primary/Secondary 
20.1 Determines the order the insurances are billed.
20.2 You can have multiple primaries and link a specific secondary to them.
20.3 Click on the field, or press the [F2] key to display the valid choices.
To view the list of only the codes, click on the arrow. Select by clicking on the correct code, OR use the ↑ (up) and ↓ (down) arrows to highlight the correct code and then press the [Enter] key to select.
All versions prior to 9.12.10

Effective version 9.12.10
21. BOX 1A/CLAIM #  >
>
21.1 In early software versions, this field was the <Subscriber> field.
21.2 If this field defaults to the patient's <Social Security Number> if entered on the WORKER screen.
Effective version 14.08.28, the SSN is displayed without '-'s; i.e., it displays as xxxxxxxxx instead of xxx-xx-xxxx.
Effective version 16.11.10, the SSN only displays the very last 4 digits and the rest are represented with asterisks (***-**-1234), unless the data in the database is malformed or incomplete.
Effective version 16.12.02, users now have the options of masking the SSN (displaying only the last 4 digits) or not masking the SSN. For additional information, see Utility --►Set Up --►Screen Fields Mask/Unmask the Social Security Number (SSN).
21.2.1 If the information is correct, press [Enter] or [Tab] to accept. Note: For many Worker's Comp insurances, the patient's SSN is the preferred entry for this field.
21.2.2 If the information is not correct, use the [Spacebar] to clear the field and then type the appropriate information required by the insurance carrier in Box 1A on the CMS1500 form.
21.3 Intellect completes Box 1a on HCFA (CMS 1500) with this number.
![]()
Or, when used for electronic claims submission, it is added to Loop 2010BA NM109.
22. Group 
22.1 Type the group number for the patient's insurance, if applicable, or leave blank is there is no group number.
22.2 Intellect completes Box 11 on HCFA (CMS 1500) with this number.

Or, when used for electronic claims submission, it is added to Loop 2000B SBR 03.
23. Coverage From 
23.1 Type the effective date of the patient’s coverage, which may be the date the patient started with your practice or the date of injury.
23.2 This insurance will NOT be billed for dates of service after this date.
24. Coverage To 
24.1 This should be left blank for the patient's current insurance.
24.2 This date should only be entered when coverage is terminated.
24.3 This insurance will NOT be billed for dates of service after this date.
25. Adjuster 
25.1 Versions prior to 15.02.17: Type the adjuster's name, if available.
25.2 Effective version 15.02.17: Enter the last name (or a portion of the last name) of the adjuster, and press [Enter]. Intellect displays a record search screen. The record search screen (similar to the [F2] screen) lists all the available options from which to choose.
25.2.1 Select the code from the displayed list by either highlighting the record and pressing the [Enter] key, or double-clicking on the record. The code and adjuster name are both displayed in the field, separated by a '/'.
25.2.2 When a new or invalid Adjuster name is entered, Intellect displays:

25.2.2.1 Clicking on [OK] displays the record search screen.
25.2.2.2 If this is a new adjuster, click [Add]. Intellect displays the Utiity--►Insurance--►Adjuster Add screen where the appropriate information may be entered and saved.
25.3 If there is no adjuster, press the [Enter] key to leave blank.
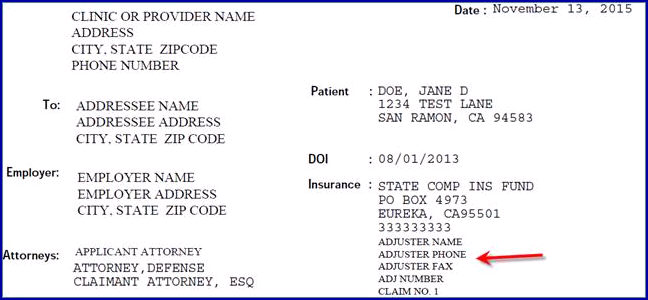
25.4 Based on the Utility Insurance Adjuster screen for the selected <Adjuster Code>, Intellect automatically completes the <Adjuster Phone>, <Adjuster Fax>, and <Adjuster Email> fields, if available.

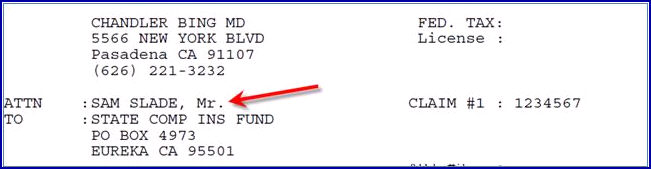
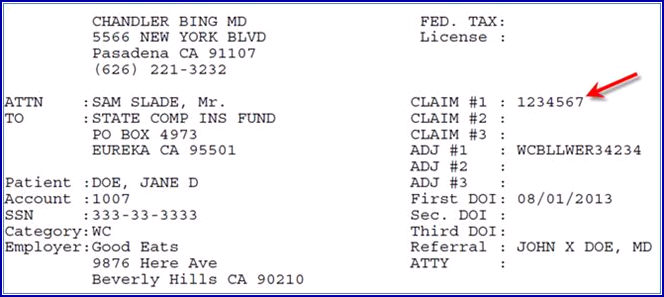
25.5 Intellect prints the Adjuster's Name with the insurance name and address on paper claims and select statement options.
25.5.1 Effective 9.12.15 (April11, 2011): The Adjuster Name is available to print on the top right corner of the CMS 1500 form. However, there are three requirements which must be met for the name to print:
25.5.1.1 For each insurance you are using, the <Print Name on Claim> field must be set to X - Print the Adjuster name. See Utility--►Insurance.
25.5.1.2 The <Adjuster> name field must be completed on either the patient's Registration --►Regular --►Patient Insurance or Registration --►Worker --►Worker Insurance screen.
25.5.1.3 The patient's category <Type> must be either W or F. See Utility--►Category.
Note: The "Adjuster Name" data element has been added to the programming file but has not been added to the form. Therefore, if your office wants to have the Adjuster Name printed on the paper WC Claims, you should call PCS Support and request it be added.
25.5.2 When Worker's Compensation or Personal Injury Statements are printed through Billing--►Worker--►Statement--►Batch of Patients or Group of Patients, the adjuster's name prints above the insurance name and address.
<Statement Type>: 1, 2, 3
<Statement Type> WC FORM1, WC FORM2, PI FORM1, PI FORM2

25.5.3 When Attorney Statements are printed through Billing--►Worker--►Attorney, the adjuster's information prints.
26. Adjuster Phone 
26.1 If not automatically populated for the <Adjuster>, type the adjuster's phone number.
27. Adjuster Fax 
27.1 If not automatically populated for the <Adjuster>, type the adjuster's fax number.
28. Adjuster Email 
28.1 Effective version 14.02.04.
28.1 If not automatically populated for the <Adjuster>, type the adjuster's email address.
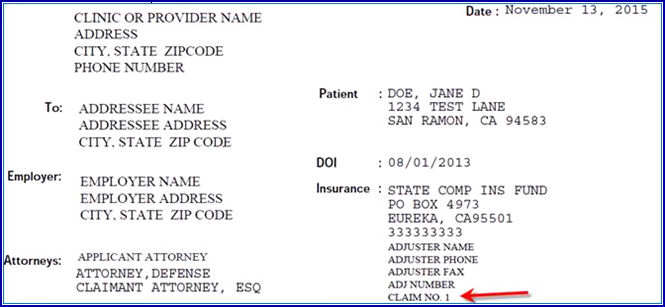
29.1 Type the assigned claim number.
29.2 This field allows for reporting of multiple claims.
29.3 Intellect includes the <Claim No. 1> on claims and select statement options.
29.3.1 Intellect prints this number in Box 11c on the CMS 1500 form.

Or, when used for electronic claims submission, it is added to Loop 200B SBR 04.
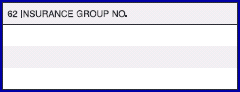
29.3.2 Effective version 9.12.29 (March 2012), the information from the <Claim No. 1> field prints in Box 62 on the UB04 for Worker patients.
Note: The change to UB04 forms is not automatically added with the update. If you want this change, you must call Prime Clinical Systems and request the form be updated.
29.3.3 When Workers' Compensation or Personal Injury Statements are printed through Billing--►Worker--►Statement--►Batch of Patient or Group of Patients, Intellect prints the <Claim No. 1>:
29.3.4 When Attorney Statements are printed through Billing Worker Attorney, the claim number prints:
29.4 Effective version 9.12.29 (March 2012), the information from the <Claim No. 1> field prints in Box 62 on the UB04 for Worker patients. The change to UB04 forms is not automatically added with the update. If you want this change, you must call Prime Clinical Systems and request the form be updated.
30. ADJ Number (formerly WCAB) 
30.1 Effective version 13.10.29 - field name was changed to <ADJ Number>. ADJ (i.e., adjudication file) indicates a case file in which the jurisdiction of the Worker's Compensation Appeals Board has been invoked and which is maintained by the Division of Worker's Compensation (DWC) in paper format, electronic format, or both, including a temporary paper case file.
30.2 Enter the adjudication number as received from your local Worker's Comp jurisdiction office. The number should begin with ADJ. Note: This number replaces the Worker's Compensation Appeals Board (WCAB) case number.
30.3 Intellect completes WC Statement ADJ #1 and CMS 1500 (HCFA) Box 11:
![]()
31.1 List areas of injury.
Note: The <Body Parts> field responds differently based on the software version you are running. Scroll through the following documentation to the version that applies to you. Versions are listed from oldest to newest.
All versions prior to 13.10.29
31.2 Refer to the Body Part Codes List and enter the applicable code(s). If there are multiple injuries, abbreviate and summarize to fit the field.
Note: The descriptions for the individual body parts on the selection list may be modified. See Utility--►Messages--►Body Part for more information.
Effective version 13.10.29
31.3 With the focus in the <Body Parts> field, press [Enter] to display the body part option list:
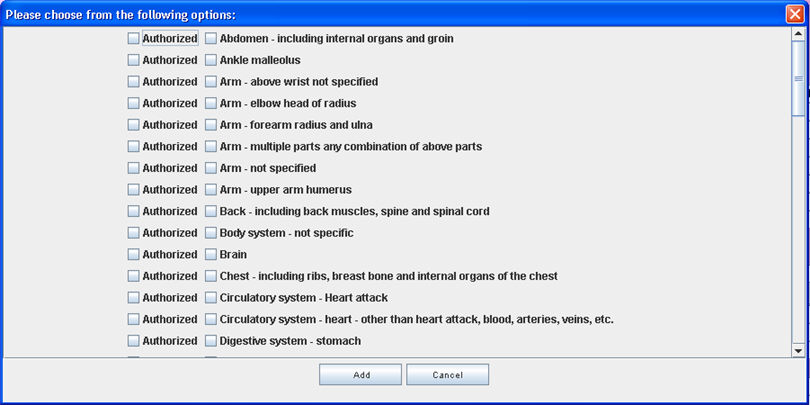
31.3.1 Click the □ for the applicable injured body part(s).
31.3.2 Click the □ Authorized box for each body part for which authorization has been given to treat.
Effective version 14.02.04
31.4 With the focus in the <Body Parts> field, press [Enter] to display the body part option list:
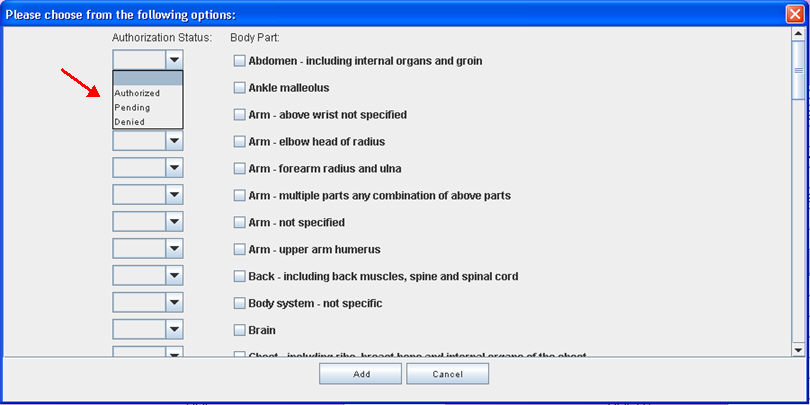
31.4.1 Under Authorization Status, click ![]() to display the drop-down list:
to display the drop-down list:

Leave the Authorization Status blank, or select ‘Authorized’, ‘Pending’, or ‘Denied’ as appropriate.
31.4.2 Under Body Part, click the □ for the applicable injured body part(s).
Note: Effective version 14.02.04, when the <Body Parts> field is modified, the selected body parts display at the top of the selection list.
31.5 To accommodate PCM users, a Comment field was added to the <Body Parts> field selection list:

Users may type specific information and/or notes associated with the selected body part into the <Comment> field. Up to 4,000 characters may be entered in each comment field, which can be scrolled up and down, and left and right. Use of this field is optional.
Intellect users may also view comments in the <Comment> field on the View All Claims screen accessed via Registration--►Worker--►View All Claims.
PCM users see the Comment information on various screens.
31.6 It is no longer possible to type directly into the three <Body Parts> fields. All additions or changes to the displayed body parts must be made via the [Enter] key and selection screen. As in prior versions, once the [Enter] key is pressed, users may select or deselect body parts, and then press [Add] to save their changes.
32. Status 
32.1 Effective version 14.02.04.
32.2 This field is a free-form text area to add notes.
33.1 Type the date of patient's injury.
33.2 Intellect completes WC Statement First DOI.

33.3 Effective version 14.11.10, if the <DOI> field on this screen is filled for the patient's P1 insurance, Intellect pulls this date to fill the <Date of Injury> field on the Registration --►Worker --►First Report screen and the <Injury Date>/<Date of Injury> fields on the Registration --►Worker --►PR2 Form, PR3 Form, and PR4 Form screens, as applicable.
33.4 Effective version 14.09.29, if the <DOI> field on this screen is filled, Intellect no longer requires the <Injury Date> field to be completed on the Charges --►Encounter screen for Box 14 on the CMS 1500 form or the electronic equivalent.
34. DOI CT 
34.1 If the original injury date gets changed, the new date should be entered here.
Note: A <DOI CT> field may be added for Claim No. 2, Claim No. 3, etc., as needed. If you need to add a <DOI CT> field for another claim, please contact PCS Support.
34.2 This does not display on the HCFA. It may display on the Attorney Statement.
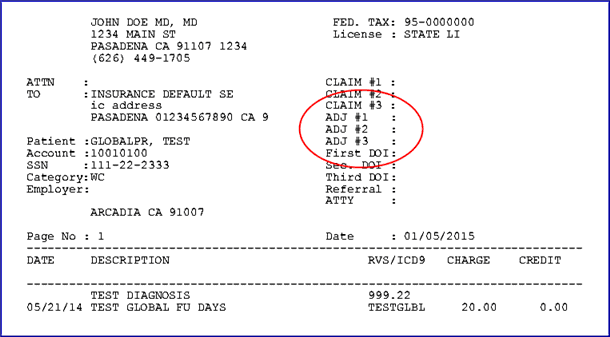
35. The screen provides areas for additional sets of Claim No, ADJ Number, Body Parts, Status, DOI, and DOI_CT information. The additional information prints on various Worker Compensation forms, as required, when there is sufficient space on the form.
Note: Claims 2 and 3 are not used for billing. If a second or third date of injury needs to be billed, information must be filled out with a P2 code.
35.1 All versions prior to 13.10.29 allow for two additional Claim Numbers.
35.2 Effective version 13.10.29, four additional Claim Numbers may be used.
35.3 Effective version 14.02.04, three Claim Numbers may be used.
36.1 Effective version 13.10.29
36.2 Enter a few characters of the last name of the Treating Doctor and press [Enter]. Select the doctor from the list by either highlighting the record or pressing the [Enter] key, or double-clicking on the record. Intellect displays the doctor's name without the associated code.
All versions prior to 13.10.29:
36.3 Type the Utility--►Provider <Provider Code> for the Treating Doctor.
36.4 Enter the Provider Code, or type up to 6 characters of the last name and press the [F2] key. Select the code from the list by either highlighting the record or pressing the [Enter] key, or double-clicking on the record. Alternately, after clearing the field, press the [F2] key twice to view the entire list of codes.

37.1 Effective version 13.10.29:
37.2 Enter a few characters of the last name of the Applicant Attorney and press [Enter]. Select the attorney from the list by either highlighting the record or pressing the [Enter] key, or double-clicking on the record. Intellect displays the attorney's name without the associated code.
All versions prior to 13.10.29:
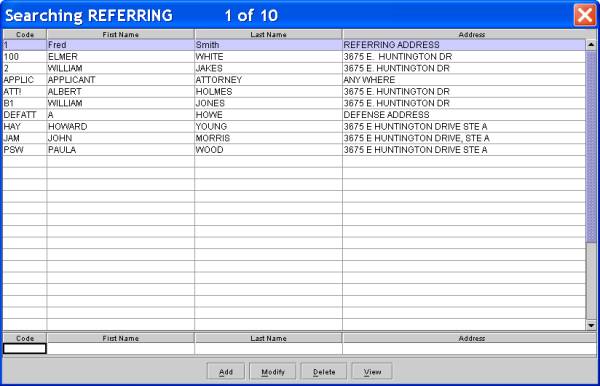
37.3 Type the Utility--►Referring <Referring Code> for the patient's attorney.
37.4 Enter the Referring Code, or type up to 6 characters of the last name and press the [F2] key. Select the code from the list by either highlighting the record or pressing the [Enter] key, or double-clicking on the record. Alternately, after clearing the field, press the [F2] key twice to view the entire list of codes.
38.1 Effective version 13.10.29:
38.2 Enter a few characters of the last name of the Defense Attorney and press [Enter]. Select the attorney from the list by either highlighting the record or pressing the [Enter] key, or double-clicking on the record. Intellect displays the attorney's name without the associated code.
All versions prior to 13.10.29:
38.3 Type the Utility--►Referring <Referring Code> for the defense attorney.
38.4 If the code is unknown, use the [F2] key to perform a search.
39.1 Effective version 13.10.29:
39.2 Enter a few characters of the last name of the Claimant Attorney and press [Enter]. Select the attorney from the list by either highlighting the record or pressing the [Enter] key, or double-clicking on the record. Intellect displays the attorney's name without the associated code.
All versions prior to 13.10.29:
39.3 Type the Utility--►Referring <Referring Code> for the claimant attorney.
39.4 If the code is unknown, use the [F2] key to perform a search.
40.1 Effective version 13.10.29:
40.2 Enter a few characters of the board name and press [Enter]. Select the board from the list by either highlighting the record or pressing the [Enter] key, or double-clicking on the record. Intellect displays the board's name without the associated code.
All versions prior to 13.10.29:
40.3 Type the Utility--►Referring <Referring Code> for Workers Comp Board hearing the case, if applicable.
40.4 If the code is unknown, use the [F2] key to perform a search.
41.1 Accept the default "N" to indicate no related accident, or use the drop-down list to make an alternate selection.
41.2 Click on the field, or press the [F2] key to display the valid choices.
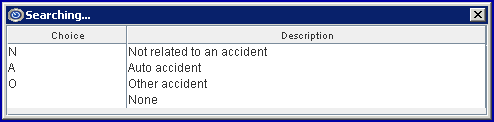
To view the list of only the codes, click on the arrow. Select by clicking on the correct code, OR use the ↑ (up) and ↓ (down) arrows to highlight the correct code and then press the [Enter] key to select.
41.3 Intellect completes Box 10 ACCIDENT on HCFA (CMS 1500).
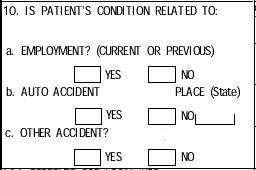
42.1 Accept the default "Y" (yes) or use the drop-down list to make an alternate selection.
42.2 Intellect completes Box 10 EMPLOYMENT on HCFA (CMS 1500).
42. 3 Effective version, 14.09.29, if the <Employment> field on this screen is filled, Intellect no longer requires the <Employment (Y/N)> field to be set to ‘Y’ on the Charges--►Encounter screen for Box 10a on the CMS 1500 form or the electronic equivalent.
43. DEU 
43. 1 Effective version 13.10.29 - New field. Enter the DEU (disability evaluation unit) number for the applicable facility.
44. Number of Insurance 
44.1 This field automatically shows the number insurance records added for this account.
45. UR Company 
45.1 Effective version 14.02.04 - New field. Enter the name of the Utilization Review Company.
a) Utilization review (UR) is the process used by employers or claims administrators to review treatment to determine if it is medically necessary. All employers or their workers' compensation claims administrators are required by law to have a UR program. This program is used to decide whether or not to approve medical treatment recommended by a physician which must be based on the medical treatment guidelines.
b) The UR process is governed by Labor Code section 4610 and regulations written by the CA Division of Workers' Compensation (DWC), which lay out time frames and other rules for conducting UR. The rules, contained in Title 8, California Code of Regulations, sections 9792.6 et seq, also require UR plans to be filed with the DWC administrative director.
Additionally, the DWC has promulgated regulations that provide for penalties to apply when claims administrators and UR companies don't follow UR rules. The UR penalty regulations, found in Title 8, California Code of Regulations, sections 9792.11 - 9792.15, provide an enforcement mechanism to ensure utilization reviews are conducted in compliance with UR regulations.
46. When you have finished entering the information, select one of the following options:

46.1 When clicking [Add], if there is an existing insurance for the account, Intellect displays:
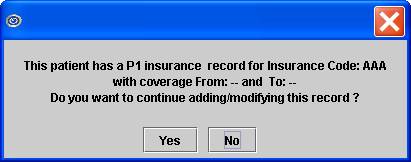
46.1.1 Clicking [Yes] adds the record, clears the form, and returns the focus to the <Patient Account No.> field.
46.1.2 Clicking [No] returns you to the current screen.
46.2 If this is new insurance Intellect saves the record, clears the form, and returns the focus to the <Account No.> field.
46.3 Clicking [Clear] clears the form without saving and returns the focus to the <Account No.> field with the current account number active.
46.4 Clicking [Exit] closes the form and returns user to the main Intellect screen without saving.
Optional Fields
1. Active ![]()
![]()
Informational field to indicate whether or not this is an active or non-active patient account.
The language drop-down selection is used when a second language CallSTAFF script is to be employed. The system reads the selection here and then plays the recording (.wav files) that matches the designated language script.
* For MIRCal filers this is a necessary option to enter the primary language of the patient. Language Codes
3. Residing At
A <Residing At> field has been added to the database for the Patient screen.
Pressing [F2] in this field displays the following list:
Not applicable - leave blank
1 House/Apartment
2 Homeless Shelter
3 Doubling Up
4 Street
5 Substance Abuse Program
6 Transitional Housing Program
7 Other
4.1 Effective version 15.09.02 - New field.
4.2 This field defaults to the entry in the Utility--►Business <Nature of Business> field when populated, or users may type the nature of business for reference purposes.
If you wish to add optional fields to the screen as needed, see the Online document on adding/removing fields: Utility --► Set Up --►Screen Fields.


