
Intellect™
REGISTRATION MENU OPTIONS

Regular
Pediatric Clinics
Pediatric Patient
Effective version 14.09.29, this option is for Pediatric clinics only.
Unlike registration of new adult patients on one screen, two screens are available for clinics serving pediatric patients. The first screen is a patient screen which includes the patient and guardian information. The second screen contains information for the guarantor. To use the pediatric screens, please contact PCS Support to set them up.
This option allows the addition of a new patient and the addition of new insurance coverage for a patient. The information entered, or modified, as a patient account is vital to effectively process this account through the various stages of clinic management.
For practices that utilize more than one clinic, Intellect provides the capability to share patient demographics, thus minimizing time spent on certain registration process (see Utility --►Set Up --►System). The following fields are NOT shared between clinics and must be updated separately in each clinic: <Category>, <Referring Name>, and <PCP Name>.
Video Available: Click Pediatric Registration to access the link. Depending on the system set up, the media player may need to be activated. Speakers need to be attached to the workstation to hear the instructions.
Note: To view the videos, log-in through the www.primeclinical.com website. Current support is required.
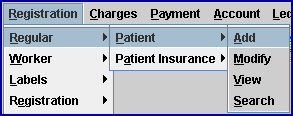
Once the pediatric screens are set up, access the Add PATIENT screen in Intellect by going to Registration --► Regular --► Patient --► Add:
The Add PATIENT screen displays:
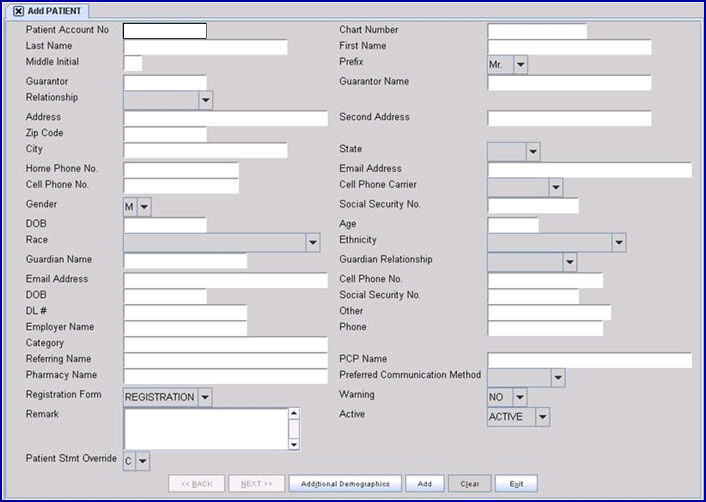
Note: Some of the fields on the Pediatric Add PATIENT screen are the same as those on the standard Add PATIENT screen (accessed through Registration --►Regular --►Patient --►Add).
1. Patient Account No 
1.1 This is the account number for the patient.
Note: The patient’s guarantor (i.e., the person responsible for any statement balances) has a separate account number. See Pediatric Guarantor for set up information.
1.2 The focus automatically starts here.
1.2.1 If the system is set to assign numbers automatically (see Utility --►Set Up --►Parameter <Auto Patient No>), Intellect displays the next available account number.
1.2.2 When the account number is not automatic, assign a unique number (up to 10-digits).
1.2.3 Trying to assign a number when the system is set to automatically provide an account number displays an error message:

Select [OK] to return to the <Patient Account No> field.
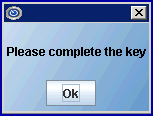
1.2.4 The <Patient Account No> field is mandatory and must be completed. The system does not continue without a unique patient number. If left blank, an error message displays:
1.3 If Utility --►Set Up --►Parameter <Check Pt Duplicate> = 'Y,' the system checks for duplicate accounts (this is highly recommended). A search screen appears when pressing [Enter] in the <Patient Account No> field:

Press [ESC] to bypasses this search.
See more on Duplicate Patient.
2. Chart Number 
2.1 This is an optional field and may be left blank.
2.2 The field accepts up to12 alphanumeric characters.
2.3 The <Chart Number> may be printed on custom superbill or Registration forms.
Chart Number examples:
· Account number from a previous system.
· For group practices, the initials of the patient's physician.
· For worker's comp patients, their date of injury.
· The language of the patient.
· The name or initials of the lab covered by this patient's insurance.
3. Last Name 
3.1 Type the patient's last name.
Effective Version 13.01.11
As of October 1, 2012, Medicare contractors now reject any claim with ANSI reason codes MA130 and MA61 when the beneficiary name and Health Claim Number do not match the information listed in the Common Working File record for the beneficiary (i.e., as shown on the Medicare card). Because of this, Intellect now accommodates suffixes for beneficiary last names. Examples of suffixes are: I, II, III,1, 11, 111, i, ii, iii, 1v, 1V, IV, iv, JR, JR., Jr, Jr., SR, SR., Sr., or Sr. Suffixes that are not listed here may be sent to PCS Support to have them added to the program.
If a patient/beneficiary has a suffix, it must be added to the patient <Last Name>; the name should be entered into Intellect exactly as it is shown on the Medicare card.
For example, if a patient has the name of John Jones, Jr., then enter Jones, Jr. in the <Last Name> field. If a comma is entered after the suffix (Jr.,), the suffix of Jr. is not included. It is OK to have a comma between the last name and the suffix.
If a hyphen is included between the last name and the suffix (Jones-Jr), Intellect includes the suffix.
3.2 This field is mandatory and must be completed. If left blank, an error message displays:

Select [OK] to return the focus to the <Last Name> field.
4. First Name 
4.1 Type the patient's first name.
4.2 This field is mandatory and must be completed. If left blank, an error message displays:

Select [OK] to return the focus to the <First Name> field.
5. Middle Initial 
5.1 Type the patient's middle initial.
5.2 This is optional, but recommended.
6. Prefix 
6.1 Accept the default 'Mr.' OR use the drop-down list to make an alternate selection:

The next three fields contain information pertaining to the patient's Guarantor, the person who is financially responsible for patient/guarantor balances.

7. Guarantor 
7.1 This field indicates the account of the person responsible for any Patient Statement balances and the RESPONSIBLE PERSON printed on CHDP form PM160, but does not affect the insured's name on paper or electronic insurance billing.
7.2 The <Patient Account No> automatically displays here.
7.2.1 If the <Guarantor> account is set to the <Patient Account No>, statements are sent to the patient's guardian (see 11.1.1).
7.2.2 When using the Pediatric Registration option, the <Guarantor> is usually set to a different account number.
7.3 Press [Space] to clear the field, and then press [F2] to search for the Guarantor's account.
7.3.1 If accounts have been added for other family member with the same guarantor, then highlight and select the guarantor on the search screen.
7.3.2 If the guarantor's account has not yet been added, add the Pediatric Guarantor screen and then insert the guarantor account number in this field.
7.4 This field is mandatory and may not be left blank.
8. Guarantor Name 
8.1 The name of the guarantor displays. This is a read-only field and may not be accessed.
9. Relationship 
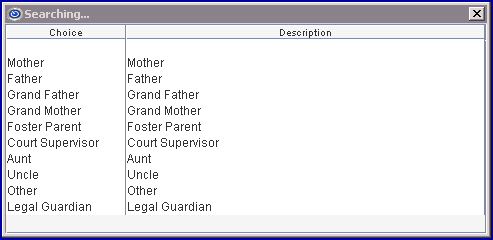
9.1 Use the drop-down menu to select the relationship of the guarantor to the patient.
10. Address 
10.1 If the <Guarantor> is different from the <Patient's Account No.>, then the guarantor's address defaults.
10.1.1 Press [Enter] to accept the default if the patient resides at the same address as the guarantor.
10.1.2 Press [Space] to clear the field and enter the patient's complete home street address (or mailing address) including apartment number, if the patient does not reside at the same address as the guarantor.
10.2 If the <Guarantor> is the same as the <Patient's Account No.>, enter the patient's complete home street address (or mailing address), including apartment number.
11. Second Address 
11.1 If requested, the <Second Address> field may be added for use as a second line on the patient's address on the Recall and Follow Up letters, Patient Statements, Registration Form, or any other custom form.
11.1.1 For example: If the <Guarantor> is the same as the <Patient Account NO.>, fill in the <Second Address> field with 'C/O <Guardian Name>' so the statement is addressed to the patient's guardian.
11.2 This field is NOT used for a separate address, and is NOT used for billing.
12. Zip Code 
12.1 If the <Guarantor> is different from the <Patient's Account No>, the guarantor's Zip Code defaults.
12.1.1 Press [Enter] to accept the default, if the patient resides at the same address as the guarantor.
12.1.2 Press [Space] to clear the field and enter the Zip Code for the patient's address, if the patient does not reside at the same address as the guarantor.
12.2 If the <Guarantor> is the same as the <Patient's Account No>, enter the patient's Zip Code for the <Address>.
12.3 If the Zip Code is unknown:
12.3.1 Press [F2] to search by city and/or state. For more information see Adding Zip Codes.
12.3.2 If left blank, press [Enter] through <City> and <State>.
IMPORTANT NOTE: NEVER enter <City> and/or <State> when the <Zip Code> field is blank.
13. City 
13.1 The city name displays from the <Zip Code>, if it is known to Intellect.
13.2 Otherwise, type the city attached to the Zip Code.
13.3 NEVER enter a city and state while leaving the Zip Code field blank.
13.4 For more information, see Adding Zip Codes.
14. State 
14.1 The State name displays from the <Zip Code> if it is known to Intellect.
14.2 Otherwise, select the state code from the drop-down list.
14.3 NEVER enter a city and state while leaving the Zip Code field blank.
14.4 For more information, see Adding Zip Codes.
15. Home Phone No. 
15.1 Enter the home phone number for the patient. This should also be the home phone number for the <Guardian Name>.
Note to CallSTAFF users: If the patient/guardian's area code is not the same as the <Default Phone Area> field in Utility --►Set Up --►Parameter, Intellect dials the 1 and area code. If the patient's area code DOES match the <Default Phone Area> field, it does NOT dial 1 and area code.
16. Email Address 
16.1 Enter the email address of the patient, if desired.
16.2 If this field is completed, Intellect can email information to the patient rather than print it when creating Patient Statements, Follow Up Letters, Recall Letters, or Forms.
16.2.1 To email information to the patient's guardian, the <Email Address> for <Guardian Name> should be used instead of the patient’s email address.
16.2.2 NOTE: Patient Statements are sent to the <Guarantor> account, so the email address for the guarantor should be used for statements, if applicable.
16.2.3 For more information on emailing in Intellect, refer to the section on Emailing.
16.3 Attention PCM users: Email address changes made in PCM are automatically made in Intellect. This is the email address used for the Patient Portal invitation, so the 'opt-out' email address may appear in this field if the patient/guardian has opted out of access to Patient Portal and should not be removed.
17. Cell Phone No. 
17.1 Enter the cell phone number of the patient, if desired.
17.2 Note: To send text message appointment reminders to the patient’s guardian, the <Cell Phone No> for the <Guardian Name> should be used instead of the patient’s cell phone number.
18.1 This information is used to send text message appointment reminders to the cell phone of the patients' guardian. If the cell phone carrier for the patient is different from the cell phone carrier of the <Guardian Name>, enter the cell phone carrier of the <Guardian Name>.
18.2 Use the drop-down list to select the cell phone carrier.
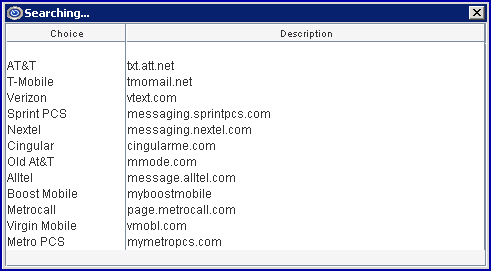
18.3 For additional set up information for text message appointment reminders, click here.
19. Gender 
19.1 Use the drop-down menu to indicate the gender of the patient. The default is 'M' (male).
19.2 Effective version 9.12.16: Decide which option to have as a default for the <Gender> field; i.e., either Male, Female, or have it default to 'Blank.'
Selecting 'Blank' as the default has some items to consider:
a - Because claims billed without a valid gender may be rejected, PCS suggests <Gender> be set up as a required field. Meaning, if it is left blank when either [Add] or [Modify] are selected, a message displays:

The operator must select a gender before exiting the screen and saving the record.
b - To schedule an appointment, a patient must have an account. For new patients, the scheduler needs to add the patient account record, which means they need to select a gender before they can save the new patient account record.
19.3 This field is used when generating Management Reports based on the patient’s gender, including Management --► OSHPD Report <Report Code> Utilization by Age and Gender and Management --► UDS Report --► Patients by Age and Gender.
20. Social Security No. 
20.1 Enter the patient's social security number in ######### format. Intellect inserts the dashes in the correct locations (###-##-####).
20.1.1 Effective version 16.11.10, the SSN only displays the very last 4 digits and the rest are represented with asterisks (***-**-1234), unless the data in the database is malformed or incomplete.
20.1.2 Effective version 16.12.02 : Options of masking the SSN (displaying only the last 4 digits) or not masking the SSN were added. For additional information, see Utility --►Set Up --►Screen Fields, Masking/Unmasking the Social Security Number (SSN).
20.2 Use the [Spacebar] or [Backspace] to remove values from the field, OR change the social security number by simply typing over the existing number.
21. DOB 
21.1 Type the patient's correct birth date formatted as MMDDYYYY. Intellect inserts the slashes.
21. 2 This field is mandatory for insurance billing, as well as various Management Reports based on the patient’s age, including Management --► OSHPD Report <Report Code> Utilization by Age and Gender and Management --► UDS Report --► Patients by Age and Gender.
22. Age 
22.1 Effective version 16.10.11, the patient's age is calculated at all times using the formula of today's date minus the patient's date of birth.
22.2 If modifying an existing patient, the age is recalculated after pressing the [Enter] key at the <DOB> field.
22.3 Systems are set to recalculate the patient age every night through automation.
23. Race 
23.1 This field is mandatory for the following:
23.1.1 PCM users: This field is required to meet the Meaningful Use requirements for the Medicaid Promoting Interoperability Program (formerly EHR Incentive Program) and/or MIPS under the Quality Payment Program. Note: Selecting ‘Declined to Specify’ satisfies the requirement to complete this field.
23.1.2 UDS Reports: This field is used for Management --► UDS Report --► Patients by Race and Language.
23.2 The field displays the code selected for the race of the patient in the drop-down menu, which is 41 characters or less. Leave blank, if not applicable.
23.3 To view the list sorted in alphabetical order (except for the first 6 options which appeared in versions prior to 9.12.14):
23.3.1 Click on the field, press [↑] arrow key OR press the [F2] key with the cursor in the field to display the code and description. To select, double-click on the correct code OR use the up or down arrows to highlight the correct code, and then press the [Enter] key to select.

23.3.2 Click on the arrow to display only the codes. Use the scroll bar, up, or down arrow keys, OR press the first letter of the patient's race to highlight the correct code and then press the [Enter] key to select.
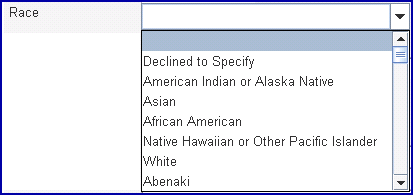
23.4 The <Race> field maps to the Race field in PCM.
24.1 This field is mandatory for the following:
24.1.1 PCM users: This field is required to meet the Meaningful Use requirements for the Medicaid Promoting Interoperability Program (formerly EHR Incentive Program) and/or MIPS under the Quality Payment Program. Note: Selecting ‘Declined to Specify’ satisfies the requirement to complete this field.
24.1.2 OSHPD Reports: This field is for use with Management --►OSHPD Report <Report Code> Utilization by Race.
24.1.3 UDS Reports: This field is used for Management --►UDS Report --► Patients by Race and Language.
24.2 If not applicable, press [Enter] to leave blank.
24.3 Effective version 9.12.14, this field was expanded to 26-characters and a numeric code was added to the description to match the ethnicity options for certified EHR technology (CEHRT) required for PCM users.
24.4 To view the list in alphabetical order (except the first 2 options which appeared in versions prior to 9.12.14):
24.4.1 Click on the field, press the [--►] right key OR press the [F2] key with the cursor in the field to display the code and description. To select, double-click on the correct code OR use the up or down arrows to highlight the correct code, and then press the [Enter] key to select.
Effective version 17.10.20 - In prior software versions, the Intellect <Ethnicity> field choices did not match those of PCM and Patient Portal. As of this update, the drop-down options were changed in Intellect to correlate with PCM and Patient Portal:

Software versions prior to 17.10.20
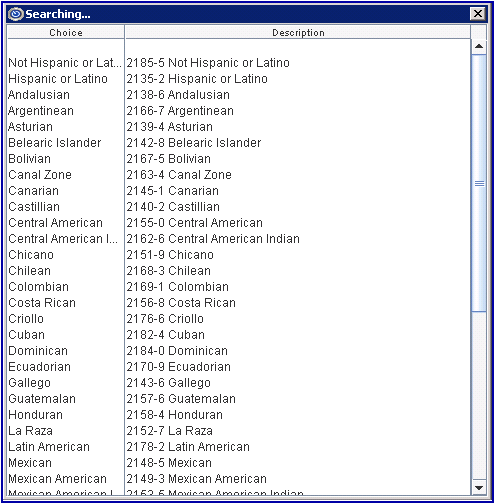
24.4.2 Click on the arrow to display only the codes. Use the scroll bar, up or down arrow keys, OR press the first letter of the patient's race to highlight the correct code and then press the [Enter] key to select.

The next ten fields contain information pertaining to the patient's Guardian, the person with whom the patient resides and usually responsible for scheduling appointments.

25.1 Enter the name of the patient’s guardian. The patient should be living with this person.
26. Guardian Relationship 
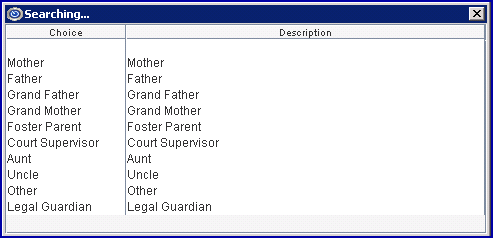
26.1 Use the drop-down menu to select the relationship of the guardian to the patient.
27.1 Enter the email address of the person listed in the <Guardian Name> field.
27.2 If this field is completed, Intellect can email the information to the patient’s guardian rather than print when creating Follow Up Letters, Recall Letters, or Forms.
For more information on emailing from Intellect, refer to the section on Emailing.
28.1 Enter the cell phone number of the person listed in the <Guardian Name> field. This is a required field to send text message appointment reminders to the patient’s guardian.
Note: If the <Cell Phone Carrier> for the patient is different from the cell phone carrier of the <Guardian Name>, the cell phone carrier of the <Guardian Name> should be entered in the <Cell Phone Carrier> field.
29. DOB 
29.1 Enter the guardian's date of birth in MMDDYYYY format. Intellect inserts the slashes in the correct locations (MM/DD/YYYY).
30. Social Security No. 
30.1 Enter the social security number of the patient's guardian in ######### format. Intellect inserts the dashes in the correct locations (###-##-####).
30.1.1 Effective version 16.11.10, the SSN only displays the very last 4 digits and the rest are represented with asterisks (***-**-1234), unless the data in the database is malformed or incomplete.
30.1.2 Effective version 16.12.02: Options of masking the SSN (displaying only the last 4 digits) or not masking the SSN were added. For additional information, see Utility --►Set Up --►Screen Fields, Masking/Unmasking the Social Security Number (SSN).
30.2 Use the [Spacebar] or [Backspace] to remove values from the field, OR change the social security number by simply typing over the existing number.
31. DL # 
31. Enter the driver’s license number of the patient’s guardian.
32. Other 
32. This is a text field to be used as needed.
33. Employer Name 
33. Enter the name of the employer of the patient’s guardian.
34. Phone 
34. Enter the phone number of the patient’s guardian’s employer.
35. Category 
35.1 This field is mandatory; it must be filled-in. Category is the financial classification of the patient and determines many aspects of how the account is handled, including whether or not follow up letters should be generated, if the patient should receive statements, and, if so, what messages should print, how the account balance should be aged, if the patient is part of a Capitated plan and, if so, should the charges be adjusted off at the time they are posted, whether or not finance charges are applied to overdue balances, and if services should be billed to the insurance.
35.2 The most common default for this field is 'NP/NEW PATIENT'. 'NP/NEW PATIENT' in this field is a clue there is incomplete information for the patient.
35.3 Effective version 13.12.12: Enter a Category (or a portion of a category) and press [Enter]. Intellect displays a record search screen. The record search screen (similar to the [F2] screen) lists all the available options from which to choose.
35.3.1 Effective version 14.03.20, the display was changed for ease of use. In the prior version, only the name displayed. As of this update, both the code and name display, separated by a '/'.
35.3.2 Effective version 14.03.20, this field may be set to search either by Utility --►Category <Description> or <Category Code>. To search by code, please contact PCS support to request this change.
Note: The default search is set to the Utility --►Category <Description> field, not the Utility --►Category <Category Code> field. For example, if the <Category Code> is CASH and the <Description> is PATIENT RESPONSIBILITY, entering CASH in the <Category> field to perform a search displays a warning: 'Match Not Found!'.
35.4 To select the code from the displayed list, either highlight the record and press the [Enter] key, OR double-click on the record.

35.5 To select the code from the displayed list, either highlight the record and press the [Enter] key, OR double-click on the record.
35.6 When a new or invalid Category is entered, Intellect displays:
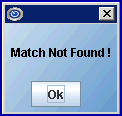
35.6.1 Click on [OK] to display the record search screen.
35.6.2 If this is a new Category, click [Add]. Intellect opens the Utility --►Category --►Add screen where the appropriate information may be entered and saved.
35.7 When adding insurance, this field is mandatory and must be completed. If left blank, an error message displays:

35.8 When completing the screen, depending on the set up of the Utility --►Category <Type> field, the system may or may not prompt to add insurance information.
35.9 A default Category code may be set up in Utility --►Set Up --►Parameter <Default Category>. If there is a default value, pressing the [Space Bar] or the [Delete] key clears the field.
NOTE: The type of category assigned to the patient determines which screens (if any) should follow the patient’s demographic screen. For example, if the patient is given a cash type category, no other screens follow the demographic screen. If the patient is given an insurance type of category, then an Add Insurance screen follows the demographic screen. Category types are determined through the Utility --► Category <Type (C/P/W/O/F/G)> field.
35.10 For clinics sharing patient demographics with other clinics, this field is clinic-specific.
36. Referring Name 
36.1 Effective version 13.12.12: Enter the LAST name of the patient's referring doctor (or a portion of the LAST name) and press [Enter]. Intellect displays a record search screen. The record search screen (similar to the [F2] screen) lists all the available options from which to choose.
36.1.1 Effective version 14.03.20, the display was changed for ease of use. In the prior version, only the name displayed. As of this update, both the code and name display, separated by a '/'.
36.1.2 Effective version 14.03.20, this field may be set to search either by Utility --►Referring <Last Name> or <Referring Code>. To search by code, please contact PCS support to request this change.
Note: The <PCP Name> field on the Registration --►Regular --►Patient screen is set to the same search criteria.
36.2 To select the code from the displayed list, either highlight the record and press the [Enter] key, OR double-click on the record.
36.3 When a new or invalid referring name is entered, Intellect displays:

36.3.1 Click on [OK] to display the record search screen.
36.3.2 If this is a new Referring Name, click [Add]. Intellect displays the Utility --►Referring --►Add screen where the appropriate information may be entered and saved.
36.4 If there is no referral source, press the [Enter] key to leave blank.
36.5 Referral codes entered here default to the Charges --►Charge <Ref Prv> field when posting charges. It may be modified or cleared there as needed.
36.6 For clinics sharing patient demographics with other clinics, this field is clinic-specific.
NOTE: The order Intellect uses to determine the source of the referring doctor's information for billing and referral reports is controlled by Utility --►Set Up --► Parameter <Referring>.
37. PCP Name 
37.1 PCP is the patient's primary care provider.
37.2 Effective version 13.12.12: Enter the LAST name of the PCP (or a portion of the LAST name) and press [Enter]. Intellect displays a record search screen. The record search screen (similar to the [F2] screen) lists all the available options from which to choose.
37.2.1 Effective version 14.03.20, the display was changed for ease of use. In the prior version, only the name displayed. As of this update, both the code and name display, separated by a '/.'
37.2.2 Effective version 14.03.20, this field may be set to search either by Utility --►Referring <Last Name> or <Referring Code>. To search by code, please contact PCS support to request this change.
Note: The <Referring Name> field on the Registration --►Regular --►Patient screen is set to the same search criteria.
37.3 To select the code from the displayed list, either highlight the record and press the [Enter] key, OR double-click on the record.
37.4 When a new or invalid PCP name is entered, Intellect displays:

37.4.1 Click on [OK] to display the record search screen.
37.4.2 If this is a new PCP Name, click [Add] on the search screen. Intellect displays the Utility --►Referring --►Add screen where the appropriate information may be entered and saved.
37.4.3 PCP records are entered into the same table as the referral sources.
37.5 If the patient does not have a PCP, press the [Enter] key to leave this field blank.
37.6 For clinics sharing patient demographics with other clinics, this field is clinic-specific.
38. Pharmacy Name 
38.1 Effective version 9.12.18 - Field used by PCM clients only.
Note: The Pharmacy table is managed by the Patient Chart Manager (PCM) program, therefore new Pharmacy records must be added through Patient Chart Manager. The Pharmacy ID is used in PCM to default the pharmacy for both written and Electronic Prescription; changing the Pharmacy ID in Intellect affects the default in PCM.
At this time, this field is not used in Intellect for those that do not have PCM.
38.2 This field is optional and is informational only.
38.3 PCM users only, enter the Pharmacy Name, as assigned in PCM.
38.4 Effective version 13.12.12: Enter a name (or a portion of a name) and press [Enter]. Intellect displays a record search screen. The record search screen (similar to the [F2] screen) lists all the available options from which to choose.
38.4.1 Effective version 14.03.20, the display was changed for ease of use. In the prior version, only the name displayed. As of this update, both the code and name display, separated by a '/'.
38.5 To select the code from the displayed list, either highlight the record and press the [Enter] key, OR double-click on the record.
38.6 When a new or invalid pharmacy name is entered, Intellect displays:

38.6.1 Click on [OK] to display the record search screen.
38.6.2 If the Pharmacy Name was entered incorrectly on Intellect's Add/Modify PATIENT screen, enter the correct information on the record search screen, press [Enter], and double-click on the correct entry.
38.6.3 New pharmacies may only be entered through PCM.
39. Preferred Communication Method 
39.1 For PCM users only: Effective version 09.12.18 - New field.
39.2 This field allows clinics to identify the method by which patients prefer to be contacted. The options for this field are shown below:

39.2.1 Version 13.04.10: Options of E-mail/Cell and E-mail/Home were added.
NOTE: Due to the certification requirements for Promoting Interoperability in PCM, the Intellect options for {E-mail/Cell} and {E-mail/Home} are not available for use in PCM. However, if either of these options is selected in Intellect, the corresponding field is populated in PCM on the Patient Data Editor window.
• E-mail/Cell: If a patient chooses Email/Cell, it means he/she would prefer to be contacted via email, but if the clinic needs to call the patient, then the patient should be called on his/her cell phone number.
• E-mail/Home: If a patient chooses Email/Home, it means he/she would prefer to be contacted via email, but if the clinic needs to call the patient, then the patient should be called on his/her home phone number.
In the future, these options are to be shared with PCM. Until then, this field is defaulted to blank.
39.3 Select the preferred method to use when contacting the patient to meet the Meaningful Use objective for Patient Reminders.
39.4 Changing the Preferred Communication Method in Intellect affects the default in PCM.
Note: At this time, the field is not used in Intellect for those that do not have PCM.
40. Registration Form 
40.1 Intellect defaults to the first option in the drop-down list, which is usually REGISTRATION.
40.2 For offices with multiple forms, to select the correct form, either click on the arrow in the field and then click on the appropriate item, OR press the → (right arrow) key, use the up and down arrows to highlight the appropriate item, and then press [Enter].
40.3 Multiple registration forms may be chosen for different languages, multi-specialties, or types of patients such as Regular and Worker Compensation.
41. Warning 
41.1 This field is used in conjunction with the <Remark> field.
41.2 Select 'YES' to display a pop-up box with the text entered in <Remark> with this entire patient's records in all screens.
41.3 Regardless of the setting selected, the Remark always displays in the Add/Modify Appointment Scheduling dialog box under Patient Info, as shown below:

42. Remark 
42.1 Intellect provides space for a 1000-character message to enter miscellaneous information about the patient.
42.1.1 If Registration <Warning> = 'Yes,' a popup message box occurs for every screen that involves this patient.
42.1.2 These fields may be programmed to print on super bills.
42.2 Various entries may be made in these fields in order to assist or alert the scheduler.
42.2.1 During the scheduling process, these fields are always displayed at the time an appointment is scheduled.
42.3 To exit the field, either use the [Control] [Tab] keyboard combination two times OR click on another field.
43. Active 
43.1 Effective version 13.10.29.
43.2 Indicate the status of the patient; i.e., whether or not the patient is currently an active patient or inactive at this time.
43.3 ATTENTION PCM Users: Changing this field to ‘INACTIVE’ affects reporting capabilities in PCM and disable some PCM functions for this account. Please refer to the PCM documentation for more details -- see Charts; Chapter: Creating/Editing Charts; Section: Patient Data Editor Window; Document: Pt Account Tab, III - Miscellaneous Fields, 6.
44. Patient Stmt Override 
44.1 This is an optional field and may not display.
44.2 This field is used to override the patient's category statement printing setting to stop sending a statement to a patient, e.g., incorrect patient address.
44.3 Accept the default 'C' to not override and use Utility --►Category settings OR use the drop-down list to make an alternate selection.
44.4 Press the [F2] key to see the valid choices:

45. When the PATIENT screen is completed, select one of the Action Buttons:

45.1 [Additional Demographics]: Effective version 17.06.09, the [Additional Demographics] button was added to accommodate adding extra patient demographic information shared with PCM to meet certified EHR technology (CEHRT) requirements. Clicking this button pops up a window with extra fields. The screen below shows the default fields for this window.
Note: This screen contains optional fields which may not apply for all patients. Please skip to 45.2 [Add] for an explanation of the other buttons.
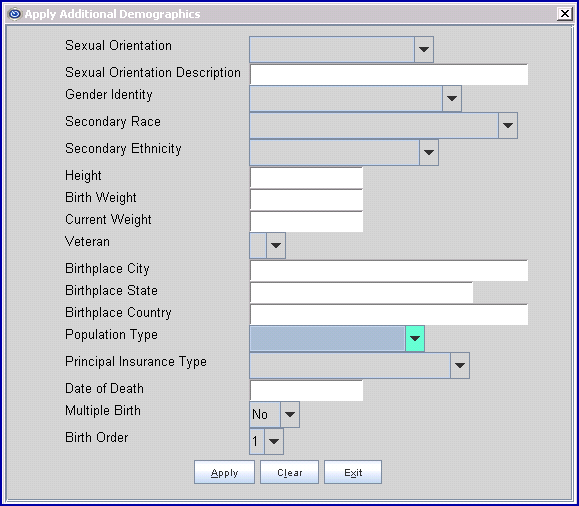
In addition to Meaningful Use information, this option may be used to add family members such as grandparents, or other information applicable to the clinic. Go to Utility --►Set Up --►Screen Fields --►Add, enter Additional Demographics in the <Screen name> field, enter the name of the field to add in <Field Name>, and complete the screen as needed. Contact PCS Support for any questions.
Note: The additional demographic information is not sent to PCM.
45.1.1 Sexual Orientation 
Accept the default OR use the drop-down list to make an alternate selection:
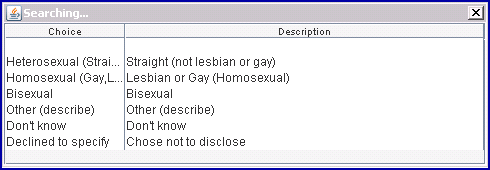
Note: If 'Other (describe)' is selected in the <Sexual Orientation Description> field (above), enter a description of the patient's sexual orientation in this free-form field.
This field is used with Management --► UDS Report --► Patients by Race and Language.
45.1.2 Sexual Orientation Description 
If 'Other (describe)' is selected in the <Sexual Orientation > field (above), enter a description of the patient's sexual orientation in this free-form field.
45.1.3 Gender Identity 
Accept the default OR use the drop-down list to make an alternate selection:
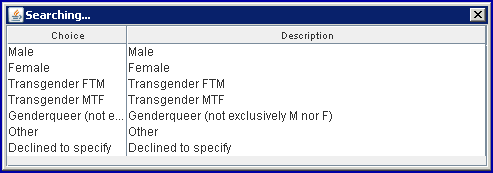
This field is used with Management --► UDS Report --► Patients by Race and Language.
45.1.4 Secondary Race 
If the patient has a secondary race, use the drop-down list to select the secondary race.
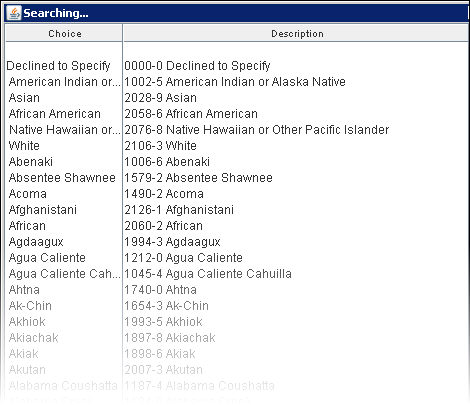
This field is for use with Management --►USD Report --►Patients by Race and Language.
45.1.5 Secondary Ethnicity 
If the patient has a secondary ethnicity, use the drop-down list to select the secondary ethnicity.

45.1.6 Height 
Enter the height of the patient as feet.inches; i.e., enter 5.11 for 5 foot 11 inches.
45.1.7 Birth Weight 
Enter the birth weight of the patient as pounds.ounces; i.e., enter 7.8 for 7 pounds 8 ounces.
45.1.8 Current Weight 
Enter the weight of the patient as pounds.ounces; i.e., enter 175.13 for 175 pounds 13 ounces.
45.1.9 Veteran 
Use the drop-down list to select 'Y' (patient is a veteran) or 'N' (patient is not a veteran):

This field is for use with Management --►UDS Report --►Patients Characteristics.
45.1.10 Birthplace City 
Enter the city where the patient was born. This is a free-form text-entry field so the city may be entered as determined by each office; i.e., in all caps (GLENDALE), or with a beginning capital letter (Glendale).
45.1.11 Birthplace State 
Enter the state where the patient was born. This is a free-form text-entry field so the state may be entered as determined by each office; i.e., in all caps (ARIZONA), with a beginning capital letter (Arizona), or the abbreviation used by the postal service (AZ).
45.1.12 Birthplace Country 
Enter the country where the patient was born. This is a free-form text-entry field so the country may be entered as determined by each office; i.e., in all caps (UNITED STATES OF AMERICA), with a beginning capital letter (United States of America), or abbreviated (USA).
45.1.13 Population Type 
Use the drop-down list to make a selection:
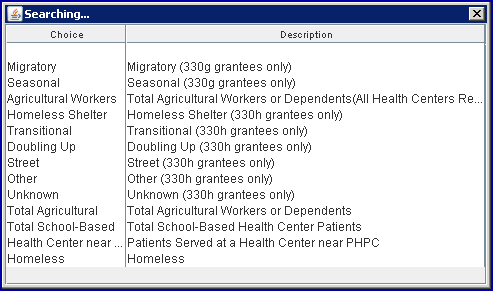
This field is for use with Management --►UDS Report --►Patients Characteristics.
45.1.14 Principal Insurance Type 
Use the drop-down list to make a selection:
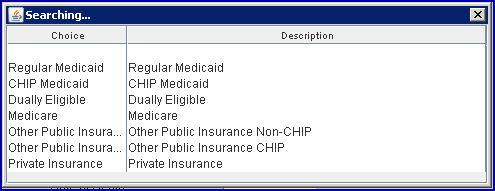
This field is for use with Management --►UDS Report --►Patients Characteristics.
45.1.15 Date of Death 
Type in the date of the patient's death.
45.1.16 Multiple Birth 
PCM users only. Effective version 17.08.16. This field was added for the purpose of reporting for the National Center for Health Statistics https://www.cdc.gov/nchs/nvss/dvs_data_release.htm.
The default for this field is 'No'. Use the drop-down list to select 'Yes' if the patient was part of a multiple birth delivery.

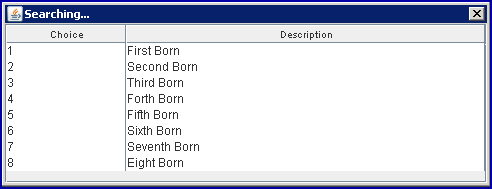
45.1.17 Birth Order 
PCM users only. Effective version 17.08.16. This field was added for the purpose of reporting for the National Center for Health Statistics https://www.cdc.gov/nchs/nvss/dvs_data_release.htm.
Use the drop-down list to select the birth order for multiple birth deliveries:
--  --
--
45.1.18 [Apply]: Select the [Apply] button to save the information added to the Apply Additional Demographics screen.
45.1.19 [Clear]: Select the [Clear] button to clear the fields on the Apply Additional Demographics screen.
45.1.20 [Exit]: Select the [Exit] button to close the Apply Additional Demographics screen.
45.2 [Add]: Select the [Add] button to save the information. Additionally, depending on the set up of the system, the following may occur:
45.2.1 If any fields have been customized in the system as mandatory fields, the following type of message is displayed. In our example, the patient's <DOB> has been designated as a mandatory field:
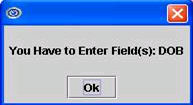
45.2.1.1 Select the [Ok] button to return the focus to the designated field, i.e.: <DOB>.
45.2.2 If the patient's Category is set up as a CASH account, the focus returns to the <Patient Account No> field. There is NOT a prompt to enter insurance information.
45.2.2.1 A CASH category is defined by setting the Utility --►Category <Type> field to 'G' - Patients without any insurance.
45.2.3 If the patient's Category is set up as any type OTHER than CASH, a prompt displays:
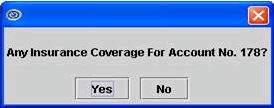
45.2.3.1 Select the [Yes] button to open the patient insurance screen.
45.2.3.2 Select the [NO] button to return the focus to the <Patient Account No> field. The screen is cleared and ready to add another patient.
45.3 [Clear]: When selecting the [Clear] button, Intellect prompts:
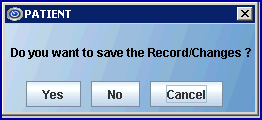
45.3.1 Select the [Yes] button to save the information and the system prompts to either complete mandatory data fields, or whether or not to add insurance information.
45.3.2 If selecting the [No] button, the information is NOT saved and the focus returns to the <Patient Account No> field.
45.3.3 Select the [Cancel] button to return the focus to the [Clear] button.
45.4 [Exit]: Selecting the [Exit] button displays:

45.4.1 Select the [Yes] button to save the information. The system prompts to either complete mandatory data fields, or whether or not to add insurance information.
45.4.2 If selecting the [No] button, the information is NOT saved and the focus returns to the <Patient Account No> field.
45.4.3 Select the [Cancel] button to return the focus to the [Exit] button.
45.5 Click on the X  in the screen's tab prompts:

45.5.1 By selecting the [Yes] button, the information is saved and the system prompts to either complete mandatory data fields, or whether or not to add insurance information.
45.5.2 If selecting the [No] button, the information is NOT saved and the focus returns to the <Patient Account No> field.
45.5.3 If selecting the [Cancel] button, the focus returns to the field where X was clicked.
For any new patient with a Utility --►Category <Type (C/P/W/O/F/G)> NOT = 'G', Intellect prompts to add insurance:
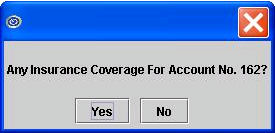
Select [Yes] to open the Add Patient Insurance screen.
NOTE: When posting charges or payments, the Patient --►Registration (Worker or Regular) Add or Modify screens must be closed or an error occurs.